每天推荐一个 GitHub 优质开源项目和一篇精选英文科技或编程文章原文,欢迎关注开源日报。交流QQ群:202790710;微博:https://weibo.com/openingsource;电报群 https://t.me/OpeningSourceOrg

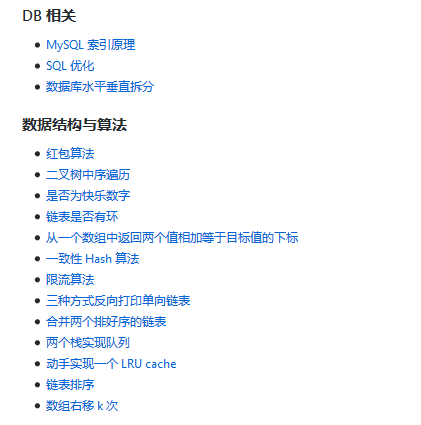
今日推荐开源项目:《Java 知识汇总 Java-Interview》传送门:GitHub链接
推荐理由:顾名思义,这个项目中汇集了关于 Java 的各种知识,包括数据结构与算法,JVM 和多线程这些,当然 Java 之外的常用的 MySQL 也有舍己,感兴趣的朋友可以去了解一下。
今日推荐英文原文:《Kotlin: A Language for Modern Multi-platform Applications》作者: K S Kuppusamy
原文链接:https://opensourceforu.com/2018/07/kotlin-a-language-for-modern-multi-platform-applications/
推荐理由:顾名思义,介绍了多平台编程语言 Kotlin。
Kotlin: A Language for Modern Multi-platform Applications
Kotlin is a multi-platform programming language that is concise, safe, interoperable and tool-friendly. It is a statically-typed programming language that runs on the Java virtual machine and can also be compiled to the JavaScript source code or can use the LLVM compiler infrastructure.
The choice of a programming language is a crucial factor in the effective implementation of any software project. In the modern multi-platform era, it is important that a language has the capabilities to address the specific needs of the platform being used. Kotlin is an emerging programming language with which you can build applications belonging to any of the following categories—native, browser-based, Android and JVM based. This article explores the rich array of features that Kotlin offers.
Programming languages play an important role in deciding the speed at which the applications are built. Apart from deciding the development time, the optimality of the implementation is also affected by the choice of the programming language. These days, there are many programming languages to choose from. However, there are various factors that determine which language one selects, such as platform support, availability of support libraries, community help, documentation, etc. So let us explore Kotlin in this context.
The Kotlin language was designed by JetBrains, and there are many open source developers who have contributed to its evolution. It was released in 2011 and its latest stable release, version 1.2.30, came out in March 2018. Kotlin is an actively maintained programming language with a growing developer support base. It is a statically typed programming language, and the licensing associated with it is Apache 2. Its design is influenced by other popular programming languages such as Java, Scala, etc. One of the design philosophies behind Kotlin is to develop a language that combines the feature set of Scala with the compilation speed of Java.

Reasons you should use Kotlin
One of the first questions that developers ask themselves while selecting a programming language is, “Why use this language?” Here are some important reasons for why you should use Kotlin.
- It is multi-platform: Kotlin can be used to build applications that target the following environments:
- Native code
- In-browser execution (through JavaScript trans-compilation)
- Android environment
- Java Virtual Machine
- It is concise: One of the main advantages of using Kotlin is its ability to reduce the amount of boilerplate code considerably. So developers can focus on the task at hand, rather than worrying about the skeleton in which the code needs to be placed.
- It is safe: Kotlin has lots of inbuilt mechanisms to prevent a large class of errors. One that will be liked by many developers is ‘null pointer exceptions’.
- It is interoperable: It is a major advantage to be able to use libraries across JVM, Android and JavaScript environments.
- It is tool-friendly: For many developers, the integrated development environment (IDE) is a factor that affects their productivity. Kotlin can be used with many popular IDEs (IntelliJ IDEA, Android Studio, Eclipse, etc). You can interact with it through the command line as well.
Why Kotlin has been given this name
Kotlin is the name of an island near St Petersburg in Russia. The Kotlin team chose this name since the name ‘Java’ also has a link to an island (apart from the connection with coffee).
With the release of Android Studio 3.0, Kotlin is completely supported as a programming language for the Android OS. It can be used as an alternative to the standard Java compiler.
Getting started
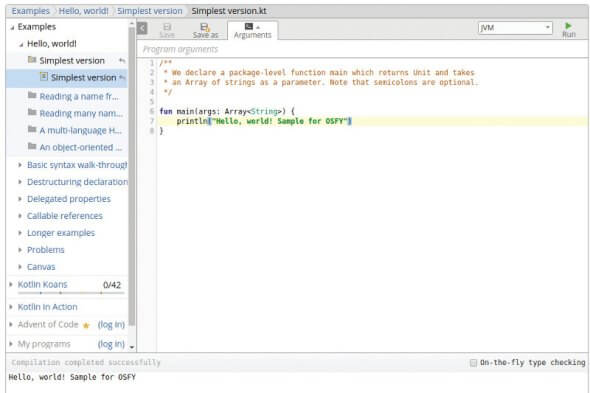
The easiest way to get started with Kotlin is to use https://try.kotlinlang.org/. The environment provided here is intuitive. There are lots of sample programs provided in this environment. Let’s first write the ‘Hello World’ program, as follows:
fun main(args: Array<String>) {

println("Hello, world! Sample for OSFY")

}
After writing this code, select one of the following as the target:
- JVM
- JavaScript
- JUnit
Then click on the Run icon. The output appears in the output window.
The input can be read from command line arguments.
A sample code snippet is as follows:
fun main(args: Array<String>) {

if (args.size == 0) {

println(“Please provide a name as a command-line argument”)

return

}

println(“Hello, ${args[0]}!”)

}
It can be observed from the above code snippet that the semi-colons are optional in Kotlin. The newline is automatically inferred by Kotlin.
Multiple arguments can be read from the command line using ‘for’, as shown in the following code snippet:
fun main(args: Array<String>) {

for (name in args)

println("Hello, $name!")

}
If you want the object-oriented version of Hello World, here is the code snippet:
class Greeter(val name: String) {

fun greet() {

println(“Hello, ${name}”);

}

}

fun main(args: Array<String>) {

Greeter(args[0]).greet()

}
It may be observed that the ‘new’ keyword is not used for creating an object.
If you wish to install the Kotlin compiler in your system, try the following command from a terminal (for Ubuntu users):
$ sudo snap install --classic kotlin
Detailed instructions for command line installation for other OSs are available at https://kotlinlang.org/docs/tutorials/command-line.html.
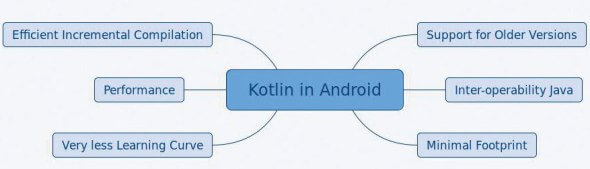
Kotlin in Android
The official Kotlin documentation lists the major features that Kotlin offers for Android development.
- Compatibility: The compatibility with JDK 6 ensures that Kotlin based applications can run on older Android devices.
- Kotlin is 100 per cent interoperable with Java: This means that all the existing Android libraries can be used in Kotlin applications.
- A minimal footprint: This important feature is available because Kotlin has a very compact run-time library.
If you are a Java developer, you can get started with Kotlin instantly. There is an automated Java-to-Kotlin converter available.
Koltin has been used by major applications such as Pinterest, Basecamp’s Android app, etc. For sample Android apps built using Kotlin, you can go to https://developer.android.com/samples/index.html?language=kotlin. Google has provided some interesting applications built using Kotlin at this link.
A detailed tutorial on getting started with Kotlin for Android app development is available at https://kotlinlang.org/docs/tutorials/kotlin-android.html.
Kotlin in browsers
As stated earlier, Kotlin enables the developer to transpile Kotlin code to JavaScript. The Kotlin-to-JavaScript compiler ensures that the code generated is optimal in size, and readability is also ensured.
Some of the prime reasons for targeting JavaScript transpiling are given below.
- DOM interaction: With the features provided by Kotlin, DOM can be handled. It is possible to update existing elements and create new elements too.
- The graphics interaction can be managed through WebGL: This can be used to build graphical components in the Web pages.
Kotlin can be adopted for browser-side use along with other JavaScript libraries or frameworks such as jQuery or React.
The conversion from Kotlin to JavaScript can be done in multiple ways. The official documentation has listed the following methods:
- Gradle approach
- IntelliJ IDEA approach
- Maven approach
- Command line approach.
In the ‘Kotlin – Try online’ tutorial, the ‘Hello World’ example produces the following JavaScript code:
kotlin.kotlin.io.output.flush();

if (typeof kotlin === ‘undefined’)

{

throw new Error(“Error loading module ‘moduleId’. Its dependency ‘kotlin’ was not found. Please, check whether ‘kotlin’ is loaded prior to ‘moduleId’.”);

}

var moduleId = function (_, Kotlin)

{ ‘use strict’;

var println = Kotlin.kotlin.io.println_s8jyv4$;

function main(args)

{ println(‘Hello, world! Sample for OSFY’); } _.main_kand9s$ = main; main([]); Kotlin.defineModule(‘moduleId’, _); return _; }(typeof moduleId === ‘undefined’ ? {} : moduleId, kotlin); kotlin.kotlin.io.output.buffer;
The detailed instructions on how to handle the aforementioned approaches are given at https://kotlinlang.org/docs/tutorials/javascript/kotlin-to-javascript/kotlin-to-javascript.html.
Native Kotlin
Kotlin has a feature for compiling to native binaries, and can execute this feature without any virtual machine. The target platforms that native Kotlin supports are listed below:
- Windows (x86_64)
- Linux
- iOS
- Android
- Web Assembly
Kotlin on the server-side
Kotlin can be used for building server-side applications as well. The following are some of the key advantages of using Kotlin on the server-side.
- Scalability: Kotlin has the potential to handle a massive number of clients.
- Migration support: There is inbuilt support for migrating large code bases from Java to Kotlin.
For server-side development, there are many important frameworks like Vert.x and Ktor.
Kotlin’s ability to support large server-side applications is already proven with some major implementations. For example, Corda, which is an open source distributed ledger platform supported by major banks, is built completely with Kotlin.
Java interoperability
As stated earlier, Kotlin supports interoperability with Java. The existing Java code can be called from Kotlin in a seamless manner. A comparative analysis of Kotlin and Java is provided at https://kotlinlang.org/docs/reference/comparison-to-java.html. Some of the prominent advantages of Kotlin are listed below:
- Has a null safety feature
- Has extension functions
- Operator overloading is allowed
- Implements coroutines
The official documentation claims that Kotlin code is more compact than Java code. In fact, it shows an estimated 40 per cent reduction in the number of lines of code with Kotlin (https://kotlinlang.org/docs/reference/faq.html).
To know more about Kotlin, refer to the many books available. A list is given at https://kotlinlang.org/docs/books.html.
With its multi-platform support and concise code, Kotlin surely has the potential to evolve into one of the most popular programming languages for developers across the spectrum.
每天推荐一个 GitHub 优质开源项目和一篇精选英文科技或编程文章原文,欢迎关注开源日报。交流QQ群:202790710;微博:https://weibo.com/openingsource;电报群 https://t.me/OpeningSourceOrg