11 Javascript Utility Libraries You Should Know In 2018
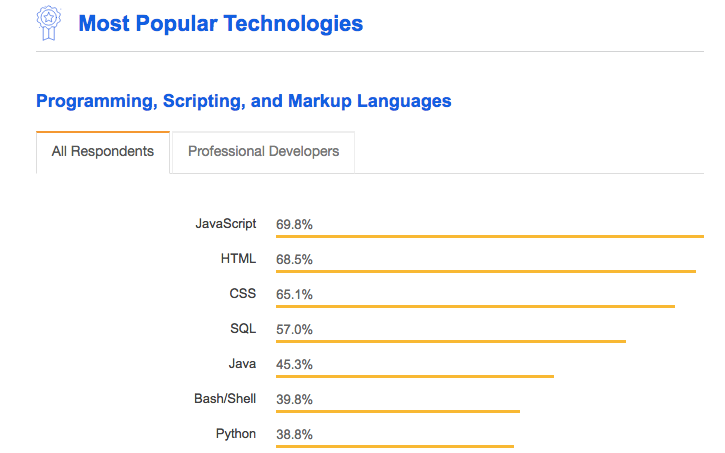
As Javascript remains the most popular and widely used programming language in 2018, so grows the ecosystem around it.
Still, Javascript’s small “standard library” is expected to stay this way. To fill the gap, many popular utility libraries have grown on GitHub in the past few years. Here is a short list of useful and highly maintained libraries.
Tip: Most if not all of the libraries on the list can be combined with Bit’s component platform, so that you can make any functionality individually available to discover, use and even develop from any project using it.
Using Bit, which is also on GitHub, you can seamlessly isolate components from any of these libraries (no refactoring) and install them in other projects using NPM, develop them from any project using Bit, update changes, collaborate and stay in sync. Feel free to jump in.
You already know both, so we’ll make it short. Underscore was built to provide utility functions for common tasks in Javascript. Lodash, NPM’s most downloaded and most dependent-upon package, was built to provide more consistent cross-environment iteration support for arrays, strings, objects, and arguments objects. It has since became a superset of Underscore, and both are maintained by the same core contributors. Should definitely be in your stack.
At over 12K stars, this JS utility library is designed for functional programming, making it easy to create functional pipelines that don’t mutate user data. Immutability and side-effect free functions are at the heart of its design philosophy. All functions are automatically curried, and passed parameters are arranged accordingly for ease of use.
At 6K stars, Math.js is an extensive math library for JavaScript and Node.js, which is compatible with JavaScript’s built-in Math library. The library contains a flexible expression parser, is able to perform symbolic computation, and comes with a large set of built-in functions and constants. You can even extend it yourself.
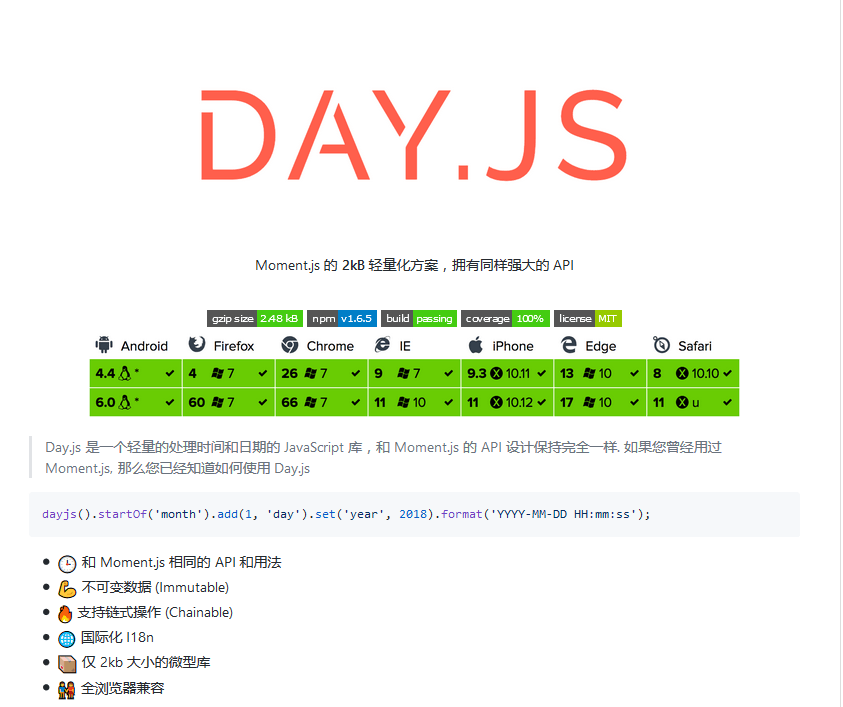
At nearly 40K stars, moment.js is a lightweight JavaScript date and time manipulation library for parsing, validating, manipulating, and formatting dates. Moment was designed to work both in the browser and in Node.js. As of v 2.10.0 the code is written in ECMAScript 6 modules.
At 3.5K stars, Sugar is a Javascript utility library for working with native objects. Custom builds and modularized npm packages let you use only what you need (can also be combined with Bit), and users can define methods or use plugins to handle specialized use cases. Worth checking out.
At 5K stars, lazy.js is a functional utility library for JavaScript with a lazy engine that “strives to do as little work as possible” while still being flexible enough. The library has no external dependancies, and here’s a live demo of testing Dome events as a sequence. Here are the API docs to get started.
At 3.5K stars, collect.js is a very promising and dependency free wrapper for working with arrays and objects in Javascript with dozens of useful functionalities in and API which is (almost) identical to Laravel Collections 5.5. The library is actively maintained, and is worth keeping an eye on.
Chance is a minimalist generator of random strings, numbers, etc. to help reduce some monotony, while writing automated tests or anywhere else you need anything random. At only 3K stars, this library is surprisingly useful as we tend to repeat our patterns when asked to generate random things.
At nearly 40k stars, chart.js is a great example of how sometimes less is more with 8 different data visualization types, each of them animated and customizable. Chart.js lets you create simple HTML5 Charts using the <canvas> tag, with great rendering performance across all modern browsers. Definitely one of the most useful and elegant libraries on the list.
At 3.5K stars, authored by the styled-components team, Polished is a great lightweight toolset for writing styles in JavaScript with Sass-style helper functions and mixins. The library is compatible with styled-components, Aphrodite, Radium, or plain inline styles. This personal favorite is available on GitHub, and all single functionalities were made available in Bit’s community (non-official) so they can be individually installed/imported and used.
Mout.js is a collection of modular JavaScript utilities that can be used in the browser as AMD modules or on node.js, providing helper methods similar to those found on other languages standard libraries (Python, Ruby, PHP etc). mout.js lets you load only the modules/functions you need, and provides a consistent API and normalizes behavior across multiple browsers.
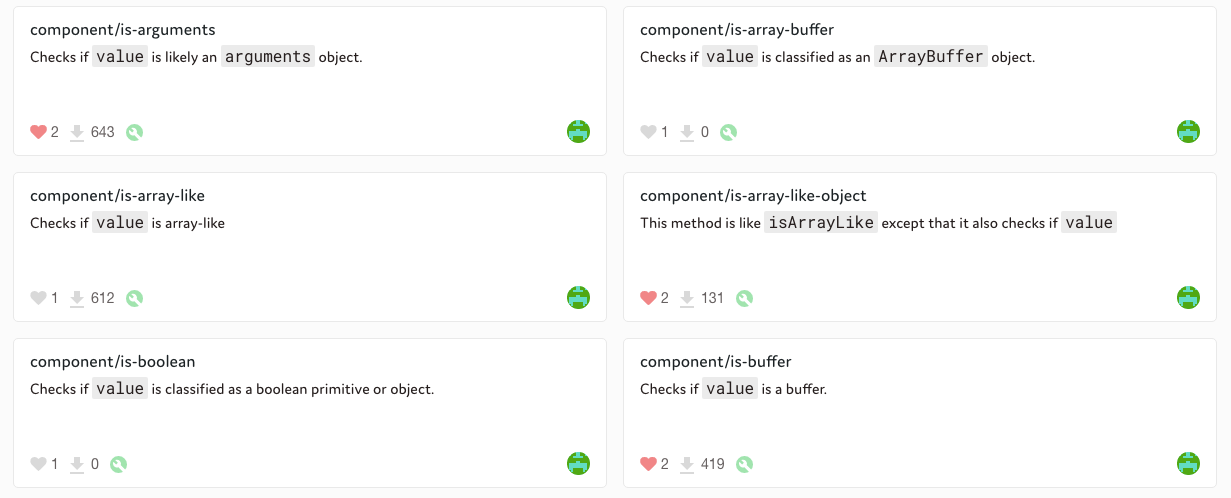
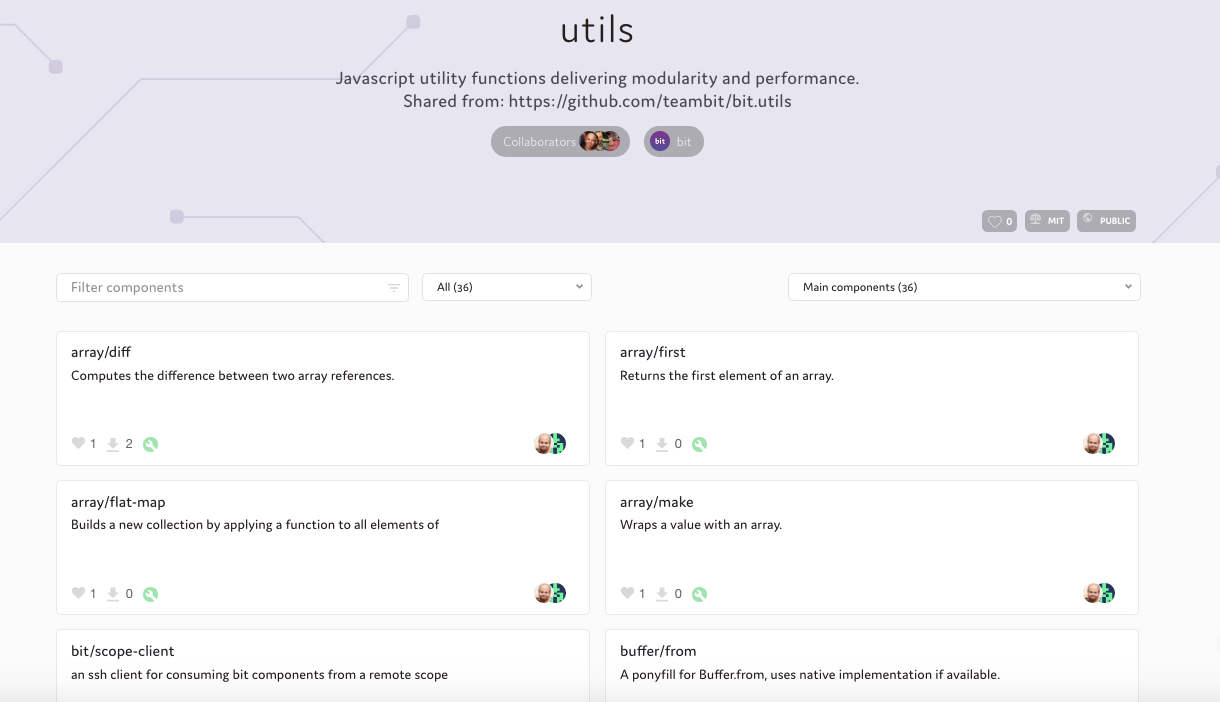
Javascript utility functions delivering modularity and performance, used in Bit’s web hub itself. These functions are individually available to install with NPM/Yarn, or to develop from any project using them (in any environment) using Bit itself. You can create your own similar collection, and gather useful functionalities from different libraries and projects into it.
A Javascript library for string manipulations. It includes helpful functions such as change case, trim, pad, slugify, latinise, sprintf’y, truncate, escape and more. You can load individual functions to minimize the application builds. The library comes with a high-test coverage and has no dependancies.
Only at 400 stars, this interesting project is basically a simple collection of useful JavaScript snippets with high docs and test coverage. v 2.0 pre-release in on master, and is actively maintained and developed.
Easily memorized, quick to implement- these solutions will change the way you compute- whether you’re a novice looking for an edge, or a power-user programmer- everyone can benefit from something here.
A year ago, I began teaching myself how to program in earnest. I completely immersed myself in programming culture. There were so many amazing things to explore- it was like there were 10,000 doors, and I wanted to know what was behind each and every one. It was pure, unbridled passion. I knew what I was meant to do.
One of my first tasks was working through some online classes on HTML/CSS. While doing so, it didn’t take me long to notice that every instructor had one thing in common- they navigated through text like absolute wizards. Having struggled with clunky-feeling and inefficient text editing myself, I was determined to learn how they moved so effortlessly from word-to-word, line-to-line- selecting, deleting, duplicating, appending. Their cursors cut through the code like katanas- mine felt like it had a ball and chain attached to it.
After setting out on this text-navigation quest and doing my research, one thing was clear: if I wanted move through text with blazing speed, and improve overall programming efficiency, Vim (Vi iMproved) was the way to go.
I liked the idea, but learning Vim while already teaching myself to program was a daunting prospect. I also didn’t like the idea of learning Vim, but not being able to use it everywhere else I edited text: emails, on the web, in my calendar/GTD app, etc. I needed a compromise. Something in between elite mastery of Vim and the clunky-feeling, slow, finger-contorting editing experience that I had been used to.
After months of searching, testing, and playing with countless tools- I found what seemed like the perfect solution- a mostly easy-to-set-up configuration that checked all of the boxes. Better yet, you can use it everywhere.
The Solution — Features
Integrated, powerful window management using simple home-row keybindings.
A ‘hyper’ key to launch a configurable set of favorite applications.
Superb, easily activated keybindings allowing Vim-style text navigation globally — all from the home row. Vim-like text movement, selection, insertion, and deletion — everywhere.
Far more useful “caps lock” and “shift” keys — particularly useful for latest generation Macbooks (much smarter binding of the ‘escape’ key).
Much easier use of the navigational arrow keys, a custom markdown mode, and app-specific keybindings.
Capability to implement a ton of other miscellaneous tweaks and improvements limited only by your curiosity and imagination.
In addition to all of that, the setup is very easily configured. Need to swap a keybinding? No problem. Prefer ‘x’ key to be elsewhere? Easy.
Note: much of what follows is heavily inspired-by and/or utilizes information, scripts, and files from two amazing sources:
To begin customizing our keyboards, two primary applications are necessary:
Hammerspoon — a free, open source tool that uses lua-scripting to allow powerful automation of the OS. Find it here.
Karabiner-Elements — a free, open source application that allows powerful, highly configurable configuration of keyboard shortcuts. Check it out here.
Both of these applications are free.
II: Setup
Download and install both Hammerspoon and Karabiner (links found above). Installation of both is pretty straightforward- move the .app file into your applications folder.
To install Karabiner, a couple of additional steps are required (installation of cmake and Boost). Read the ‘installation’ section of their Github page. It’s easy and will only take you a moment.
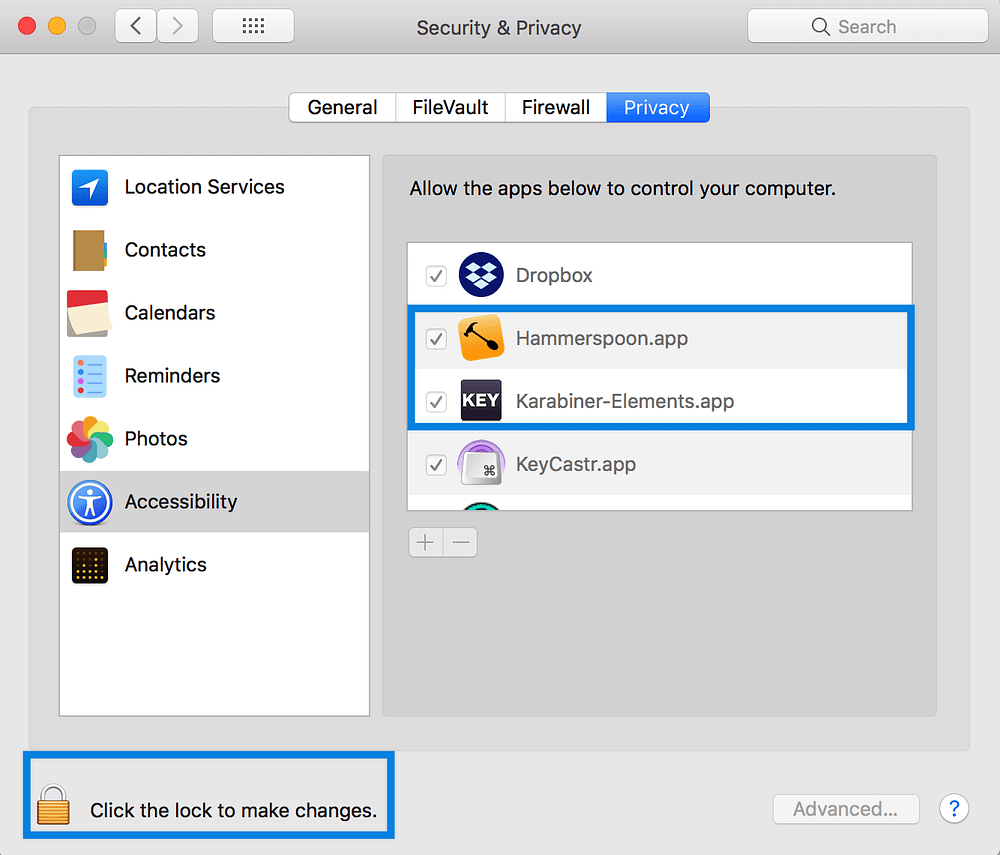
Enable Hammerspoon and Karabiner in your ‘Accessibility’ options within System Preferences:
Click the lock, and then click the ‘+’ sign to add both applications to the list.
III: Configuration
Now that we have both applications installed and added to “accessibility” within System Preferences, we are ready to begin setting them up for usage.
Module I: Hammerspoon
Hammerspoon is a powerful tool that utilizes lua-scripting to power a wide range of automations, shortcuts, and widgets.
With a large following, and a ton of native and community-contributed recipes and scripts, there are a lot of possibilities for cool OS enhancements. See a list of recipes here and here.
To get Hammerspoon configured for our purposes, let’s do the following:
Clone Jason Rudolph’s “keyboard” repository on Github, here.
2. Once you have the repository cloned, enter the folder in your terminal by typing cd ~/.keyboard, and type the following:
script/setup
It’s as easy as that. Following installation, you should get a quick popup from Hammerspoon letting you know that everything installed correctly, and you’re ready to go.
Module II: Karabiner
Karabiner is a highly-efficient, easily configured keyboard customizer. With Karabiner, you are able to reassign any key on your keyboard to a different function. More importantly, Karabiner adds functionality to bind more than one function to a single key, dependent upon length of key press. This particular functionality is hugely helpful while programming.
With Karabiner installed, we can begin configuration. Some of our desired Karabiner configuration will have already been taken care of by Jason Rudolph’s “keyboard” repository that was brought in during our Hammerspoon setup.
Aside from what was already configured using Jason’s repository, I recommend adding a few other bindings.
These bindings are Steve Losh’s Karabiner configurations from his “A Modern Space Cadet” setup. Download the files from the link above, and import them into your Karabiner setup by doing the following:
Open up Karabiner-Elements.
Once open, navigate to theComplex Modifications tab.
Within Complex Modifications , look for the Import more rules from the Internet (open a web browser) button. Click it.
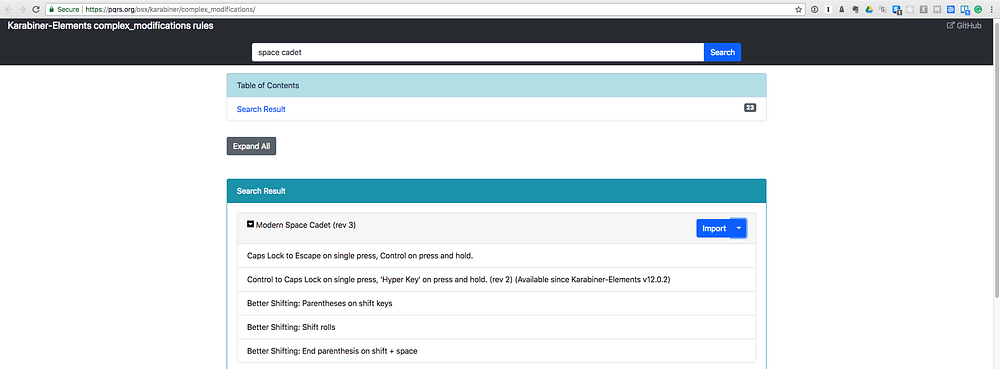
Once opened, type “Space Cadet” into the search bar.
The first result should be “Modern Space Cadet (rev 3)”- click the Import button.
Karabiner’s website- showing the Space Cadet bindings.
Head back to your Karabiner-Elements window, and the new bindings should be in there.
Steve Losh’s Space Cadet Karabiner bindings bring a few additions to our existing setup from Jason’s “keyboard” repository, however, we are only concerned with the “Better Shifting” portion. Go ahead and delete the others (they would be redundant as we already have caps lock remapped and a hyper key from Jason’s repository).
When you are finished importing the Space Cadet bindings and deleting the redundant extras, your configuration should look and read like the below. I have also included brief descriptions of each Karabiner binding:
Simple Modifications
Karabiner- Simple Modifications Section
Remap caps lock to left control .
Function Keys
Defaults
Complex Modifications
Karabiner- Complex Modifications Section
Change right option to Hyper (i.e. command + control + option + shift ).
Change right command + h/k/j/l to arrow keys .
Change left shift and right shift to left parenthesis and right parenthesis .
End parenthesis on shift + space .
Shift rolls: rapidly pressing left shift (open paren) and then right shift (close paren) will automatically jump you to the right of the closed parenthesis- useful for arrow functions.
As mentioned above, each binding can be capable of more than one function depending on the length of the key stroke (short vs. long). Two of the keybind sets utilize this advanced functionality:
left shift and right shift, when held down for longer than x milliseconds (configurable), function normally.
This allows for regular shift key usage (capitalization, modifier, etc.).
caps lock , when held down longer than x milliseconds (configurable), functions as left control .
This is, in my opinion, is the most valuable binding of the set. This remaps the essentially-useless caps lock key to escape when quickly pressed, and left control when held down. A huge boost in efficiency and ergonomics versus the defaults. For Vim users, or users of the smart keyboard on the iPad Pro, this bind can be invaluable.
Each of these bindings may be installed a la carte- you don’t need to use all of them. There is a large community that actively contributes new Karabiner bindings and setups, and you can absolutely script your own. For additional information, visit Karabiner’s Github page, here.
Take a look through Karabiner’s repositories of built-in and community-contributed bindings as well, here.
IV: Usage
Phew. That was a lot of instructions. Thanks for sticking it out and making it this far. We still have some ground to cover, but trust me, it will be worth it.
Now that we’ve made it through installation and configuration, we can get to the exciting part: usage.
Let’s go over some of our new functionality. I’ll break it up into segments:
Text Navigation
Text navigation bindings are the bread and butter of what we’ve just installed. With our new setup, we will be able to traverse text at light speed- selecting, deleting, appending, moving by letter, word, or line- all using only our home row keys. Go ahead and say goodbye to awkward keybindings of days past.
In order to utilize so many bindings in such a small space, several unique and highly functional “modes” are utilized. The primary “mode” we will be using for text navigation is “Super-Duper” mode.
To enter Super-Duper mode, simply hold down your s and d keys simultaneously.
Note: getting the timing correctly on this might be mildly challenging at first. You need to press s and d at close to the same time, and continue holding them to keep Super-Duper mode activated. It won’t take long to master this.
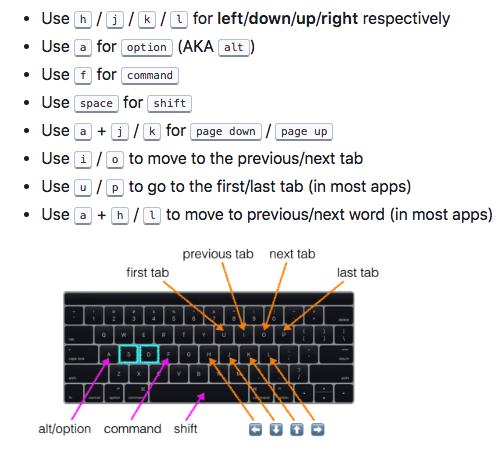
Once in Super-Duper mode, an entire new set of keybindings becomes available, shown below:
Credit: Jason Rudolph
As you can see, Super-Duper mode opens up a ton of possibilities when navigating text. With a functioning in place of option, f functioning in place of command, and space functioning in place of shift, you can easily create combinations of home-row keys to traverse, select, and move text with ruthless efficiency.
Some helpful Super-Duper mode combinations include:
To jump to the end of a line: hold f and press l
Likewise, to hop to the beginning of a line: hold f and press h
To navigate text by word, hold a and press l for the next word, or h for the last.
To select an entire line of text, hold f and space and press l.
To select multiple lines of text, hold f and space and press j.
Text Navigation- Others
Note: the four bindings below are used outside of any mode. No other keys are required to be held down or pressed.
Control and u to delete (text) to the start of the line.
Control and ; to delete (text) to the end of the line.
Option and h to delete the previous word.
Option and l to delete the next word.
These are some of my most frequently used shortcuts. The power to delete everything to the left or right in a line, as well as entire words, is absolutely incredible. These bindings can be easy to forget as they don’t accompany any particular mode, but definitely refer back to these- they’re important and hugely useful.
Basic text navigation in Super-Duper mode.
Super-Duper Mode- Browser Navigation
In addition to the vim-like home-row text navigation capabilities, Super-Duper mode adds some useful functionality within the browser, as shown in the keyboard layout above.
Still within Super-Duper mode ( s and d simultaneously),
Press i to go to the last tab.
Press o to go to the next tab.
Press u to go to the first tab.
Press p to go to the last tab.
These tab navigation bindings come in handy really quickly. After almost a year of use, I honestly don’t know what I’d do without them.
The potential combinations and uses of Super-Duper mode are numerous. Play around with each, and please, please reference Jason’s Github repository for a more detailed guide. Linked again here.
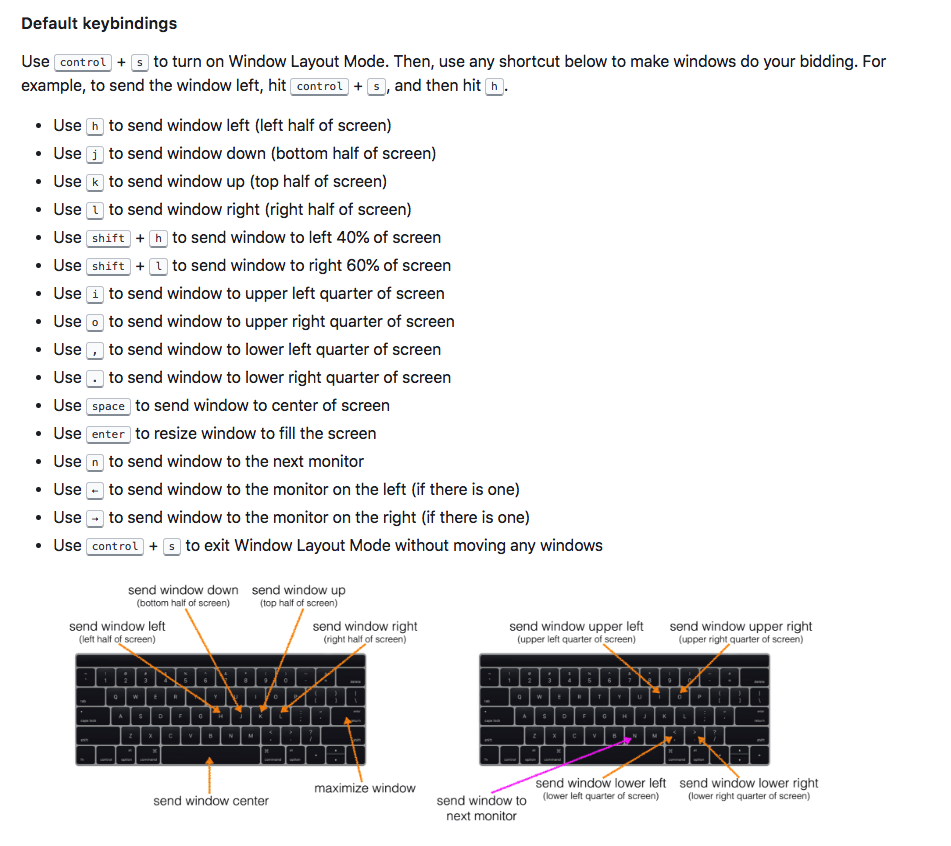
Window Layout Mode
Window Management using Karabiner & Hammerspoon
Another amazing addition from Jason Rudolph’s “keyboard” repository is the Window Layout mode. This mode allows blazing-fast resizing, moving, and distribution of windows.
There are several applications both free and paid available for Macs that allow a similar type of functionality, and some even have keybindings. This setup, however, is by far the most convenient and easy-to-use that I have found thus far.
More importantly, it allows full window management without leaving the home-row of your keyboard. As many of you probably know, whether you’re a programmer, typist, or just someone that writes a lot, staying on the home-row is absolutely invaluable. Everything in Jason’s repository has been optimized to accommodate just that, and once you’ve gotten used to it, trust me when I say that you won’t know how you got by before.
To begin using the Window Layout Mode, simply press Control and then s.
To exit Window Layout Mode without changes, press Control and then s again.
While inside Window Layout Mode, there are a ton of options- see the below:
Credit: Jason Rudolph
As you can see, the keybinding layout follows the same vim-like style, again focusing on the home-row.
Something worth noting is that while Super-Duper mode requires s and d to be held down simultaneously, Window Layout mode does not. You may press control and then s separately, and more notably, Window Layout mode remains open until a keybind is pressed, or you exit without changes.
Window Layout Mode’s bindings are pretty straightforward. I won’t go through them all, but some of my most used bindings are:
shift and h — sends the window to the left 40% of the screen.
shift and l — sends the window to the right 60% of the screen.
These two are particularly useful while editing code (on the left), with a browser open on the right- either reading docs or watching instructional video.
enter to resize the window to fill the screen — doesn’t make it full screen, fills it just right.
left arrow to send the window the monitor to the left.
right arrow to send the window the monitor on the right.
These are useful when I’m at work and I need to quickly move windows or specific applications between monitors. No more dragging between them, resizing, and getting them to awkwardly fit together. All of that can be done in seconds now.
Virtually any window layout or configuration you can dream up can be near-instantly created using these bindings. Once again, it will take some time to remember all of these and adjust. Stick with it for a few weeks, and it will be second nature. It will pay dividends in saved seconds over time.
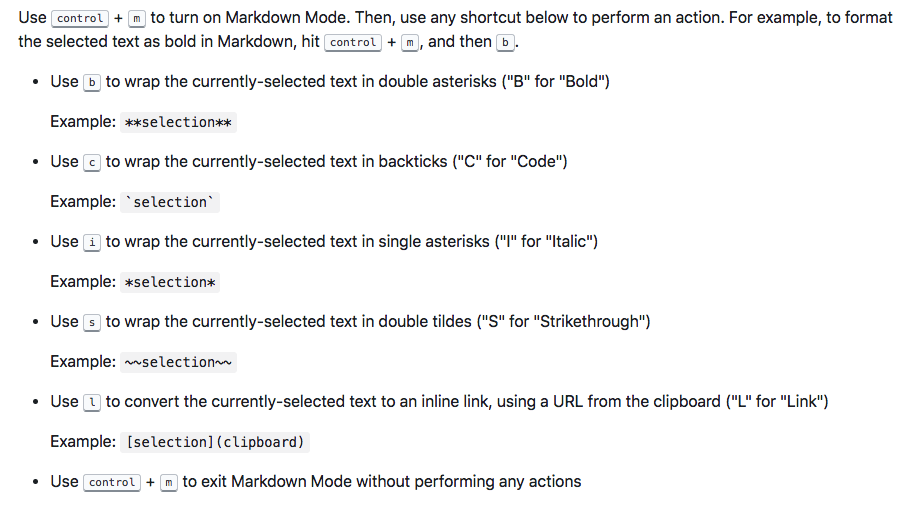
Markdown Mode
Next up is Markdown Mode. For writers, Markdown syntax is an increasingly useful and increasingly prevalent way to write. From programmers to authors, it is gaining more popularity.
If you haven’t heard of Markdown, don’t stress. You don’t need to use these next bindings at all, and no additional configuration is required. You can leave this next section, and these bindings alone.
If you do use Markdown on a regular basis, however- these bindings add some interesting and pragmatic time-saving shortcuts.
To enter Markdown Mode, simply press Control and then m. Like Window Layout mode, these do not need to pressed simultaneously, nor do they need to be held down. Markdown Mode will remain activated until a binding is selected or it is exited without changes.
Likewise, to exit Markdown Mode without changes, simply press Control and then m again.
The Markdown Mode bindings are as follows:
Depending on where you’re editing Markdown, some of this functionality may overlap with native functionality within that editor, but these bindings will likely be faster once memorized nonetheless.
The bind I use most frequently in Markdown Mode is without a doubt the inline link bind:
Select text, and press l. Markdown Mode will convert the selected text to an inline link using a URL from your clipboard.
Markdown Mode is definitely worth memorizing if you’re writing in MD frequently.
Hyper Mode
Last, but certainly not least, is Hyper Mode. Mac keyboards don’t ship by default with a Hyper key. Using Karabiner, and Jason’s configuration, however, we are able to create our own.
To enter Hyper Mode, simply press and hold your right option key. Please note, similar to Super-Duper mode, Hyper mode requires you told down the key to keep the mode active.
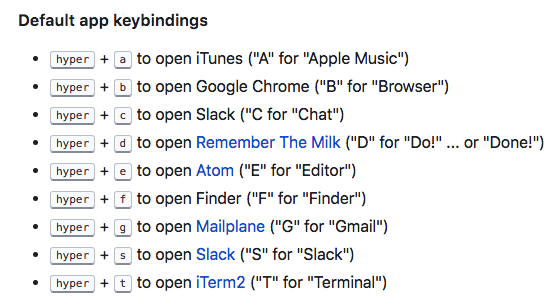
While holding down right option , a single press of any of the below listed keys will allow instant opening of your favorite applications. This list is completely configurable, but the defaults are as follows:
Credit: Jason Rudolph
The applications you would like to bind and the specific keys themselves, as mentioned, are totally configurable. You can set this list up to look however you’d like.
To configure your Hyper Mode applications/keybinds, do the following:
In your Terminal or Finder, navigate to your ~/.keyboard folder.
Once inside ~/.keyboard , enter the hammerspoon folder.
Inside ~/.keyboard/hammerspoon , look for a file named hyper-apps-defaults.lua — open this up in the text editor of your choice.
While editing~/.keyboard/hammerspoon/hyper-apps-defaults.lua, you’ll see the list of applications, as well as instructions on how to change them. Essentially, you just need to create a copy of that file and rename it to hyper-apps.lua , placed in the same folder.
In the newly copied file, feel free to edit the applications, as well as the keys they are bound to. Just plug the names of your favorite applications into the same spots the default ones are in.
Note: for non-programmers, the default hyper-mode applications might be a bit of a pain to edit. If you’re having problems, please refer to Jason Rudolph’s repository for reference, and if you’re still having serious issues, please reach out to me directly on Twitter @caulfieldOwen and I’ll be happy to help you out.
Miscellaneous Bindings
In addition to everything we’ve covered above, Jason Rudolph added in a few extras:
These bindings are accessed on their own, agnostic of modes, and are as follows:
Control and — to split iTerm panes horizontally.
Control and | to split iTerm panes vertically.
Control and h, j, k, or l to move up, down, left, or right, respectively, in iTerm2.
If you’re a user of iTerm that frequently uses multiple panes-tmux comes to mind- these bindings will be of particular use to you.
Visual Studio Code
The final bindings I wanted to note are specific to visual studio code. I do quite a bit of editing in vs, and there were a couple of tweaks that I always wished were possible to make the editing experience completely fluid.
In particular, I got hung up on two things: exiting parens/brackets easily, and adding semicolons to the end of a line or statement, while still remaining inside parens or brackets.
These two changes may sound fairly trivial, and yes, you can manually perform both of these operations. But the plugins I’m about to show you add tons of convenience and will net you a huge time savings over time:
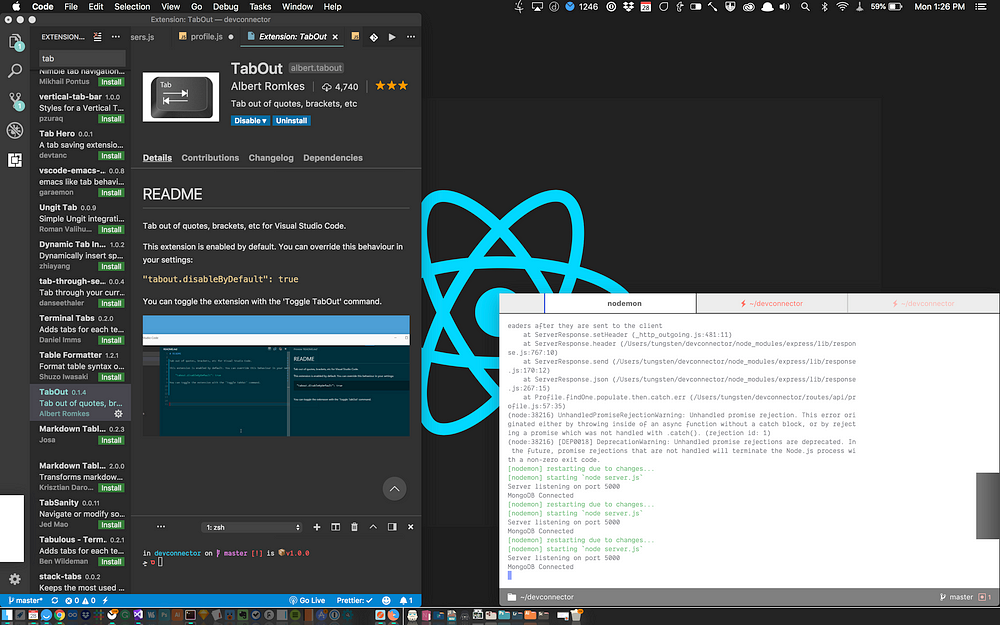
TabOut
TabOut Plugin in VS Code
TabOut allows you to quickly and easily jump out of parens, brackets, or quotations with ease, using the Tab key. You might ask- wait, don’t we need the tab key for indentation? Yes, we do, however TabOut has that covered. When inside of parens, brackets, or quotes, TabOut takes over and hops you out of them, even multitiered brackets/parens.
When outside of brackets/parens/quotes, your Tab key functions as normal, allowing indentation or your default use.
This plugin is absolutely indispensable for me when editing next now. It also allows for quite a bit of configurability-check out its plugin page (pictured above), and give it a try.
As a side note, there are similar plugins available for Sublime Text, Atom, and probably your other IDE of choice. Do a little research and I’m confident you will find something similar.
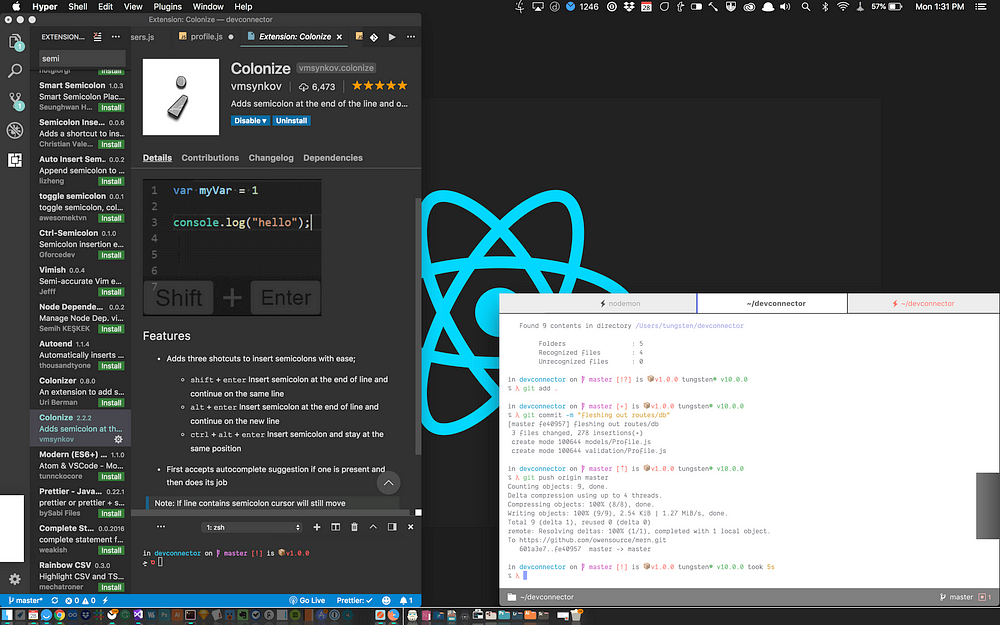
Colonize
Colonize Plugin in VS Code
The second plugin I recommend adding to your arsenal is Colonize. This plugin adds 3 main capabilities while editing text:
shift + enter — Insert semicolon at the end of line and continue on the same line
alt + enter — Insert semicolon at the end of line and continue on the new line
ctrl + alt + enter — Insert semicolon and stay at the same position
These bindings are configurable. Again, I don’t know if I could live without this functionality now that I’ve used it for several months. Being able to append a semicolon to the end of a line or statement, while remaining in my current position (within parens or brackets, etc), is priceless. Additionally, being able to append a semicolon and hop to the next line, or end up right next to it, is extremely convenient.
This plugin is a huge timesaver and I would highly recommend you give it a try. Once again, there are alternatives or clones of it available for Atom/Sublime/X IDE.
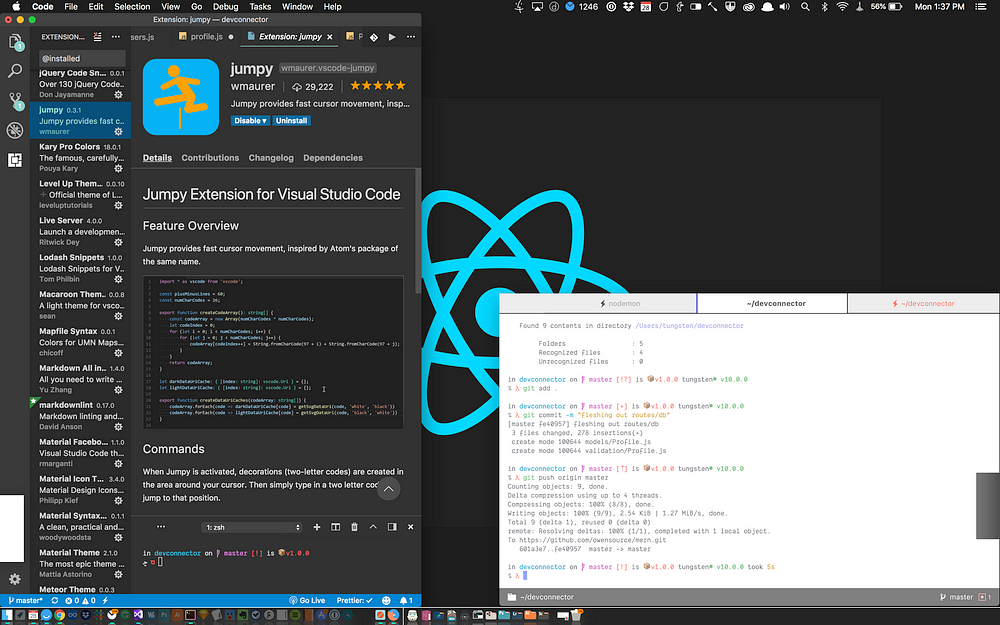
Jumpy
Jumpy Plugin in VS Code
The last plugin I wanted to feature is Jumpy. I use Jumpy slightly less than my previous two recommendations, but it is still a valuable addition nonetheless.
To use Jumpy, you press a preconfigured key combination. Upon pressing that combination, you enter Jumpy mode, where visual cues are attached to each line/word in your document. Press the corresponding letter(s) on those cues, and your cursor will instantly jump there.
Trust me, it’s less complicated than it sounds. It doesn’t take long to get the hang of, and in large documents, it can definitely save you some precious time. Similar plugins are available on all major text editing platforms.
V. Conclusion
Wow- you made it. We’re at the end. If you’ve come this far, you must be a serious nerd like me, and I’m proud of you for that. Cheers. You’re on your way to being a keyboard-master like you’ve always wanted to be. If you’re ready to throw away your mouse now, I won’t stop you.
But seriously, we’ve just installed a ton of modifications and new capabilities, so it’s going to take some time to adjust- do not feel discouraged if it feels awkward at first. If you’re a programmer, particularly someone with experience using Vim, however, these new bindings should make you feel right at home.
With our previously discussed text navigation bindings and the three plugins specific to VS Code, navigating text will become effortless. No longer do I wonder how those expert text wranglers cut through the code so quickly, because now I can do it myself. If anything, I may just cut through it faster than they did.
Mastering Vim bindings will still probably result in faster editing capabilities, but the downside is that those bindings are only available in Vim. Most of the bindings we have discussed today are available across your entire computer- and that, in my mind, makes them exponentially more valuable. Working in your GTD app, writing an email, typing a tweet or a text message? No problem- you can still use the bindings and continue improving your efficiency. That’s something I felt was worth sharing.
If you put in the work with these bindings, or some of your own, you’re going to find quickly that your wrists feel better. You’re typing faster, more efficiently, more easily. There’s science behind this stuff, and there’s a lot to be said for remaining on the home-row almost the entire time you’re editing.
As a final note, there are a few other resources and applications absolutely worth looking into:
Brett Terpstra’s own Hyper/Vim setup — find it here.
Keyboard Maestro- a paid keyboard customization and automation application that is extremely powerful- beyond the scope of this article. This application is the apex predator in its department, and is worth investing in and researching. Find it here.
BetterTouchTool- a paid keyboard, touchbar, and peripheral remapping, automation, and customization tool. BTT is a well known essential application with literally near-endless functional applications. Again, so much amazing functionality in this app. Find it here.
If I missed your favorite application, configuration, script, or keybind- that’s okay. There are myriad setups which could achieve the functionality I described in this article with different combinations of applications and solutions- this guide is not exhaustive nor exclusive concerning the described functionality. I do believe this setup, however, to be the easiest to configure and adopt.
Regardless of personal preference, I will continue to advocate for greater adoption of keyboard-focused UX/capability within not only the programming world, but the greater world of computing, as it is without question the healthier, more efficient way to go.
Credits
This thing took me some time to write and edit, but the real credit for the logic and innovation behind all of this goes to, as mentioned, Jason Rudolph and Steve Losh.
Their work, and their willingness to open-source their configurations, is extremely generous and they should be thanked for it. I definitely want to stress that credit for the photos of the keybindings and the “keyboard” repository itself goes to Jason Rudolph. Please star his Github repository if you have a free moment.
Support
If you run into hangups during the installation or configuration process, please reference the “keyboard” Github repository, and search its “issues” section. Additionally, please refer to Karabiner’s website as well as its Github repository for support on that end.
If neither of those resources are able to solve your issue, feel free to reach out to me on Twitter @caulfieldOwen, and I’d be more than willing to give you a hand.
Sometimes the right tool for the job is a command-line application. A command-line application is a program that you interact with and run from something like your shell or Terminal. Git and Curl are examples of command-line applications that you might already be familiar with.
Command-line apps are useful when you have a bit of code you want to run several times in a row or on a regular basis. Django developers run commands like ./manage.py runserver to start their web servers; Docker developers run docker-compose up to spin up their containers. The reasons you might want to write a command-line app are as varied as the reasons you might want to write code in the first place.
For this month’s Python column, we have three libraries to recommend to Pythonistas looking to write their own command-line tools.
Click
Click is our favorite Python package for command-line applications. It:
Has great documentation filled with examples
Includes instructions on packaging your app as a Python application so it’s easier to run
Automatically generates useful help text
Lets you stack optional and required arguments and even several commands
Has a Django version (django-click) for writing management commands
Click uses its @click.command() to declare a function as a command and specify required or optional arguments.
The @click.option() decorator declares an optional argument, and the @click.argument() decorator declares a required argument. You can combine optional and required arguments by stacking the decorators. The echo() method prints results to the console.
$ python hello.py --name='Lacey'
Hello Lacey!
Docopt
Docopt is a command-line application parser, sort of like Markdown for your command-line apps. If you like writing the documentation for your apps as you go, Docopt has by far the best-formatted help text of the options in this article. It isn’t our favorite command-line app library because its documentation throws you into the deep end right away, which makes it a little more difficult to get started. Still, it’s a lightweight library that is very popular, especially if exceptionally nice documentation is important to you.
Docopt is very particular about how you format the required docstring at the top of your file. The top element in your docstring after the name of your tool must be “Usage,” and it should list the ways you expect your command to be called (e.g., by itself, with arguments, etc.). Usage should include help and version flags.
The second element in your docstring should be “Options,” and it should provide more information about the options and arguments you identified in “Usage.” The content of your docstring becomes the content of your help text.
"""HELLO CLI

Usage:
    hello.py
    hello.py <name>
    hello.py -h|--help
    hello.py -v|--version

Options:
    <name>  Optional name argument.
    -h --help  Show this screen.
    -v --version  Show version.
"""

from docopt import docopt

def say_hello(name):
    return("Hello {}!".format(name))


if __name__ == '__main__':
    arguments = docopt(__doc__, version='DEMO 1.0')
    if arguments['<name>']:
        print(say_hello(arguments['<name>']))
    else:
        print(arguments)
At its most basic level, Docopt is designed to return your arguments to the console as key-value pairs. If I call the above command without specifying a name, I get a dictionary back:
This shows me I did not input the help or version flags, and the name argument is None.
But if I call it with a name, the say_hello function will execute.
$ python hello.py Jeff
Hello Jeff!
Docopt allows both required and optional arguments and has different syntax conventions for each. Required arguments should be represented in ALLCAPS or in <carets>, and options should be represented with double or single dashes, like --name. Read more about Docopt’s patterns in the docs.
Fire
Fire is a Google library for writing command-line apps. We especially like it when your command needs to take more complicated arguments or deal with Python objects, as it tries to handle parsing your argument types intelligently.
Its weakness is the documentation it makes available to the console. Docstrings on your commands don’t appear in the help text, and the help text doesn’t necessarily identify arguments.
import fire


def say_hello(name=''):
    return 'Hello {}!'.format(name)


if __name__ == '__main__':
  fire.Fire()
Arguments are made required or optional depending on whether you specify a default value for them in your function or method definition. To call this command, you must specify the filename and the function name, more like Click’s syntax:
$ python hello.py say_hello Rikki
Hello Rikki!
You can also pass arguments as flags, like --name=Rikki.
Bonus: Packaging!
Click includes instructions (and highly recommends you follow them) for packaging your commands using setuptools.
To package our first example, add this content to your setup.py file:
Everywhere you see hello, substitute the name of your module but omit the .py extension. Where you see say_hello, substitute the name of your function.
Then, run pip install --editable to make your command available to the command line.
You can now call your command like this:
$ hello --name='Jeff'
Hello Jeff!
By packaging your command, you omit the extra step in the console of having to type python hello.py --name='Jeff' and save yourself several keystrokes. These instructions will probably also work for the other libraries we mentioned.
Imagine you’ve been tapped to give a presentation. As you’re preparing your talk, you think, “I should whip up a few slides.”
Maybe you prefer the simplicity of plain text, or maybe you think software like LibreOffice Writer is overkill for what you need to do. Or perhaps you just want to embrace your inner geek.
It’s easy to turn files formatted with Markdown into attractive presentation slides. Here are four tools that can do help you do the job.
All you need to do is write up your slides with Markdown, crack open a terminal window, and run the command landslide followed by the name of the file. Landslide will spit out presentation.html, which you can open in any web browser. Simple, isn’t it?
Don’t let that simplicity fool you. Landslide offers more than a few useful features, such as the ability to add notes and create configuration files for your slides. Why would you want to do that? According to Landslide’s developer, it helps with aggregating and reusing source directories across presentations.
Viewing presenter notes in a Landslide presentation
Marp
Marp is a work in progress, but it shows promise. Short for “Markdown Presentation Writer,” Marp is an Electron app in which you craft slides using a simple two-pane editor: Write in Markdown in the left pane and you get a preview in the right pane.
Marp supports GitHub Flavored Markdown. If you need a quick tutorial on using GitHub Flavored Markdown to write slides, check out the sample presentation. It’s a bit more flexible than baseline Markdown.
While Marp comes with only two very basic themes, you can add background images to your slides, resize them, and include math. On the down side, it currently lets you export your slides only as PDF files. To be honest, I wonder why HTML export wasn’t a feature from day one.
Editing some simple slides in Marp
Pandoc
You probably know pandoc as a magic wand for converting between various markup languages. What you might not know is that pandoc can take a file formatted with Markdown and create attractive HTML slides that work with the Slidy, Slideous, DZSlides, S5, and Reveal.js presentation frameworks. If you prefer LaTeX, you can also output PDF slides using the Beamer package.
You’ll need to use specific formatting for your slides, but you can add some variables to control how they behave. You can also change the look and feel of your slides, add pauses between slides, and include speaker notes.
Of course, you must have the supporting files for your preferred presentation framework installed on your computer. Pandoc spits out only the raw slide file.
Craft your slide deck in a two-pane editor in your browser—type in Markdown on the left and see it rendered on the right. When you’re ready to present, you can do it from within Sandstorm or get a link that you can share with others to present remotely.
What’s that—you say that you don’t use Sandstorm or Sandstorm Oasis? No worries.There’s a version of Hacker Slides that you can run on your desktop or server.
Editing slides in Hacker Slides
Two honorable mentions
If you use Jupyter Notebooks (see community moderator Don Watkins’ article) to publish data or instructional texts, then Jupyter2slides is for you. It works with Reveal.js to convert a notebook into a nice set of HTML slides.
If you prefer your applications hosted, test-drive GitPitch. It works with GitHub, GitLab, and Bitbucket. Just push the source files for your slides to a repository on one of those services, point GitPitch to that repository, and your slides are ready to view at the GitPitch site.