• 开源镜像
  • 开源沙龙
  • 媛宝
  • 猿帅
  • 注册
  • 登录
  • 息壤开源生活方式平台
  • 加入我们

开源日报

  • 2018年3月11日:开源日报第3期

    11 3 月, 2018

    每天推荐一个 GitHub 优质开源项目和一篇精选英文科技或编程文章原文,欢迎关注开源日报。交流QQ群:202790710;电报群 t.me/openingsource


    今日推荐开源项目:《基于H5 Canvas的交互框架——Konva》;GitHub地址

    推荐理由:Knova.js 是一个基于HTML5 Canvas 的JavaScript 框架,可以实现高性能的动画,转换,节点嵌套,分层,过滤,缓存,时间处理等等,并且具有良好的响应式布局,可以同时支持电脑桌面和移动应用。

    在使用Knova时,可以在Knova.Stage上开始绘制,为它们添加事件监听器,移动它们,缩放它们,即使您的应用程序使用了数千种形状,并将它们从其他形状中独立出来以支持高性能的动画。

    实现方式

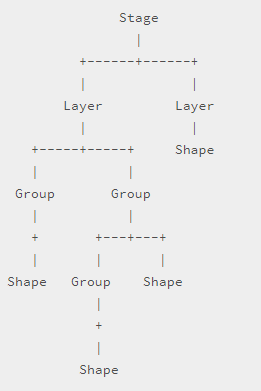
    所有工作都从Konva.Stage开始,每个stage可以包含多个图层,而每个图层则包含两个canvas渲染器,其中一个是我们所看见的,另一个隐藏,用来提高实现事件监听的效率。

    使用示例

    <script src="https://cdn.rawgit.com/konvajs/konva/1.7.3/konva.min.js"></script>
    <div id="container"></div>
    <script>
        //首先创建一个stage
        var stage = new Konva.Stage({
            container: 'container',
            width: window.innerWidth,
            height: window.innerHeight
        });
    
        // 创建图层并添加到stage中
        var layer = new Konva.Layer();
        stage.add(layer);
    
        // 创建图形
        var box = new Konva.Rect({
            x: 50,
            y: 50,
            width: 100,
            height: 50,
            fill: '#00D2FF',
            stroke: 'black',
            strokeWidth: 4,
            draggable: true
        });
        
        //将图像添加到图层
        layer.add(box);
        
        //绘图
        layer.draw();
    
        // 添加光标的效果
        box.on('mouseover', function() {
            document.body.style.cursor = 'pointer';
        });
        box.on('mouseout', function() {
            document.body.style.cursor = 'default';
        });
    </script>
    

    效果演示

    加载和安装

    Konva支持UMD加载。因此,您可以使用所有可能的变体将框架加载到您的项目中:

    1. 通过<script>标签来加载Konva:
    <script src ="https://cdn.rawgit.com/konvajs/konva/1.7.3/konva.min.js"> </ script >
    

    2. 通过AMD加载:

    define(['./konva'], function(Konva) {  // your code});
    

    3. 通过npm:

    npm install konva --save
    

    导入代码

    // old way
    var Konva = require('konva');
    // modern way
    import Konva from 'konva';
    // typescript
    import * as Konva from 'konva';
    

    4. 如果您使用的是webpack或browserfy,则可以使用此方法仅加载所需的Konva零件:

    import Konva from 'konva/src/Core';
    // now you have Konva object with Stage, Layer, FastLayer, Group, Shape and some additional utils function
    // so there are no shapes (rect, circle, etc), no filters, no d&d support.
    // but you can simply add anything you need:
    import 'konva/src/shapes/rect';
    //now Konva.Rect is available to use
    

    了解更多欢迎进入官方演示站:

    https://konvajs.github.io/


    今日推荐英文原文:《What is open source programming?》

    推荐理由:很多时候我们都在说开源软件,但是什么叫开源呢?把源代码放在 GitHub 上就叫开源了吗?恐怕不是,那么,一起来听听看,什么是开源?什么不是开源?


    What is open source programming?

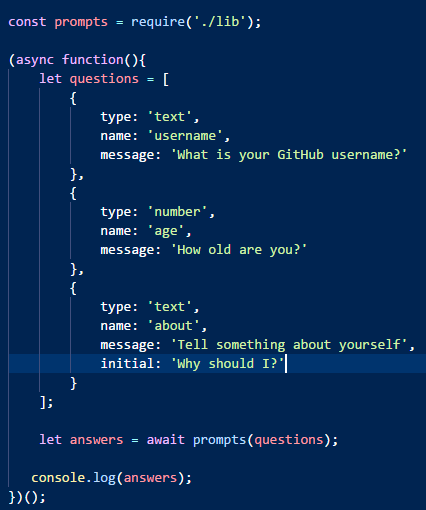
    At the simplest level, open source programming is merely writing code that other people can freely use and modify. But you’ve heard the old chestnut about playing Go, right? “So simple it only takes a minute to learn the rules, but so complex it requires a lifetime to master.” Writing open source code is a pretty similar experience. It’s easy to chuck a few lines of code up on GitHub, Bitbucket, SourceForge, or your own blog or site. But doing it right requires some personal investment, effort, and forethought.

    What open source programming isn’t

    Let’s be clear up front about something: Just being on GitHub in a public repo does not make your code open source. Copyright in nearly all countries attaches automatically when a work is fixed in a medium, without need for any action by the author. For any code that has not been licensed by the author, it is only the author who can exercise the rights associated with copyright ownership. Unlicensed code—no matter how publicly accessible—is a ticking time bomb for anyone who is unwise enough to use it.

    A well-meaning author may think, “well, it’s obvious this is free to use,” and have no plans ever to sue anyone, but that doesn’t mean the code is safe to use. No matter what you think someone will do, that author has the right to sue anyone who uses, modifies, or embeds that code anywhere else without an expressly granted license.Clearly, you shouldn’t put your own code out in public without a license and expect others to use or contribute to it. I would also recommend you avoid using (or even looking at) such code yourself. If you create a highly similar function or routine to a piece of unlicensed work you inspected at some point in the past, you could open yourself or your employer to infringement lawsuits.

    Let’s say that Jill Schmill writes AwesomeLib and puts it on GitHub without a license. Even if Jill never sues anybody, she might eventually sell all the rights to AwesomeLib to EvilCorp, who will. (Think of it as a lurking vulnerability, just waiting to be exploited.)

    Unlicensed code is unsafe code, period.

    Choosing the right license

    OK, you’ve decided you want to write a new program, and you want people to have open source rights to use it. The next step is figuring out which license best fits your needs. You can get started with the GitHub-curated choosealicense.com, which is just what it says on the tin. The site is laid out a bit like a simple quiz, and most people should be one or two clicks at most from finding the right license for their project.

    Unlicensed code is unsafe code, period.

    A word of caution: Don’t get overly fancy or self-important. If you choose a commonly used and well-known license like the Apache License or the GPLv3, it’s easy for people to understand what their rights are and what your rights are without needing a team of lawyers to look for pitfalls and problems. The further you stray from the beaten path, though, the more problems you open yourself and others up to.Most importantly, do not write your own license! Making up your own license is an unnecessary source of confusion for everyone. Don’t do it. If you absolutely must have your own special terms that you can’t find in any existing license, write them as an addendum to an otherwise well-understood license… and keep the main license and your addendum clearly separated so everyone involved knows which parts they’ve got to be extra careful about.

    I know some people stubborn up and say, “I don’t care about licenses and don’t want to think about them; it’s public domain.” The problem with that is that “public domain” isn’t a universally understood term in a legal sense. It means different things from one country to the next, with different rights and terms attached. In some countries, you can’t even place your own works in the public domain, because the government reserves control over that. Luckily, the Unlicense has you covered. The Unlicense uses as few words as possible to clearly describe what “just make it public domain!” means in a clear and universally enforceable way.

    How to apply the license

    Once you’ve chosen a license, you need to clearly and unambiguously apply it. If you’re publishing somewhere like GitHub or GitLab or BitBucket, you’ll have what amounts to a folder structure for your project’s files. In the root folder of your project, you should have a plaintext file called LICENSE.txt that contains the text of the license you selected.

    Putting LICENSE.txt in the root folder of your project isn’t quite the last step—you also need a comment block declaring the license at the header of each significant file in your project. This is one of those times where it comes in handy to be using a well-established license. A comment that says: # this work (c)2018 myname, licensed GPLv3—see https://www.gnu.org/licenses/gpl-3.0.en.html is much, much stronger and more useful than a comment block that merely makes a cryptic reference to a completely custom license.

    If you’re self-publishing your code on your own site, you’ll want to follow basically the same process. Have a LICENSE.txt, put the full copy of your license in it, and link to your license in an abbreviated comment block at the head of each significant file.

    Open source code is different

    A big difference between proprietary and open source code is that open source code is meant to be seen. As a 40-something sysadmin, I’ve written a lot of code. Most of it has been effectively proprietary—I started out writing code for myself to make my own jobs easier and scratch my own and/or my company’s itches. The goal of such code is simple: All it has to do is work, in the exact way and under the exact circumstance its creator planned. As long as the thing you expected to happen when you invoked the program happens more frequently than not, it’s a success.

    A big difference between proprietary and open source code is that open source code is meant to be seen.

    Open source code is very different. When you write open source code, you know that it not only has to work, it has to work in situations you never dreamed of and may not have planned for. Maybe you only had one very narrow use case for your code and invoked it in exactly the same way every time. The people you share it with, though… they’ll expose use cases, mixtures of arguments, and just plain strange thought processes you never considered. Your code doesn’t necessarily have to satisfy all of them—but it at least needs to handle their requests gracefully, and fail in predictable and logical ways when it can’t service them. (For example: “Division by zero on line 583” is not an acceptable response to a failure to supply a command-line argument.)Your open source code also has to avoid unduly embarrassing you. That means that after you struggle and struggle to get a balky function or sub to finally produce the output you expected, you don’t just sigh and move on to the next thing—you clean it up, because you don’t want the rest of the world seeing your obvious house of cards. It means that you stop littering your code with variables like $variable and $lol and replace them with meaningful names like $iterationcounter or $modelname. And it means commenting things professionally (even if they’re obvious to you in the heat of the moment) since you expect other people to be able to follow your code later.

    This can be a little painful and frustrating at first—it’s work you’re not accustomed to doing. It makes you a better programmer, though, and it makes your code better as well. Just as important: Even if you’re the only contributor your project ever has, it saves you work in the long run. Trust me, a year from now when you have to revisit your app, you’re going to be very glad that $modelname, which gets parsed by several stunningly opaque regular expressions before getting socked into some other array somewhere, isn’t named $lol anymore.

    You’re not writing just for yourself

    The true heart of open source isn’t the code at all: it’s the community. Projects with a strong community survive longer and are adopted much more heavily than those that don’t. With that in mind, it’s a good idea not only to embrace but actively plan for the community you hope to build around your project.

    Batman might spend hundreds of hours in seclusion furiously building a project in secrecy, but you don’t have to. Take to Twitter, Reddit, or mailing lists relevant to your project’s scope, and announce that you’re thinking of creating a new project. Talk about your design goals and how you plan to achieve them. Request input, listen to similar (but maybe not identical) use cases, and build that information into your process as you write code. You don’t have to accept every suggestion or request—but if you know about them ahead of time, you can avoid pitfalls that require arduous major overhauls later.

    This process doesn’t end with the initial announcement. If you want your project to be adopted and used by other people, you need to develop it that way too. This isn’t a barrier to entry; it’s just a pattern to use. So don’t just hunker down privately on your own machine with a text editor—start a real, publicly accessible project at one of the big foundries, and treat it as though the community was already there and watching.

    Ways to build a real public project

    You can open accounts for open source projects at GitHub, GitLab, or BitBucket for free. Once you’ve opened your account and created a repository for your project, use it—create a README, assign a LICENSE, and push code incrementally as you develop it. This will build the habits you’ll need to work with a real team later as you get accustomed to writing your code in measurable, documented commits with clear goals. The further you go, the more likely you’ll start generating interest—usually in the form of end users first.

    The users will start opening tickets, which will both delight and annoy you. You should take those tickets seriously and treat their owners courteously. Some of them will be based on tremendous misunderstandings of what your project is and what is or isn’t within its scope—treat those courteously and professionally, also. In some cases, you’ll guide those users into the fold of what you’re doing. In others, however haltingly, they’ll guide you into realizing the larger—or slightly differently centered—scope you probably should have planned for in the first place.

    If you do a good job with the users, eventually fellow developers will show up and take an interest. This will also both delight and annoy you. At first, you’ll probably just get trivial bugfixes. Eventually, you’ll start to get pull requests that would either hardcode really, really niche special use-cases into your project (which would be a nightmare to maintain) or significantly alter the scope or even the focus of your project. You’ll need to learn how to recognize which contributions are which and decide which ones you want to embrace and which you should politely reject.

    Why bother with all of this?

    If all of this sounds like a lot of work, there’s a good reason: it is. But it’s rewarding work that you can cash in on in plenty of ways. Open source work sharpens your skills in ways you never realized were dull—from writing cleaner, more maintainable code to learning how to communicate well and work as a team. It’s also the best possible resume builder for a working or aspiring professional developer; potential employers can hit your repository and see what you’re capable of, and developers you’ve worked with on community projects may want to bring you in on paying gigs.

    Ultimately, working on open source projects—yours or others’—means personal growth, because you’re working on something larger than yourself.


    每天推荐一个 GitHub 优质开源项目和一篇精选英文科技或编程文章原文,欢迎关注开源日报。交流QQ群:202790710;电报群 t.me/openingsource

  • 2018年3月10日:开源日报第2期

    10 3 月, 2018

    每天推荐一个 GitHub 优质开源项目和一篇精选英文科技或编程文章原文,欢迎关注开源日报。交流QQ群:202790710;电报群 t.me/openingsource


    今日推荐开源项目:《Prompts助你构建美观的命令行交互界面》
    GitHub 地址:https://github.com/terkelg/prompts

    推荐理由:一个极其方便的库,能通过创建CLI(命令行)界面实现美观的交互式提示,而你需要做的只是在安装完成后简单的调用API即可,可以说是超级懒人kit了。

    使用

    代码:

    开源项目精选:Prompts助你构建美观的CLI交互界面


    结果(操作后):

    开源项目精选:Prompts助你构建美观的CLI交互界面

    关于各种你能用到的部分官方都给出了详细的解释(并且都很贴心的附上了图),参考:

    https://github.com/terkelg/prompts

    注:另外,这真的是一个十分简单,方便,又不失美观的库(*^_^*)

    关于Node.js

    Node 公开宣称的目标是 “旨在提供一种简单的构建可伸缩网络程序的方法”,即服务器程序,本身运行V8 JavaScript(V8 JavaScript 引擎是 Google 用于其 Chrome 浏览器的底层 JavaScript 引擎),并且采用的是事件驱动编程模式

    详细介绍:

    IBM:https://www.ibm.com/developerworks/cn/opensource/os-nodejs/

    中文网:http://nodejs.cn/

    官网:https://nodejs.org/en/

    Wiki:https://en.wikipedia.org/wiki/Node.js

    关于作者

    个人主页:http://www.terkel.com


    今日推荐英文原文:《How I review code》

    推荐理由:作为一名程序员来说,除了 write code, review code,和自己的 PM 一起 review code 真的是一件必不可少的事情,可能也是一个极大的噩梦,但是你应该承认,对于项目来说,它是很重要的步骤,Yahoo 旗下 Tumblr 的工程师就分享了一下他的关于 review code 心得与想法。


    How I review code

    Reviewing code is one of the most important parts of an engineer’s job at Tumblr, even more so than writing code. Our codebases are shared by hundreds of engineers, so it’s critical to make sure we’re not just writing the best code we can, but that the code being written can be understood by others. Taking the time to review someone else’s code is the most critical opportunity to ensure all of that is happening.

    At Tumblr, every code change happens in a Pull Request on an internal Github instance. We have repositories for the PHP backend, our database schemas, our iOS (Swift/Obj-C) and Android (Java/Kotlin) mobile apps, infrastructure projects written in Go, C/C++, Lua, Ruby, Perl, and many other projects written in Scala, Node.js, Python, and more. All of our code repositories rely on authors to write Pull Requests and get approvals from their peers before merging their changes to the master branch and deploying to production where real people interact with it.

    How I personally review code has changed considerably over my few years at Tumblr. Before working at Tumblr, I wrote code mostly by myself and reviewed code with a very small set of people. Shifting to a huge codebase with hundreds of contributors was a big change. Thankfully I’ve had some good teachers. I went from reviewing maybe one pull request a month to currently reviewing an average of 25 pull requests a week. Here are some of the principles that help me keep my reviews timely and helpful.

    Review the code with its author in mind

    The first thing I ask myself after a review has been requested of me is who wrote this? Are they a junior or senior engineer? Are they new to this codebase or a seasoned veteran? Have I ever reviewed their code before? Am I familiar with the project this code change contributes to?

    When I’m reviewing the code of someone I work with closely, I probably know pretty well what their thinking was when they wrote it, and I have an idea of what experiences they’ve been through. Junior engineers sometimes need a little more hand-holding, which usually means giving them more help with code examples and references. Senior engineers sometimes need to be reminded that highly performant, abstract, or clever code is often difficult to read and understand later, which usually means asking them for more inline comments and documentation.

    It’s also fundamentally important to review the code as if anyone could read the review you’re about to submit, not just the author. There are two main reasons for this. First, some people learn by reading the reviews that other engineers write; as a more junior engineer that’s exactly how I found out the most about the intricacies of Tumblr’s codebase. Also, in six months’ time it’s very likely you may be looking at this code again to figure out how it works. Having a helpful code review of it around can give some insight into the decisions that went into why it works the way it does.

    Review the code with everyone else in mind, too

    The core of my review, no matter who is writing the code change, centers around being able to understand the code itself and the motivations and context around it. To me, ideally anyone should be able to pop into a pull request and expect enough context to understand the code change and why it was done the way it was done and how it works the way it works. This is especially important in an old, shared codebase, where someone three years from now may be looking at your PR to figure out why you chose to do what you did. If that’s not included, or if there aren’t at least links out to the relevant context, something is wrong. More detail is always better.

    I don’t worry as much about code style or syntax itself, as we have automated processes to ensure that new or changed code conforms to our agreed-upon coding standards. Similarly to what I wrote about in how I code now, I look for code that is well-documented (both inline and externally), and code that is clear rather than clever. I’d rather read ten lines of verbose-but-understandable code than someone’s ninja-tastic one-liner that involves four nested ternaries. Especially if the person writing the code has been around the block a few times and been burned themselves by old, undocumented, clever code.

    Once I feel like I can understand the code change, I try to put myself in the shoes of someone who doesn’t deal with this area of the codebase very often (which may be the case for me at the time!) and think of how to review the code to help make it clear for them. I try to think of someone new being hired six months from now, looking at this code, wondering how it works.

    Understand the PR’s scope

    Sometimes not everything can get done in one pull request. At Tumblr we try to keep our PRs small so they can be reviewed quickly and safely, rather than bundling a ton of hard-to-review work into a 5,000-line-change PR. Because of this, sometimes the work has to be broken up into chunks, with PRs that build a foundation and lead to future PRs with finished implementations.

    Or, alternatively, it’s common for evergreen codepaths to have known issues or work that’s been ticketed for future sprints, so it’s become a good, common practice to leave a @todo in the code with the name of the ticket where that todo will get done. That way we can unblock code changes from having to be totally complete within one pull request.

    Stay on top of the whole review process

    The number one thing that helps me review code in a timely manner, and stay on top of updates about PRs, is email. I check every Github email I get; I make sure that I don’t get notified for everything that happens in the repo, but I do get every email that happens relating to a PR I’m associated with. This helps me stay on top of every step in the review process, because it’s almost always a back-and-forth that ideally shouldn’t last more than a day.

    At Tumblr, most of our reviewers are selected by automated round-robin assignment when the PR author is ready to receive reviews. That assignment triggers an email and subscribes me to everything that happens relating to that PR. From there, it’s on me to stay on top of my email and make sure that I not only allocate time to do the review as soon as possible, but follow up on the PR if I leave a review and the author updates it in response to my review.

    Remember to be a human

    The most important advice for reviewing code (and, in other ways, writing code) is to remember to be a human. Remember that the person who wrote the code you’re reviewing is also a human. Give them the benefit of the doubt. Be nice when you write a suggestion, or have a question, or find an edge case that they don’t seem to have covered. Even if they’re a seasoned veteran coder who has written bulletproof performant code for years, treat them like a person who makes mistakes sometimes. Even if they’re someone you work with every day and you feel comfortable cracking jokes at their expense, understand that a new person might not understand.

    Remember that shared, living codebases are often hectic and strange, especially ones that have been around for a decade. Remember that sometimes things are in a rush, so you can only do the best you can. We can’t halt everything in the name of perfect code, but we should make sure that everyone is doing the best they can, whether we’re writing or reviewing code.


    每天推荐一个 GitHub 优质开源项目和一篇精选英文科技或编程文章原文,欢迎关注开源日报。交流QQ群:202790710

  • 2018年3月9日:开源日报第1期

    9 3 月, 2018

    每天推荐一个 GitHub 优质开源项目和一篇精选英文科技或编程文章原文,欢迎关注开源日报。


    开源日报的第0期推出已经有一段时间啦,今天我们终于正式推出第1期开源日报,敬请关注。

    今日推荐开源项目:《GIF制作工具Gifski》;GitHub 地址:https://github.com/NickeManarin/ScreenToGif

    推荐理由:Gifski这个开源程序可以将一系列图片或一段视频转化为高质量的gif,转换不难,难得的是保持着高质量,这个项目也是入围了 GitHub Trending 增长最快的repo排行榜。

    使用

    Gifski实际上适用于windows,mac以及linux三个平台,唯一不同的是,mac平台上的gifski内置了视频分帧工具,因此可以直接把视频拖入程序窗口即可生成gif,而其它平台上则只能使用第三方程序分帧后才能处理,并且要在命令行中运行。

    (在这里插入一张图片,太大自行尝试上传文件:官方实例图片.gif)

    不过这并不是什么大问题,还记得开源工场之前的延展ffmpeg吗

    https://opensourcedaily.org/553/?这款命令行程序就是完美的分帧工具。下面笔者将以一段视频为例,演示这两个工具的使用教程。

    环境:win10

    视频源:祖娅纳惜-逆浪春秋,该视频FPS30,更能体现这个工具的性能。

    如果你是刚接触命令行工具,请按照以下步骤进行:

    将ffmpeg,gifski,准备转换的视频放在同一个文件夹。

    按Win+R,输入cmd,打开命令提示行。

    输入 X:,X是你的文件夹所在盘符。

    输入 cd xxxx/xxxx 即文件夹所在目录。不需要输入盘符。


    此时就可以开始调用这两个工具了。

    运行cmd,调用ffmpeg,开始分帧:

    < ffmpeg -i video.mp4 frame%04d.png>


    此处%04d表示会从0001开始计数。如果视频较长可以调大,但不建议,因为太多会极大影响GIF的生成时间,实际上,1000帧就已经要花去十几分钟来生成了。

    处理完成后,删掉你不需要的帧。

    开源项目精选:GIF制作工具Gifski


    接下来就要把这些图片整合到一起,成为一张GIF。

    运行cmd,调用gifski:

    <gifski -o file.gif frame*.png>

    开源项目精选:GIF制作工具Gifski


    友情提示,本机处理1280×720大小的gif的处理速度大概是0.7秒/帧,制作GIF的时候请注意时间。另外这里使用的是默认参数:帧率20。

    由于帧率是20较原视频小,因此显得较慢。

    程序提供的参数:

    开源项目精选:GIF制作工具Gifski


    这里我们尝试使用30帧速率再次制作,并且取名为h_sped.gif:

    gifski -o h_sped.gif –fps 30 frame*.png

    效果如下:

    (由于gif文件过大,此处仅提供文字描述)

    可以发现,到后面会有较为明显的掉帧现象,这有可能是程序的问题,更有可能是电脑性能所限。实际使用中,不建议使用这么大的图片以及这么长的片段,毕竟用户要看这么大的GIF也是得颇费周章。


    总体来说gifski是个强大的高质量gif工具,但功能较为单一,且需要先依靠ffmpeg分割为png,操作略显繁琐,而且大小无法进行选取。所以相比之下,如若在windows下则并不推荐使用gifski。可以尝试下面推荐的软件。

    而在Linux下ubantu自带的ImageMagick也几乎可以得到完全相同的效果(速度较快,质量高),操作也十分相近,可以说不相上下,同时这两款也都十分依靠ffmpeg。Mac平台下不清楚其他软件的特性,反正gifski同样适用。


    实际上,在比较的时候,笔者还发现了一个神奇的集大成者:ScreentoGIF。

    它把ffmpeg与gifski整合到了一起,还支持录屏功能,尽管是阉割版,不能支持所有的视频格式,但是也已经非常强力了,还可以手动选择要转化的帧,最关键的是,这是一个窗口程序而不是命令行程序!不懂命令行或者厌烦命令行操作的小伙伴们可有福了,之前的命令行教程权当学习一下吧……(别打死我2333)


    今日推荐英文原文:来自 Google 的《Machine learning meets culture》

    推荐理由:机器学习是时下时髦热闹的话题,繁华背后有着怎样的人文境遇和思考,当机器学习遇到文化,交汇在这十字路口,又有怎样奇妙的反应呢?不管是人类还是机器,都会遇到,也迟早会思索这个问题。现在,一群科学家们已经在用机器学习来处理艺术品了。

    Machine learning meets culture

    Whether helping physicians identify disease or finding photos of “hugs,” AI is behind a lot of the work we do at Google. And at our Arts & Culture Lab in Paris, we’ve been experimenting with how AI can be used for the benefit of culture. Today, we’re sharing our latest experiments—prototypes that build on seven years of work in partnership the 1,500 cultural institutions around the world. Each of these experimental applications runs AI algorithms in the background to let you unearth cultural connections hidden in archives—and even find artworks that match your home decor.

    Art Palette

    From interior design to fashion, color plays a fundamental role in expression, communicating personality, mood and emotion. Art Palette lets you choose a color palette, and using a combination of computer vision algorithms, it matches artworks from cultural institutions from around the world with your selected hues. See how Van Gogh’s Irises share a connection of color with a 16th century Iranian folio and Monet’s water lilies. You can also snap a photo of your outfit today or your home decor and can click through to learn about the history behind the artworks that match your colors.
    Watch how legendary fashion designer, Sir Paul Smith uses Art Palette:

    Giving historic photos a new lease on LIFE

    Beginning in 1936, LIFE Magazine captured some of the most iconic moments of the 20th century. In its 70-year-run, millions of photos were shot for the magazine, but only 5 percent of them were published at the time. 4 million of those photos are now available for anyone to look through. But with an archive that stretches 6,000 feet (about 1,800 meters) across three warehouses, where would you start exploring? The experiment LIFE Tags uses Google’s computer vision algorithm to scan, analyze and tag all the photos from the magazine’s archives, from the A-line dress to the zeppelin. Using thousands of automatically created labels, the tool turns this unparalleled record of recent history and culture into an interactive web of visuals everyone can explore. So whether you’re looking for astronauts, an Afghan Hound or babies making funny faces, you can navigate the LIFE Magazine picture archive and find them with the press of a button.

    Identifying MoMA artworks through machine learning

    Starting with their first exhibition in 1929, The Museum of Modern Art in New York took photos of their exhibitions. While the photos documented important chapters of modern art, they lacked information about the works in them. To identify the art in the photos, one would have had to comb through 30,000 photos—a task that would take months even for the trained eye. The tool built in collaboration with MoMA did the work of automatically identifying artworks—27,000 of them—and helped turn this repository of photos into an interactive archive of MoMA’s exhibitions.

    We unveiled our first set of experiments that used AI to aid cultural discoveries in 2016. Since then we’ve collaborated with institutions and artists, including stage designer Es Devlin, who created an installation for the Serpentine Galleries in London that uses machine learning to generate poetry.  We hope these experimental applications will not only lead you to explore something new, but also shape our conversations around the future of technology, its potential as an aid for discovery and creativity.

    You can try all our experiments at g.co/artsexperiments or through the free Google Arts & Culture app for iOS and Android.


    每天推荐一个 GitHub 优质开源项目和一篇精选英文科技或编程文章原文,欢迎关注开源日报。交流QQ群:202790710

  • 2018年2月28日:开源日报第0期

    28 2 月, 2018

    每天推荐一个 GitHub 优质开源项目和一篇精选英文科技或编程文章原文,欢迎关注开源日报。


    今日推荐开源项目:《把你的钱放在你的爱的地方——Thanks》

    今日推荐英文原文:《Learning to program is getting harder》


    今日推荐开源项目:《把你的钱放在你的爱的地方——Thanks》

    GitHub 项目链接:https://github.com/feross/thanks

    推荐理由:“把你的钱放在你爱的地方.”感恩之人如是说。

    Thanks是一个基于js的项目,其目的是提供网络上开源项目开发及维护者者的名单。

    “开源维护人员的工作使我们的应用程序,网站和项目成为可能,许多作者花费无数小时来开源。让我们来帮助作者,让我们中意的软件能健康发展。”这是项目发起者的初衷。

    如果你是需要帮助与支持的开源作者,你也当然也可以拉取请求将自己添加到CLI中。

    使用:

    1. 运行 npx thanks 在你的项目里
    2. 得知那些开源工作者在募捐;;

    两种安装:

    1. 用 npx thanks
    2. npm install -g thanks

    效果演示:

    开源项目精选: 把你的钱放在你爱的地方——Thanks

    今日推荐英文原文:《Learning to program is getting harder》

    推荐理由:那么多编程语言、框架,如何选择?该在哪里敲代码?敲完代码后怎么跑起来?一层又一层的封装(IDE、云、图形界面等)将计算机工作原理隐藏了,初学编程的人没法很自然地学习起来。

    以下为转载原文(推荐点击原链接查看)


    I have written several books that use Python to explain topics like Bayesian Statistics and Digital Signal Processing.  Along with the books, I provide code that readers can download from GitHub.  In order to work with this code, readers have to know some Python, but that’s not enough.  They also need a computer with Python and its supporting libraries, they have to know how to download code from GitHub, and then they have to know how to run the code they downloaded.

    And that’s where a lot of readers get into trouble.
    Some of them send me email.  They often express frustration, because they are trying to learn Python, or Bayesian Statistics, or Digital Signal Processing.  They are not interested in installing software, cloning repositories, or setting the Python search path!
    I am very sympathetic to these reactions.  And in one sense, their frustration is completely justified:  it should not be as hard as it is to download a program and run it.
    But sometimes their frustration is misdirected.  Sometimes they blame Python, and sometimes they blame me.  And that’s not entirely fair.
    Let me explain what I think the problems are, and then I’ll suggest some solutions (or maybe just workarounds).
    The fundamental problem is that the barrier between using a computer and programming a computer is getting higher.
    When I got a Commodore 64 (in 1982, I think) this barrier was non-existent.  When you turned on the computer, it loaded and ran a software development environment (SDE).  In order to do anything, you had to type at least one line of code, even if all it did was another program (like Archon).
    Since then, three changes have made it incrementally harder for users to become programmers
    1) Computer retailers stopped installing development environments by default.  As a result, anyone learning to program has to start by installing an SDE — and that’s a bigger barrier than you might expect.  Many users have never installed anything, don’t know how to, or might not be allowed to.  Installing software is easier now than it used to be, but it is still error prone and can be frustrating.  If someone just wants to learn to program, they shouldn’t have to learn system administration first.
    2) User interfaces shifted from command-line interfaces (CLIs) to graphical user interfaces (GUIs).  GUIs are generally easier to use, but they hide information from users about what’s really happening.  When users really don’t need to know, hiding information can be a good thing.  The problem is that GUIs hide a lot of information programmers need to know.  So when a user decides to become a programmer, they are suddenly confronted with all the information that’s been hidden from them.  If someone just wants to learn to program, they shouldn’t have to learn operating system concepts first.
    3) Cloud computing has taken information hiding to a whole new level.  People using web applications often have only a vague idea of where their data is stored and what applications they can use to access it.  Many users, especially on mobile devices, don’t distinguish between operating systems, applications, web browsers, and web applications.  When they upload and download data, they are often confused about where is it coming from and where it is going.  When they install something, they are often confused about what is being installed where.
    For someone who grew up with a Commodore 64, learning to program was hard enough.  For someone growing up with a cloud-connected mobile device, it is much harder.
    Well, what can we do about that?  Here are a few options (which I have given clever names):
    1) Back to the future: One option is to create computers, like my Commodore 64, that break down the barrier between using and programming a computer.  Part of the motivation for the Raspberry Pi, according to Eben Upton, is to re-create the kind of environment that turns users into programmers.
    2) Face the pain: Another option is to teach students how to set up and use a software development environment before they start programming (or at the same time).
    3) Delay the pain: A third option is to use cloud resources to let students start programming right away, and postpone creating their own environments.
    In one of my classes, we face the pain; students learn to use the UNIX command line interface at the same time they are learning C.  But the students in that class already know how to program, and they have live instructors to help out.
    For beginners, and especially for people working on their own, I recommend delaying the pain.  Here are some of the tools I have used:
    1) Interactive tutorials that run code in a browser, like this adaptation of How To Think Like a Computer Scientist;
    2) Entire development environments that run in a browser, like PythonAnywhere; and
    3) Virtual machines that contain complete development environments, which users can download and run (providing that they have, or can install, the software that runs the virtual machine).
    4) Services like Binder that run development environments on remote servers, allowing users to connect using browsers.
    On various projects of mine, I have used all of these tools.  In addition to the interactive version of “How To Think…“, there is also this interactive version of Think Java, adapted and hosted by Trinket.
    In Think Python, I encourage readers to use PythonAnywhere for at least the first four chapters, and then I provide instructions for making the transition to a local installation.
    I have used virtual machines for some of my classes in the past, but recently I have used more online services, like this notebook from Think DSP, hosted by O’Reilly Media.  And the repositories for all of my books are set up to run under Binder.

    These options help people get started, but they have limitations.  Sooner or later, students will want or need to install a development environment on their own computers.  But if we separate learning to program from learning to install software, their chances of success are higher.

    UPDATE: Nick Coghlan suggests a fourth option, which I might call Embrace the Future: Maybe beginners can start with cloud-based development environments, and stay there.

    UPDATE: Thank you for all the great comments!  My general policy is that I will publish a comment if it is on topic, coherent, and civil.  I might not publish a comment if it seems too much like an ad for a product or service.  If you submitted a comment and I did not publish it, please consider submitting a revision.  I really appreciate the wide range of opinion in the comments so far.

    每天推荐一个 GitHub 优质开源项目和一篇精选英文科技或编程文章原文,欢迎关注开源日报。交流QQ群:202790710

←上一页
1 … 259 260 261 262
下一页→

Proudly powered by WordPress