每天推荐一个 GitHub 优质开源项目和一篇精选英文科技或编程文章原文,欢迎关注开源日报。交流QQ群:202790710;电报群 https://t.me/OpeningSourceOrg
今日推荐开源项目:《网页滚动特效库basicScroll》
推荐理由:basicScroll是用来实现页面滚动时特效的JavaScript库,当页面中元素相对于屏幕发生改变时,basicScroll通过改变元素css属性值而实现特效。
优势
- basicScroll具有灵活的动画效果,开发者可以直接在CSS中使用变量来得到想要的动画效果,也可以使用JS来更好的控制动画.
- basicScroll是一个的轻量小型独立的现代化框架。basicScroll高度优化,开发者可以使用它创造出优雅平滑的动画。
- basicScroll的响应式做的也非常好,它可以在不改变代码行的情况下从小屏幕到大屏幕切换。
安装
可以通过Bower或者npm安装basicscroll
bower install basicScroll
npm install basicscroll
安装完成后,在HTML文件中引用(根据文件的位置自行调整)
<script src="dist/basicScroll.min.js"></script>
实现一个简单的特效
以图片随页面下拉逐渐淡化为例
首先在HTML中加载一张图片,假设将图片的类设置为image
设置image类的css属性:
      .image{
            opacity: var(--opacity);
            will-change: opacity;
      }
在JavaScript代码中:
/*
*创建一个实例
*/
const instance = basicScroll.create({
      /*
       *取类为image的元素为目标
       */
      elem: document.querySelector('.image'),
      /*
       *设置触发效果的位置
       */
      from: 'top-bottom',
      to: 'top-top',
      /*
       *设置效果
       */
      props: {
            '--opacity': {
                  from: .01,
                  to: .99
            }
      }
})

/*
 *启用创建的实例
 */
instance.start()
效果演示

实例API
basicScroll还有许多实例API,比如:
开始
开始动画实例。basicScroll将跟踪滚动位置并相应地调整实例。仅当滚动位置改变时才会执行更新。
instance.start()
停止
停止动画实例。实例的所有效果将保持其最后的值。
instance.stop()
更新
触发实例的更新,即使实例当前已停止。
const props = instance.update()
……(更多API可以在GitHub文档中查阅)
CSS的力量
basicScroll中有很多用CSS变量控制的动画,作者认为CSS变量的力量是不应该被低估的。CSS自定义属性 – 如规范命名 – 可以比SASS变量做更多的事情。它们是属性,它们像普通属性一样级联。
使用CSS变量,可以消除多余的样式。开发者从编程语言的函数中了解得原理适用于CSS自定义属性,定义一次,可以重复使用,无需重复编写相同的代码。
(参考文章《CSS变量的力量》)
进入官网了解更多basicScroll:https://basicscroll.electerious.com/
今日推荐英文原文:《Top JavaScript Libraries & Tech to Learn in 2018》
Top JavaScript Libraries & Tech to Learn in 2018
First, software ate the world, the web ate software, and JavaScript ate the web. In 2018, React is eating JavaScript.
2018: The Year of React
React won the popularity battle in 2017.
There are still lots of developers working on Angular code bases, which shows up in Google trends:
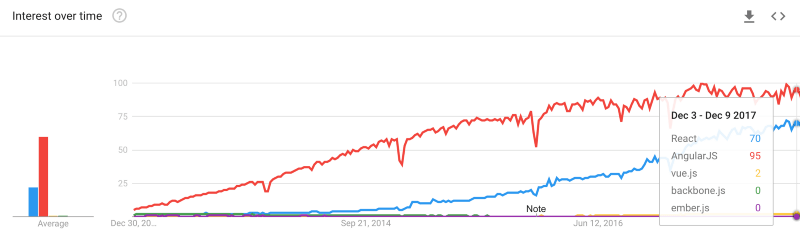
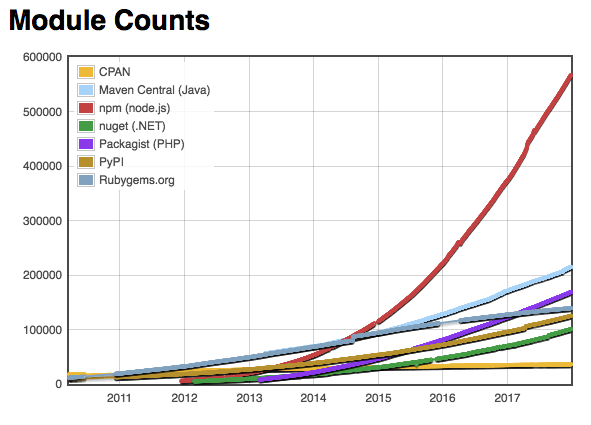
But as React continues to win customer satisfaction surveys, React growth has left Angular (and everything else) in the dust.
What About Vue.js? I Heard it’s Hot
Everybody loves paying lip service to alternatives like Vue.js. Here’s what I said about it last year:
Vue.js has a ton of GitHub stars and downloads. If things continue the way they are going, it will do very well in 2017, but I don’t think it will unseat either React or Angular (both of which are also growing fast) in the next year or so. Learn this after you have learned React or Angular.
Vue.js did do very well in 2017. It got a lot of headlines and a lot of people got interested. As I predicted, it did not come close to unseating React, and I’m confident to predict it won’t unseat React in 2018, either. That said, it could overtake Angular in 2018:
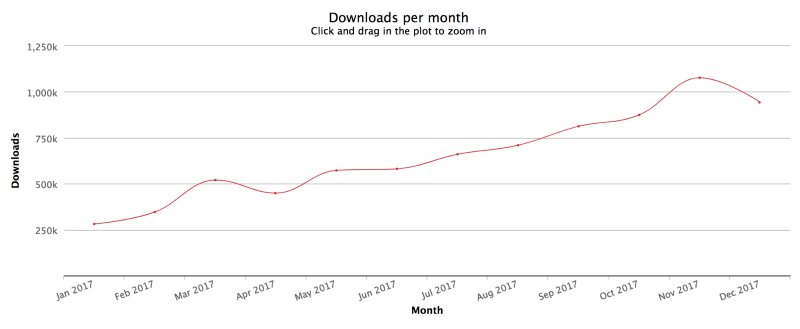
As you can see, Vue.js is gaining on Angular downloads:
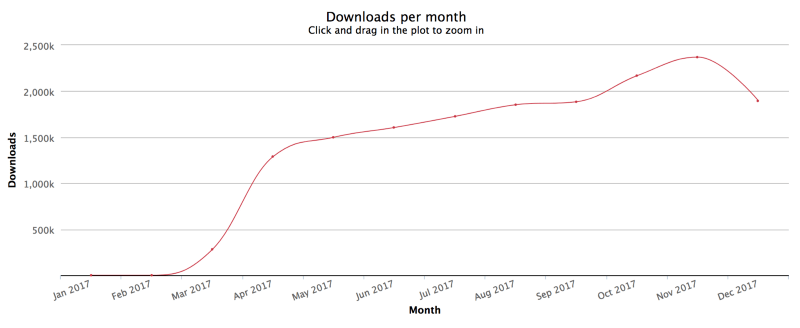
But React has a strong lead and a strong growth rate to match:
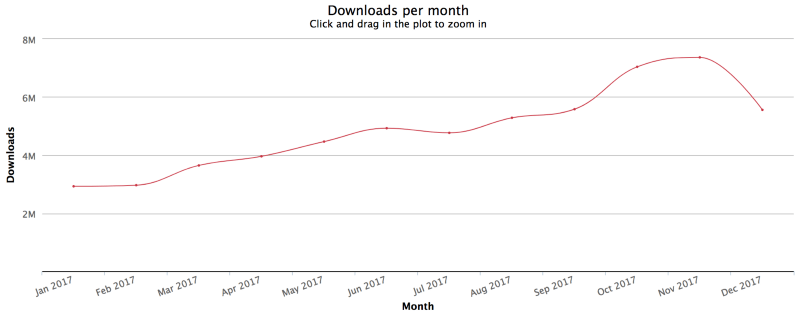
Vue.js is still growing faster than React. Why should it be any different than React vs Angular in 2017?
At the end of 2016, the JavaScript world was ready for a new framework. Angular users were very unsatisfied, React users were very satisfied, lots of people wanted to learn React, and very few wanted to learn Angular. At the end of 2017, Angular 2+ user satisfaction is still less than half, at 49%.
The story is very different for React vs Vue.js. React is beating Vue.js in user satisfaction (93% to 90%). The big incentive to switch from React in early 2017 was because of confusion over the React license. Facebook heard the users and switched the license.
At this stage, I simply don’t see compelling evidence that the market is motivated to switch from React to anything else. Vue.js is going to have a much harder time stealing users from React than they are having stealing users from jQuery and Angular.
There’s plenty of room for Vue.js to pick up a lot of Angular and jQuery users at a fast clip, but they will likely hit a brick wall when they have to start stealing users from React to continue the growth streak.
I predict strong Vue.js growth for another year or two, followed by a much harder battle with React in the top spot and Vue.js relegated to second fiddle unless something big changes to upset the balance.
Jobs
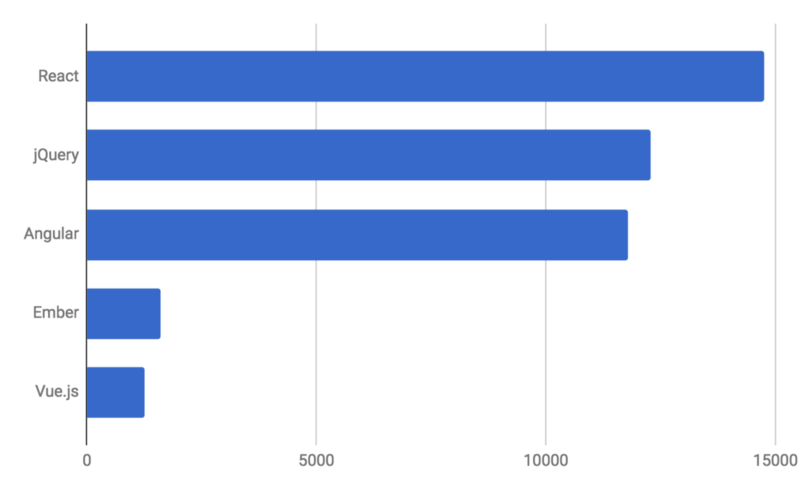
jQuery has fallen.
In the job listings, React completely took off and blew right past jQuery — the first library to pass jQuery in job popularity in a decade.¹ What we’re witnessing here is the end of an era.
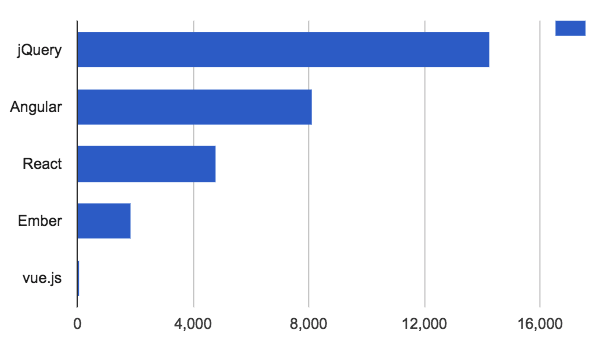
Compare to last year’s chart:
What’s really interesting in these charts is that other libraries grew a lot more than jQuery fell. The total open jobs mentioning a front-end framework are up by more than ~10k over last year.
With the job growth, we have also seen a boost in average salaries, too: $110k compared to $93k at the end of 2016. The inflation rate for the same period stayed below 2%, accounting for only a small percentage of the salary boost.
Clearly, it’s still a candidate’s market in 2018.
1. Methodology: Job searches were conducted on Indeed.com. To weed out false positives, I paired searches with the keyword “software” to strengthen the chance of relevance, and then multiplied by ~1.5 (roughly the difference between programming job listings that use the word “software” and those that don’t.) All SERPS were sorted by date and spot checked for relevance. The resulting figures aren’t 100% accurate, but they’re good enough for the relative approximations used in this article.
Framework Recommendations
After looking at this year’s numbers, I’m prepared to strongly recommend React for most general app development use cases, including mobile apps (PWAs, React Native), web applications, most office productivity applications, and desktop media content production apps (see Electron).
Notable category exceptions where something else may serve you better: Featherweight marketing landing pages (skip the framework entirely), 3D games, AR/VR. For 3D content, check out Unity, Unreal, or PlayCanvas. That said, React is being used for 3D content UIs, too.
I’m rating all other front-end frameworks strictly optional this year. This doesn’t mean they’re not cool, just not serious contenders to React in the job market. Remember, this list is about learning ROI, not which tech is the “best”.
Why so Much Interest in React?
Browsing through the React job listings, I noticed an interesting trend — a lot of them were for things that we don’t think of as front-end web work:
- React Native (for perspective, there are more of these openings than the total number of Vue.js openings)
- React for IoT
- React for AR/VR (with Oculus Rift leading the hiring charge)
- React for obscure computing thing you’ve never heard of
React has broken free of its web roots.
Versatility is one of the big selling points of React. Unlike many other frameworks, buying into React doesn’t entail buying into some baked in data model, or even the browser or DOM itself. In fact, I found quite a few React job listings that didn’t even mention JavaScript.
React also offers a rich, vibrant ecosystem piggybacking on React’s de-facto standards — something the JavaScript world hasn’t seen since jQuery plugins ruled the web.
The question is no longer “which framework?”
The question is “which tech pairs best with React?”
Nothing is going to unseat React in 2018 (maybe even 2019). You’re safe. JavaScript fatigue seems to be settling down. We have a great framework to build apps on now, and there’s a great ecosystem settling in around React.
Which Topics Should You Study?
Like last year, you can’t go wrong focusing on the essentials, but you should place more emphasis on functional programming for React apps.
React is great for two primary reasons:
- Deterministic view renders
- Abstracting the view layer away from direct DOM manipulation
Determinism is best served by building applications using pure functions, which is essentially the definition of functional programming.
With that in mind, here are some topics you should study:
- Basic ES6 syntax
- Class syntax and its many pitfalls — It’s OK to use
classfor React components, but avoid extending from your own classes, avoidinstanceof, and avoid forcing users of your classes to use thenewkeyword. - Functional programming & software composition
- Currying
- Closures
- Pure functions
- Promises
- Generators & async functions
- TDD
- The RAIL performance model
- Progressive Web Applications (PWAs): See “Native Apps are Doomed” & “Why Native Apps Really Are Doomed”
- GraphQL matured a lot in 2017, and is quickly taking over from REST APIs. Apollo is adding built-in offline first client cache architecture that will make Apollo+GraphQL a serious alternative (or complement) to Redux in 2018.
Libraries & Tools
These are the libraries and tools I’m finding most useful:
- React
- Redux
- Redux-Saga to manage async I/O and isolate side-effects
- Next.js — SSR with Node & Express, automatic bundle splitting, styled-jsx
- Material UI
- Storybook
- Cheerio for unit testing React components (I prefer this over Enzyme)
- Lodash (I prefer utilities from
lodash/fp). Import just the utilities you need to avoid blowing up your bundle size. - Babel: Used to compile ES6 to work on older browsers.
- Webpack: The most popular bundler for standard JavaScript look for simple starter kit/boilerplate config examples to get things running fast)
- ESLint: Catch syntax errors and style issues early. After code review and TDD, the third best thing you can do to reduce bugs in your code.
- Ramda — mostly for lenses and transducers.
- Node & Express
- RxJS: Observables for JavaScript. I’ve been using transducers more, lately. Remember to use pipeable operators to avoid blowing up your bundle size.
TypeScript did well in 2017, but I’ve seen it get in the way and complicate apps more than it helped. It’s primary shortcomings are over reliance on annotations as opposed to inference, and an inability to properly type higher-order functions without indescribable contortions. I gave it a full-time daily trial for a while, but these still apply: “The Shocking Secret About Static Types” &“You Might Not Need TypeScript”. Flow shares the same problems and the developer tools are not as good as TypeScript’s.
Tech to Watch in 2018
All of these areas of R&D are creating real jobs in 2018:
- Progressive Web Apps (PWAs)
- Blockchain & fintech
- Medical technology
- AR/VR — Hololens, Meta, and ODG are shipping today. ODG R-9 was scheduled to ship in 2017 but will likely ship in 2018 instead. MagicLeap has promised to ship in 2018. AR will transform the human experience more than the cell phone did.
- 3D printing
- AI
- Drones
Quantum computing is also poised to transform the world, but it may be 2019 or later before the disruption really starts. There are working quantum computers online, but they can’t do much yet. It’s still too early for most developers to even begin to experiment productively. Microsoft recently announced its Q# programming language for quantum computing. Meanwhile, IBM and Google also continue to invest heavily to own the embryonic cloud quantum computing market.
If you want to be prepared to learn quantum computing, you’ll want to study up on linear algebra. There are also functional explorations of quantum computing based on lambda calculus.
It’s likely that, as we’ve seen with AI, cloud APIs will be developed that will let people with less math background take advantage of some of the capabilities of quantum computing.
每天推荐一个 GitHub 优质开源项目和一篇精选英文科技或编程文章原文,欢迎关注开源日报。交流QQ群:202790710;电报群 https://t.me/OpeningSourceOrg

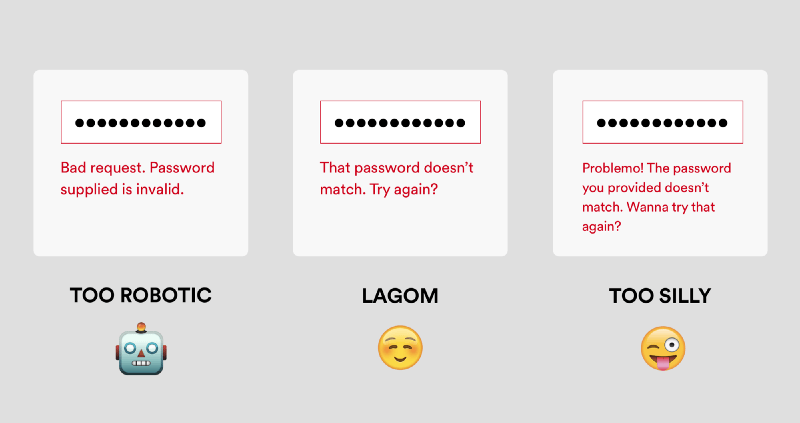
 Needs work
 Better!
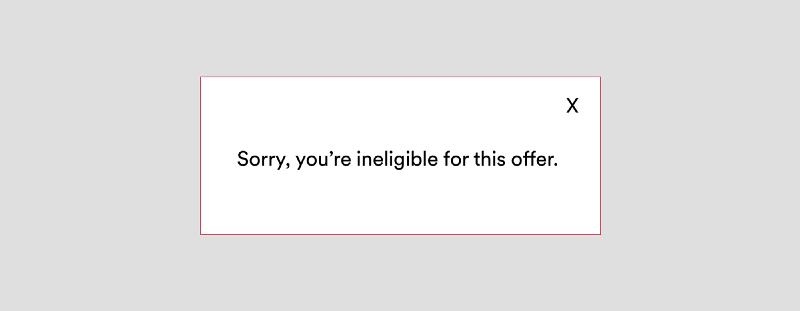 Needs work
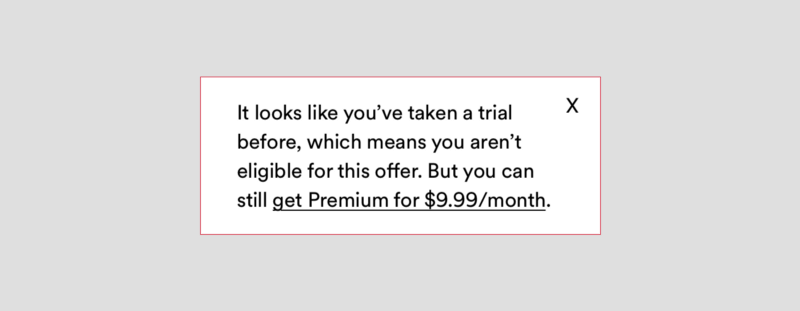 Better!
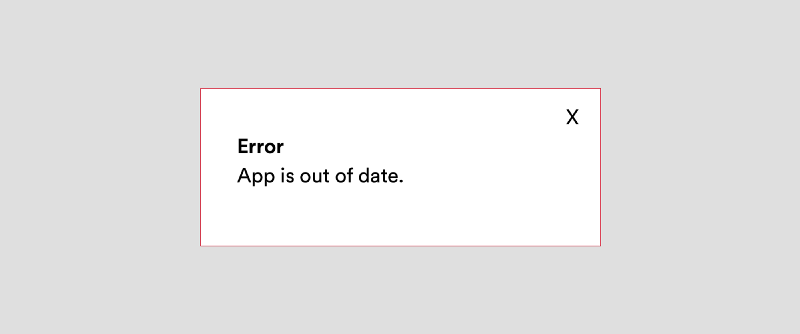 Needs work
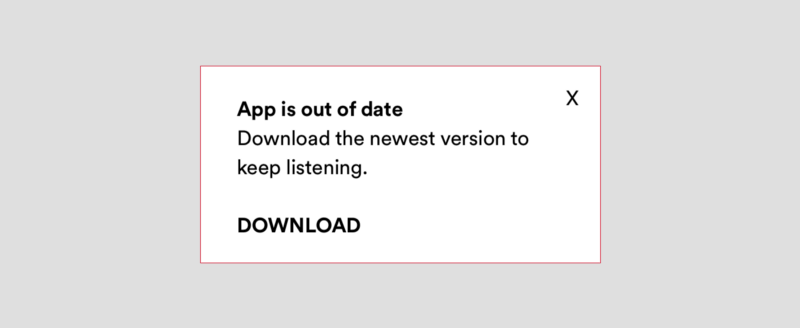 Better!