• 开源镜像
  • 开源沙龙
  • 媛宝
  • 猿帅
  • 注册
  • 登录
  • 息壤开源生活方式平台
  • 加入我们

开源日报

  • 2018年5月6日:开源日报第59期

    6 5 月, 2018

    每天推荐一个 GitHub 优质开源项目和一篇精选英文科技或编程文章原文,欢迎关注开源日报。交流QQ群:202790710;电报群 https://t.me/OpeningSourceOrg


    今日推荐开源项目:《Majestic》GitHub地址:https://github.com/Raathigesh/majestic

    推荐理由:Majestic是一个电子应用程序,提供了一个用Jest运行测试的UI。Jest CLI本身提供了当今最好的测试体验之一,但Majestic试图通过提供一个丰富的用户界面来在开发/测试循环期间扩展它。

    开源周报2018年第2期:Hyperapp领风骚,Python带你跳一跳

    特征:
    • 通过点击运行整个项目,文件或特定的测试
    • 观看整个项目,文件或测试
    • 点击更新特定的快照“
    • 内联覆盖报告
    • 支持打字稿项目
    • 支持Create-React-App开箱即用
    • 快速搜索,搜索您的所有测试(It)声明
    • 失败摘要在单个屏幕中显示所有测试失败。跨多个文件出现故障时很有用。
    • 点击一个按钮,在您的编辑器中找到一个特定的测试

    如果你有一个外部的jest配置文件,你应该有一个指向文件的jestConfig键,package.json如下所示:

    {
       “ name ”:“ my-awesome-proj ”,
       “ version ”:“ 0.1.0 ”,
       “ description ”:“ .. ”,
       “ jestConfig ”:“ ./jest-custom.config.js ”
    }
    

    零配置用户界面的Jest


    今日推荐英文原文:《Using Deep Learning to Understand Your Source Code》作者:Jesus Rodriguez

    原文链接:https://medium.com/@jrodthoughts/using-deep-learning-to-understand-your-source-code-28e5c284bfda

    推荐理由:使用机器学习来理解你的源代码?正是没错。你知道你的程序出错,但是不知道哪里出错?想找个人帮帮忙?嘿嘿!

    Using Deep Learning to Understand Your Source Code

    This should be a familiar experience to any programmer. You are immersed writing code in a static language like C# or Java, you have happily written a few hundred lines of this beautiful algorithm and then you press compile hoping to see the results of your great work. To your frustration, the compiler outputs an error message in bold red lines indicating that you missed a semicolon in line 17. At that point, you can’t avoid thinking why the stupid compiler doesn’t just add the semicolon to the end of line 17 and move on instead of telling you. Seriously, how hard could that be? Well, it turns out its pretty hard. The reason for the compiler’s frustrating behavior is that code interpreters and compilers today and extremely efficient analyzing the syntactic aspects of a problem but very limited when comes to understand the semantics of the program or our intentions as a programmer.

    Many bugs in a program are not solely derived from the syntax of the program due to the higher level semantic aspects. Consider the following code snippet that should indicate an agent to turn right. While it is very obvious to a programmer that the code is wrong as it us using the left angle to turn right, mainstream compilers are completely incapable to detect that flaw.

    When a programmer looks at a specific source code, it seems more than instructions and functions and it starts forming an understanding of the goals and functionality of the program. Wouldn’t it be great if compilers were able to formulate a similar level of understanding? The irony is that recent advancements in deep learning areas such as natural language understanding(NLU) allow artificial intelligence(AI) agents to understand highly complex communication structures such as human conversations while we still can’t figure out highly structured texts such as computer programs.

    Recently, Microsoft Research published a paper that proposes a technique that combines NLU techniques with mathematical logic to detect semantically-related bugs in source code. The key idea of the technique is to form a semantic representation of source code that complements its syntactic structure in order to detect more abstract errors.

    Titled “Learning to Represent Programs with Graphs”, the Microsoft Research paper introduces a deep learning method that transform a specific source code into a graph structure. The nodes of the graph include the tokens of the program (that is, variables, operators, method names, and so on) and the nodes of its abstract syntax tree (elements from the grammar defining the language syntax such as If Statement). The program graph contains two different types of edges: syntactic edges, representing only how the code should be parsed, such as while loops and if blocks; and semantic edges that are the result of simple program analyses.


    Having semantic edges allows the deep learning model to represent all sorts of high level knowledge constructs that resemble the way programmers analyze a specific source code. For instance, semantic edges such as “LastUse” connect a variable to the last time it may have been used in program execution (which in the case of loops can be later in the source code), “LastWrite” edges connect a variable to the last time it was written to, or as “ComputedFrom” edges connect a variable to the values it was computed from. From that perspective, a large group of semantic edges can help to simulate the human interpretation process of a computer program.


    In order to validate their technique, the Microsoft researchers focused on two specific types of semantic errors. The VARMISUSE task is focused on detecting variable misuses in code is a task that requires understanding and reasoning about program semantics. To successfully tackle the task one needs to infer the role and function of the program elements and understand how they relate. For example, given the following program, the task is to automatically detect that the marked use of clazz is a mistake and that first should be used instead.

    var clazz=classTypes["Root"].Single() as JsonCodeGenerator.ClassType; Assert.NotNull(clazz); var first=classTypes["RecClass"].Single() as JsonCodeGenerator.ClassType; Assert.NotNull( clazz ); Assert.Equal("string", first.Properties["Name"].Name); Assert.False(clazz.Properties["Name"].IsArray);

    Similarly, the VARNAMING task corrects infers the correct variable name based on a specific syntaxtic representation of a source code. For instance, the following example from the C# Roslyn compiler detected incorrect uses of the parameter filepath and the field _filePath, which are easily mistaken for each other.

    The use of Program Graphs are not only an interesting theoretical exercise but it proven to be more efficient than many alternatives in the deep learning space. The Microsoft team conducted experiments analyzing over 2.9 million lines of source code and the new technique yielded substantially better results that more traditional methods such as bidirectional recurrent neural networks. Although the methods are highly experimental, program graphs seem to be a step towards making compilers are intelligent as human programmers.


    每天推荐一个 GitHub 优质开源项目和一篇精选英文科技或编程文章原文,欢迎关注开源日报。交流QQ群:202790710;电报群 https://t.me/OpeningSourceOrg

  • 2018年5月5日:开源日报第58期

    5 5 月, 2018

    每天推荐一个 GitHub 优质开源项目和一篇精选英文科技或编程文章原文,欢迎关注开源日报。交流QQ群:202790710;电报群 https://t.me/OpeningSourceOrg


    今日推荐开源项目:《用 Toapi 为任何网站添加api服务》

    推荐理由:Toapi是一个能够为任何网站添加api服务的python项目,通过我们所添加的api,我们可以轻松的获取我们的想要的信息,功能类似与爬虫,相比于其他的爬虫,它最大的特点就是可以自动实时更新。

    开源周报第1期:GitHub Trending 丁酉年叱咤开源项目风云榜

    工作流程:

    1.使用相同的url向源web站点发送一个请求

    2.获取从缓存和存储获取的大部分数据

    3.当缓存过期时,从存储中获取HTML

    4.当存储过期时,从源站点获取HTML

    开源周报第1期:GitHub Trending 丁酉年叱咤开源项目风云榜

    toapi的特点:

    toapi使用缓存来防止重复解析网站并运用储存防止重复发送请求

    1. toapi可以同时收集多个页面的信息
    2. 通过toapi创建的api可以共享给其他人
    3. 由于toapi是由flask框架构建的,所以它有很大的拓展空间,易于更新
    4. toapi构建的api可以自动判断自身的状态,我们可以随时调用它们

    官方文档


    今日推荐英文原文:《Linux Apps Are Coming to Chromebooks and You Can Try Them Right Now, Here’s How》

    作者: Marius Nestor

    原文链接:https://news.softpedia.com/news/linux-apps-are-coming-to-chromebooks-and-you-can-try-them-now-in-chrome-os-dev-520966.shtml

    推荐理由:没错,Chromebooks 除了可以支持 Chome 浏览器扩展、Android App 之外,现在又可以支持 Linux App 了,可以说是越来越强大了。

    Linux Apps Are Coming to Chromebooks and You Can Try Them Right Now, Here’s How

    Rumored to come to a Chromebook near you, support for Linux apps just entered beta testing in the latest Chrome OS Dev channel, as confirmed by Kevin Tofel of About Chromebooks. The feature appeared in the Settings and needed to be turned on if you want to use Linux tools, editors, and IDEs on your Chromebook.

    The first sign of Linux app support in Chrome OS appeared two months ago when a Reddit user discovered a Chromium Gerrit commit explaining a new device policy designed to allow containerized Linux apps to Chromebooks. Then, someone discovered a Terminal app, whichfailed to install, but suggested upcoming support for Linux apps.

    Here’s how to try Linux apps on your Chromebook

    Now that the feature is finally accessible to the masses, you can try Linux apps on your Chromebook by switching to the Chrome OS Dev channel. To do that, access the Chrome OS Settings, scroll down on the left side panel list and click on “About Chrome OS,” then click on “Detailed build information,” click “Change channel” next to “Channel,” and choose the Developer channel.

    Click “Change Channel” to change the channel and apply the settings. Chrome OS will then automatically download an update to your Chromebook and ask you to restart. Once you’re back on the desktop, open the Chrome OS Settings again, go to “About Chrome OS” and make sure you’re running at least Chrome OS 68.0.3416.0. Go back and turn on Linux (Beta) feature under the Linux Apps section.

    Once you enable the Linux Apps feature, your Chromebook will apparently start downloading the Terminal app, which says that you’re running the Debian GNU/Linux operating system in a container. However, be aware the support for native Linux apps might need some work before it’s ready for the masses, so use it with caution until it lands in the Chrome OS Stable channel.


    每天推荐一个 GitHub 优质开源项目和一篇精选英文科技或编程文章原文,欢迎关注开源日报。交流QQ群:202790710;电报群 https://t.me/OpeningSourceOrg

  • 2018年5月4日:开源日报第57期

    4 5 月, 2018

    每天推荐一个 GitHub 优质开源项目和一篇精选英文科技或编程文章原文,欢迎关注开源日报。交流QQ群:202790710;电报群 https://t.me/OpeningSourceOrg


    今日推荐开源项目:《捍卫隐私的秘器 Haven》

    推荐理由:很多朋友肯定听说过 Haven 的神秘背景,小编就不提了,不过说到需求,你是否曾为找不到有效的保护私人信息的方法而苦恼?是否还在苦苦寻求保护私人空间和信息的方法?如果有的话,Haven将会是一个绝佳的选择!

    Haven 是一款Android应用程序,能为那些需要一种方法来保护自己的个人空间和财产,而不损害自己的隐私的人提供的应用。

    开源周报第1期:GitHub Trending 丁酉年叱咤开源项目风云榜

    Haven利用设备上的传感器来提供对物理空间的监视和保护。避风港把任何Android手机变成运动,声音,振动和光检测器,注意意外的客人和不必要的入侵者。并且只在运动或音量触发时才保存图像和声音,并将所有内容存储在设备上。您可以放置​​设备的摄像头以捕捉可见的动作,或将手机放置在某个谨慎的地方,只听声音。立即获取入侵事件的安全通知,并在以后远程或随时访问日志。

    监测下列传感器的可测量变化,然后记录到设备上的事件日志中:

    • 加速度计:手机的运动和振动
    • 相机:从前置或后置摄像头移动到手机可见的环境中
    • 麦克风:环境中的噪音
    • 灯光:来自环境光线传感器的光线变化
    • 电源:检测到设备被拔出或掉电

    当其中一个传感器被触发(达到配置的灵敏度阈值)时,将通过以下通道发送通知(如果启用):

    • 短信:当监控开始时,一条消息被发送到指定的号码
    • 信号:如果配置,可以通过信号发送端到端的加密通知

    相关链接:

    Haven 的完整演示文稿: Haven App Overview

    安装F-Droid链接:install F-Droid

    从GitHub处获取链接:GitHub releases page


    今日推荐英文原文:《Resolving Boot Loader Issues》作者:Kshitij Upadhyay

    原文链接:https://opensourceforu.com/2018/05/resolving-boot-loader-issues/

    推荐理由:大部分朋友在安装 Linux 或者 BSD 等非 Windows 系统时都会遇到 BIOS/UEFI 相关的问题,这里有一个完整的 Boot Loader 问题解决方案来帮你扫请障碍。

    Resolving Boot Loader Issues

    Boot loader issues often plague computer systems. This article demystifies the booting process, both for BIOS based systems as well as UEFI systems.

    A Basic Input Output System (BIOS) powered system goes through a number of steps from when it is powered up to when it runs a Red Hat Enterprise Linux (RHEL) system. The following list of steps gives a high-level overview of what exactly takes place. This list also applies to virtual machines that emulate a traditional BIOS system. The list assumes that the GRUB2 boot loader is being used. For different boot loaders, the list will differ.

    1) The BIOS firmware is started and performs a ‘power on self-test’ (POST).

    2) The BIOS scans for possible boot devices, and orders them according to a user-set preference.

    3) The boot devices are scanned for boot firmware (such as a PXE ROM on network cards), a Master Boot Record (MBR), or a partition marked as bootable. If found, the BIOS executes them.

    4) The first-stage boot loader stored in the MBR loads the Stage 1.5 (drivers) and Stage 2 boot loaders from the disk, and executes them.

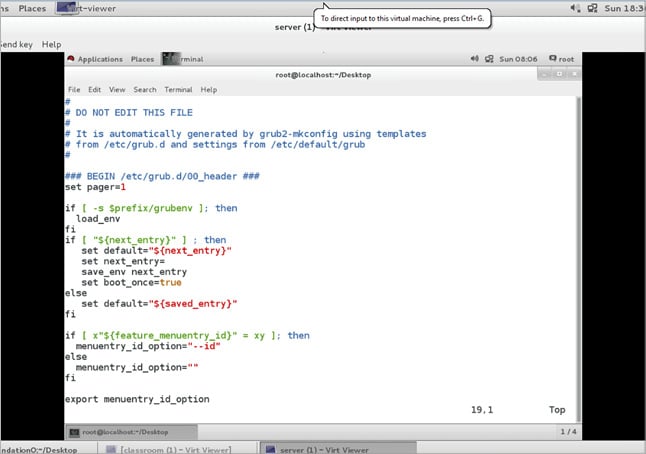
    5) The boot loader loads a configuration file from the disk. In the case of GRUB2, this will be /boot/grub2/grub.cfg. The file is shown in Figure 1. This file is auto generated and should not normally be edited manually.

    6) The configuration file is parsed and, based on its contents, a boot entry is selected automatically by the user.

    7) The kernel and initial RAM disk referenced in the boot entry are loaded from the disk, and control is handed over to the kernel.

    8) The kernel starts and initialises hardware using the drivers found in the initial RAM disk. A simple init system is also started from the RAM disk.

    9) The scripts in the initial RAM disk mount the root file system of the target system; they then switch the root to the newly mounted file system and hand over control to /sbin/init on the target root file system.

    10) The init system mounts file systems and starts services according to its configuration.

    GRUB2

    The boot loader used on RHEL is GRUB2, the second major version of the GRand Unified Bootloader. GRUB2 stores its files on a BIOS system in a number of different locations, as listed below.

    /boot/

    The kernel and initial RAM disks are stored here. Sub-directories contain other files.

    /boot/grub2/

    This contains the configuration files, extension modules and themes.

    /boot/grub2/grub.cfg

    This has the main GRUB2 configuration file. This file is auto generated, and should normally not be edited manually. As a convenience, /etc/grub2.cfg is a symbolic link to this file.

    /etc/grub.d/

    This directory contains a helper script to generate a main GRUB2 configuration file.

    /etc/defaults/grub

    This file contains variables used in the generation of the main GRUB2 configuration file, as shown in Figure 2.

    /boot/grub2/grubenv

    This contains a file of exactly 1KiB, which is used as storage for variables, such as a default or ‘saved’ boot entry.

    The grub2-editenv tool can be used to read and modify these settings.The Master Boot Record (MBR)

    In order to boot GRUB2 from the disk on a BIOS system, there are two options—store the first part of the GRUB2 boot loader in the Master Boot Record (MBR) of a disk, or store it in the first sector of a partition that is marked as ‘bootable’.

    The problem with the MBR

    There is a major constraint with using the MBR. A typical MBR is only 512 bytes in size, and part of that space is used for the partition table of that disk, leaving only 446 bytes for the boot loader.

    To work around this issue, GRUB2 can use the ‘boot track’, ‘MBR gap’, or ‘embedding area’ on the disk to store the extra modules and files it needs. This is the space between the MBR and the first partition on the disk. In order to work reliably, there needs to be at least 31KiB of space available this way (63 sectors on a 512-byte sector disk). If a disk has been partitioned by Anaconda, the first partition will usually start at sector 2048, leaving roughly 1MiB of space for the embedding area, which is ample room for GRUB2.

    Note: The ibi (or binary prefix) units KiB, MiB, GiB are based on 2^10(1024) whereas standard decimal units

    (KB, MB, GB) are based on 10^3(1000). In this article, we have used the units KiB, MiB and TiB.

    1KB= 1000 bytes 1KiB=1024 bytes

    1MB=1000KB 1MiB=1024KB

    1GB=1000MB 1GiB=1024MB

    1TB=1000GB 1TiB= 024GB

    Configuring GRUB2

    Under normal circumstances, an administrator should not have to manually configure the GRUB2 boot loader. When a new kernel is installed, it will be added to the configuration automatically and when a kernel is removed, the corresponding entry in the boot loader menu is removed automatically as well.

    An administrator might want to tweak some parameters that are passed into the kernel at startup by GRUB2. The best way to do this is by editing /etc/defaults/grub and then forcing a recreation of the main GRUB2 configuration file.

    The settings in /etc/defaults/grub that are of interest are listed here.

    GRUB_TIMEOUT

    This is the number of seconds the GRUB2 menu is displayed before the default entry is booted automatically.

    GRUB_DEFAULT

    This is the number of the default entry that should be started whenever a user does not select another entry, which is when GRUB2 starts counting at 0. If this variable is set to the string saved, the entry will be taken from /boot/grub2/grubenv.

    GRUB_CMDLINE_LINUX

    This variable contains a list of extra kernel command-line options that should be added to every single Linux kernel. Typical uses include ‘rhgb quiet’ for a graphical boot, ‘console=xxxxxx’ for selecting a kernel console device, and ‘crashkernel=xxxx’ for configuring automatic kernel crash dumping.

    After updating the file /etc/default/grub, changes can be applied by running the command grub2-mkconfig –o /boot/grub2/grub.cfg. This will generate a fresh configuration file using the scripts in /etc/grub.d and the settings in /etc/defaults/grub. If no output file is specified with the –o option, a configuration file will be written to the standard output.

    Reinstalling GRUB2 into the MBR

    If, for some reason, the MBR, or the embedding area, has become damaged, an administrator will have to reinstall GRUB2 into the MBR. Since this implies that the system is currently unbootable, this is typically done from some live CD or from within the rescue environment provided by the Anaconda installer.

    The following procedure explains how to boot into a rescue environment and reinstall GRUB2 into the MBR from there. If an administrator is still logged into a running system, the procedure can be shortened to just the grub-install command.

    1. Boot from an installation source; this can be a DVD image, a netboot CD, or from PXE providing a RHEL installation tree.

    2. In the boot menu for the installation media, select the ‘Rescue an installed system’ option, or edit the kernel command line to include the word ‘rescue’.

    3. When prompted about mounting the disks for the target system to be rescued, select Option 1 (continue). This will mount the system under /mnt/sysimage.

    4. Press Enter to obtain a shell when prompted. This shell will live inside the installation/rescue environment, with the target system mounted under /mnt/sysimage.

    This shell has a number of tools available for rescuing a system, such as all common file systems, disks, LVMs, and networking tools. The various bin directories of the target system are added to the default executable search path (${PATH}) as well.

    5. chroot into the /mnt/sysimage directory, using the following command:

    # chroot /mnt/sysimage

    6. Verify that /boot is mounted, using the command given below. Depending on the type of installation, /boot can be on a separate partition, or it can be part of the root file system.

    # ls –l /boot.

    7. Use the command grub2-install to rewrite the boot loader sections of the MBR and the embedding area. This command will need the block device that represents the main disk as an argument. If unsure about the name of the main disk, use lsblk and blkid to identify it.

    # grub2-install /dev/vda

    8. Reboot the system. This can be done by exiting both the chroot shell and the rescue shell.

    9. Wait for the system to reboot twice. After the first reboot, the system will perform an extensive SELinux file system relabel, after which it will reboot again automatically to ensure that proper contexts are being used. This relabel is triggered automatically by the Anaconda rescue system creating the /. autorelabel.

    Resolving boot loader issues on UEFI systems

    What is UEFI?

    Introduced in 2005, the Unified Extensible Firmware Interface (UEFI) replaces the older Extensible Firmware Interface (EFI) and the system BIOS. A replacement for the older BIOS was sought to work around the limits that the BIOS imposed, such as 16-bit processor mode and only 1 MiB of addressable space.

    UEFI also allows booting from disks larger than 2 TiB, as long as they are partitioned using a GUID Partition Table (GPT).

    One of the big differences between UEFI systems and BIOS systems is the way they boot. While in the case of the latter, the BIOS has to search for bootable devices, operating systems can ‘register’ themselves with the UEFI firmware. This makes it easier for end users to select which operating system they want to boot in a multi-boot environment — GRUB2 or UEFI.

    GRUB2 and UEFI

    In order to boot a UEFI system using GRUB2, an EFI system partition (ESP) needs to be present on the disk. This partition should have a GPT UUID or the MBR type. The partition needs to be formatted with a FAT file system, and should be large enough to hold all bootable kernels and the boot loader itself. A size of 512MiB is recommended, but smaller sizes will work. This partition should be mounted at /boot/efi and will normally be created by the Anaconda installer.

    The main GRUB2 difference between BIOS and UEFI

    While most of the configuration syntax and tools remain the same between BIOS and UEFI boots, some of the following small changes do apply.

    Linux16/initrd16 vs linuxefi/initrdefi

    The configuration commands to load a kernel and initial RAM disk switch from linux16 and initrd16 to linuxefi and initrdefi, respectively.

    The change is necessary since kernels need to be loaded differently on a UEFI system than on a BIOS system. The grub2-mkconfig command automatically recognises a UEFI system and makes the correct changes.

    /boot/grub2 vs /boot/efi/EFI/redhat

    On UEFI systems the directory holding all grub2 configuration files and extras is moved to /boot/efi/EFI/redhat. This is a location on the ESP, making it accessible to the UEFI firmware.

    grub2-install

    While a grub2-install command is more than capable of installing a boot loader onto a UEFI system, it should never be used directly. Calling grub2-install on a UEFI system will generate a new /boot/efi/EFI/redhat/grubx64.efi file. On Red Hat Enterprise Linux 7 systems, this file should be the prebaked version from the grub2-efi-package.

    The grub2-install command will also register a bootable target in the UEFI firmware using this updated grubx64.efi application, instead of the shim.efi application.

    Warning: Using grub2-install will install a custom grubx64.efi. If a system was set up for a secure boot, this will cause the boot to fail.

    /boot/grub2/grub.cfg vs /boot/efi/EFI/redhat/grub.cfg

    Included in the move from /boot/grub2 to /boot/efi/EFI/redhat/ is the move of the main GRUB2 configuration file. The symbolic link /etc/grub.cfg is also moved to /etc/grub2-efi.cfg.

    Reinstalling GRUB2 on UEFI-based machines

    If, for some reason, any of the files needed to boot in /boot/efi have been removed, or if the partition has been recreated, these files can be recovered by reinstalling both the grub2-efi and shim packages, as follows:

    # yum reinstall grub2-efi shim

    If /boot/efi/EFI/redhat/grub.cfg has been removed, it can be restored with the following command:

    # grub2-mkconfig –o /boot/efi/EFI/redhat/grub.cfg.

    If the Red Hat entry has been removed from the UEFI boot menu, booting from the disk that has an installation of Red Hat Enterprise Linux 7 will automatically add it back.

    The UEFI based chain

    In order to work with secure boot systems, where signatures on boot loaders, kernels, etc, can be checked by the firmware to authenticate that only unmodified software is run, Red Hat Enterprise Linux 7 uses the shim UEFI bootloader.

    The shim.efi application is signed with a key trusted by most UEFI firmware. When started, it will attempt to load grubx64.efi using the normal UEFI firmware calls. If the UEFI firmware refuses to load the application due to a bad signature, shim will attempt to verify the application using other keys compiled into it, or a user-generated key stored in UEFI NVRAM (machine owner key (MOK)). When attempting to start a signed application for which no keys have been registered, the MokManager.efi application is started automatically so that an end user can register a personal key.

    The shim.efi application also registers a new UEFI system call that can be used by GRUB2 to verify kernel signatures.

    If shim.efi is not registered with the UEFI firmware, booting from the disk that contains the ESP will launch the /boot/efi/EFI/BOOT/BOOTX64.efi application. This, in turn, will launch the fallback.efi application, which automatically registers the shim.efi application and boots the system, based on the settings in /boot/efi/EFI/redhat/BOOT.CSV.

    Early root shell

    In some cases, startup tasks can take far longer than anticipated, or even fail to complete after minutes or hours. To help debug these types of problems, the systemctl list-jobs command can show all current jobs that sytemd is executing, allowing an administrator to stop or kill them, or fix the reason these jobs are taking so long.

    To obtain a root shell during startup, an administrator can enable the debug-shell.service. This service will start a virtual console with a logged-in root shell attached to it on /dev/tty9, very early during boot—during the startup of the sysinit.target target.

    Using this early root shell, an administrator can analyse, debug and sometimes remedy a failing service or unit.

    Warning: Do not leave the debug-shell.service service enabled and running after debugging is done. Anyone with console access, either physical or via a management card or KVM switch, will have full, unrestricted root access to the machine.


    每天推荐一个 GitHub 优质开源项目和一篇精选英文科技或编程文章原文,欢迎关注开源日报。交流QQ群:202790710;电报群 https://t.me/OpeningSourceOrg

  • 2018年5月3日:开源日报第56期

    3 5 月, 2018

    每天推荐一个 GitHub 优质开源项目和一篇精选英文科技或编程文章原文,欢迎关注开源日报。交流QQ群:202790710;电报群 https://t.me/OpeningSourceOrg


    今日推荐开源项目:《React 内容加载器react-content-loader》

    推荐理由:这是基于 React 框架的React 组件,它使用SVG创建一个模拟加载内容前端界面。这类似于 Facebook 推出的个性化名片服务 Facebook Cards 的加载器。

    应用框架:

    • React Native: GitHub React Native中文网
    • Preact:GitHub Preact 官方网站
    • Vue.js:GitHub Vue.js中文网

    特点:

    • 界面可以自定义不同风格,简洁干净明了。

    如:Facebook风格

    • 使用较为简单,使用者只需要使用简单代码实时编辑。

    开始你的在线编辑

    安装:

    Using npm:

    npm i react-content-loader --save

    Using Yarn:

    yarn add react-content-loader --save

    自定义使用实例:

     // import the component
         import ContentLoader, { Rect, Circle } from 'react-content-loader'
           const MyLoader = () => {
               return (
                 <ContentLoader
                     height={140} 
                      speed={1} 
                       primaryColor={'#333'}                                                          secondaryColor={'#999'}  >
                      <Circle x={195} y={30} radius={30} />
                      <Rect x={50} y={80} height={10} radius={5}  width={300} />
                      <Rect x={75} y={100} height={10} radius={5} width={250} />
                      </ContentLoader>
                     )
                   }
    

    example:


    今日推荐英文原文:《9 ways to improve collaboration between developers and designers》作者: Jason Brock

    原文链接:https://opensource.com/article/18/5/9-ways-improve-collaboration-developers-designers

    推荐理由:如果男女朋友吵架,应该是谁的错?当然是男生啦!如果是设计人员和程序员吵架呢?哼哼,当然是产品经理,还用多想吗?这里有一个秘籍,可以让 PM 协调团队小伙伴更好的协作,极大提升 PM 的战斗力,改善设计人员和开发者协作的9种方法!

    9 ways to improve collaboration between developers and designers

    Image by : opensource.com

    This article was co-written with Jason Porter.

    Design is a crucial element in any software project. Sooner or later, the developers’ reasons for writing all this code will be communicated to the designers, human beings who aren’t as familiar with its inner workings as the development team.

    Stereotypes exist on both side of the divide; engineers often expect designers to be flaky and irrational, while designers often expect engineers to be inflexible and demanding. The truth is considerably more nuanced and, at the end of the day, the fates of designers and developers are forever intertwined.

    Here are nine things that can improve collaboration between the two.

    1. First, knock down the wall. Seriously.

    There are loads of memes about the “wall of confusion” in just about every industry. No matter what else you do, the first step toward tearing down this wall is getting both sides to agree it needs to be gone. Once everyone agrees the existing processes aren’t functioning optimally, you can pick and choose from the rest of these ideas to begin fixing the problems.

    2. Learn to empathize.

    Before rolling up any sleeves to build better communication, take a break. This is a great junction point for team building. A time to recognize that we’re all people, we all have strengths and weaknesses, and most importantly, we’re all on the same team. Discussions around workflows and productivity can become feisty, so it’s crucial to build a foundation of trust and cooperation before diving on in.

    3. Recognize differences.

    Designers and developers attack the same problem from different angles. Given a similar problem, designers will seek the solution with the biggest impact while developers will seek the solution with the least amount of waste. These two viewpoints do not have to be mutually exclusive. There is plenty of room for negotiation and compromise, and somewhere in the middle is where the end user receives the best experience possible.

    4. Embrace similarities.

    This is all about workflow. CI/CD, scrum, agile, etc., are all basically saying the same thing: Ideate, iterate, investigate, and repeat. Iteration and reiteration are common denominators for both kinds of work. So instead of running a design cycle followed by a development cycle, it makes much more sense to run them concurrently and in tandem. Syncing cycles allows teams to communicate, collaborate, and influence each other every step of the way.

    5. Manage expectations.

    All conflict can be distilled down to one simple idea: incompatible expectations. Therefore, an easy way to prevent systemic breakdowns is to manage expectations by ensuring that teams are thinking before talking and talking before doing. Setting expectations often evolves organically through everyday conversation. Forcing them to happen by having meetings can be counterproductive.

    6. Meet early and meet often.

    Meeting once at the beginning of work and once at the end simply isn’t enough. This doesn’t mean you need daily or even weekly meetings. Setting a cadence for meetings can also be counterproductive. Let them happen whenever they’re necessary. Great things can happen with impromptu meetings—even at the watercooler! If your team is distributed or has even one remote employee, video conferencing, text chat, or phone calls are all excellent ways to meet. It’s important that everyone on the team has multiple ways to communicate with each other.

    7. Build your own lexicon.

    Designers and developers sometimes have different terms for similar ideas. One person’s card is another person’s tile is a third person’s box. Ultimately, the fit and accuracy of a term aren’t as important as everyone’s agreement to use the same term consistently.

    8. Make everyone a communication steward.

    Everyone in the group is responsible for maintaining effective communication, regardless of how or when it happens. Each person should strive to say what they mean and mean what they say.

    9. Give a darn.

    It only takes one member of a team to sabotage progress. Go all in. If every individual doesn’t care about the product or the goal, there will be problems with motivation to make changes or continue the process.


    每天推荐一个 GitHub 优质开源项目和一篇精选英文科技或编程文章原文,欢迎关注开源日报。交流QQ群:202790710;电报群 https://t.me/OpeningSourceOrg

←上一页
1 … 245 246 247 248 249 … 262
下一页→

Proudly powered by WordPress