• 开源镜像
  • 开源沙龙
  • 媛宝
  • 猿帅
  • 注册
  • 登录
  • 息壤开源生活方式平台
  • 加入我们

开源日报

  • 2018年6月15日:开源日报第99期

    15 6 月, 2018

    每天推荐一个 GitHub 优质开源项目和一篇精选英文科技或编程文章原文,欢迎关注开源日报。交流QQ群:202790710;微博:https://weibo.com/openingsource;电报群 https://t.me/OpeningSourceOrg


    今日推荐开源项目:《手绘图形库 Rough.js》GitHub链接

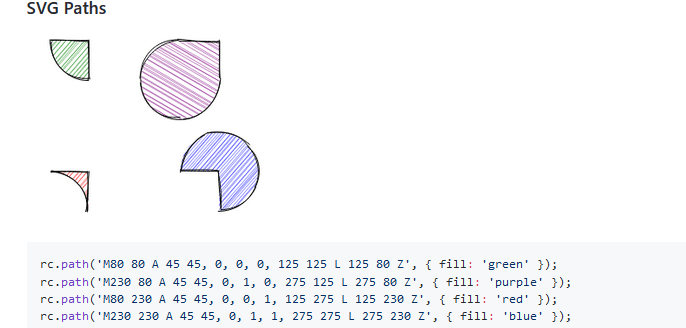
    推荐理由:这个JavaScript库可以让你画出手绘画风的图形,它也内置了诸如线段和椭圆这些可能常用到的图形,或者你也可以自己使用SVG路径去画自己想要的图形。如果你想要改变页面的画风,使用这个库将是不错的选择,目前已经有一些项目使用了这个库去改变它们的画风。

    手绘画风版贪吃蛇:https://www.aria.ai/snake.html


    今日推荐英文原文:《How to Create your own Text Adventure》作者:Julianna Stevenson

    原文链接:https://medium.com/@julianna.h.stevenson/how-to-create-your-own-text-adventure-12df36411b7f

    推荐理由:这篇文章介绍了如何使用Inform来制造一个文字游戏。制作一个文字游戏并不算难,它提供了很多可以自定义的地方,让你可以重温小时候写在记事本上文字游戏的感觉。

    How to Create your own Text Adventure

    Unlike most people my age, I didn’t grow up playing video games; I grew up playing text adventures, or interactive fiction.

    After exploring the dungeons of Zork, all 12 year old me wanted to do was to learn how to create my own game. Nine years later, I’ve finally accomplished that goal!

    Text adventures are a fun, creative way to tell interactive stories, and they’re easier to make than you think!

    Step 1: Download Inform

    Inform is a programming language made specifically for creating text adventures.

    It makes it easy for anyone to create their own, whether you know how to program or not. Unlike other programming languages, it’s mostly made of existing English words and grammar!

    Download the correct version of the software onto your computer!

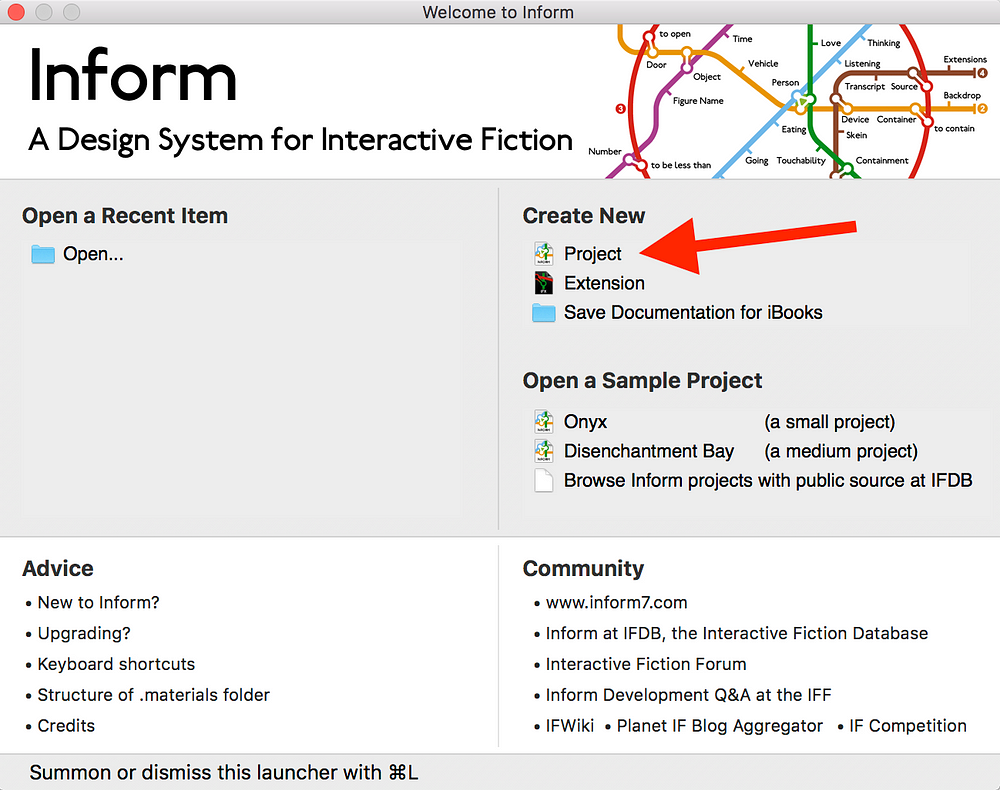
    Step 2: Open Inform and create a new project

    When you open Inform, you’ll see a welcome screen, like below. Click “Project” under “Create New” to start your text adventure. Give it a great name!

    Inform Welcome Menu

    Step 3: Create a room

    The bulk of writing text adventures in Inform relies on three ideas: objects, descriptions, and relationships.

    Every room, item, and person that is in your text adventure is defined as an object in the code. You make these objects come to life by providing descriptions of them and having them form relationships through actions.

    Inform will give you a little bit of code to start out with, including the definition of your first room. It has defined “Example Location” as a room using this line of code:

    Example Location is a room.

    However, “Example Location” is a really boring name for a room, so instead I’m going to make it my bedroom.

    Julianna's Bedroom is a room.

    Step 4: Run your code

    You might have guessed this already, but all you need to do to run your code is to press the big button in the top left corner that says go!

    Go button in Inform

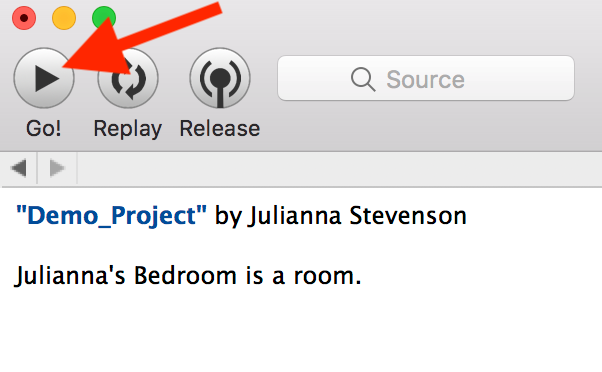
    After pressing run, your code will compile and run. It should look something like this:

    Running game

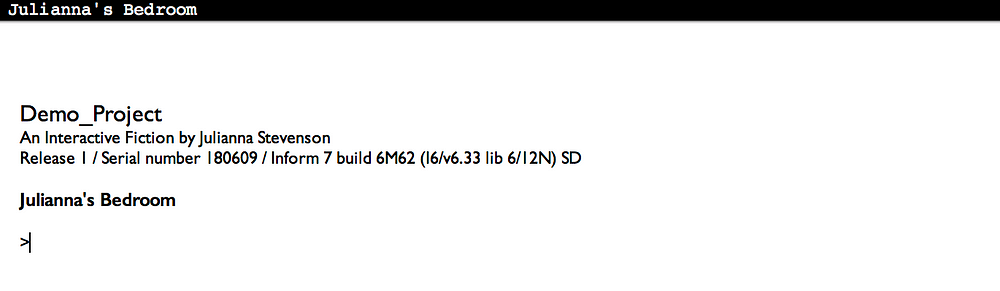
    Since Inform was made for creating text adventures, it already has a lot of the classic text adventure commands built in! Check out this site for some ideas of commands to try out.

    When you type in a command and press enter, the software will generate a response based on your code.

    You, the player, are an object in the game. Since you’re the only thing in the bedroom, all you can successfully do right now is interact with yourself (try “examine me,” “kiss me,” and “rub me” ?).

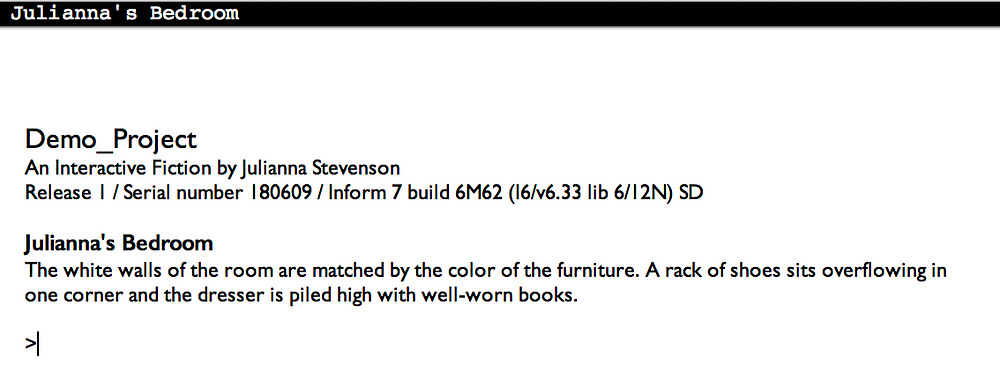
    Step 5: Add a room description

    Being by yourself in an empty room isn’t super fun, so the next step is to create your setting. Go back to your code and add a description to your room. This is how the room will be described to the player.

    For example, here is how I would define the description of my room:

    Julianna's Bedroom is a room. The description is "The white walls of the room are matched by the color of the furniture. A rack of shoes sits neatly in one corner and the dresser and bedside table are clear of dust.".

    The description can be as brief or long as you like.

    If you run your code again, you can see the description of your room!

    Step 6: Add an object

    Now the player can see things in the room, but they still can’t interact with anything!

    So, we’re going to add an object that the player can interact with. By default, players can pick up and drop any object that you put into the room.

    Since this is my bedroom and I like to read, I’m going to put a book in the middle of my bed. To create an object, you just need to mention what it’s called and what room it’s in. You can also add a blurb about the object that will be included in the room’s description.

    So, now my code reads

    Julianna's Bedroom is a room. The description is "The white walls of the room are matched by the color of the furniture. A rack of shoes sits neatly in one corner and the dresser and bedside table are clear of dust.".
    A book is in Julianna's Bedroom. "There is a book lying in the center of the bed."

    Instead of using the name of the specific room, you can also just use “here” to refer to the most recently defined room.

    Try running your code again. Now, you can pick up and drop your object!

    Step 7: Add another room

    Some text adventures will take place in one room, but most have multiple rooms for players to move through and explore! You can create another room the same way we created the first one — defining it and adding a description.

    Since my first room is a bedroom, I’m going to add a living room. To allow the player to move from one room to another, you have to define how the two rooms are located in relation to one another using cardinal directions.

    The Living Room is a room. The description is "This is a small room with a couch in the middle. On one wall there is a bookshelf.".
    The Living Room is east of Julianna's Bedroom.

    If I run my code and use the command “east” while I’m in the bedroom, I will move into the living room and if I use “west” while I’m in the living room, I’ll move back to the bedroom.

    Try it out for yourself!

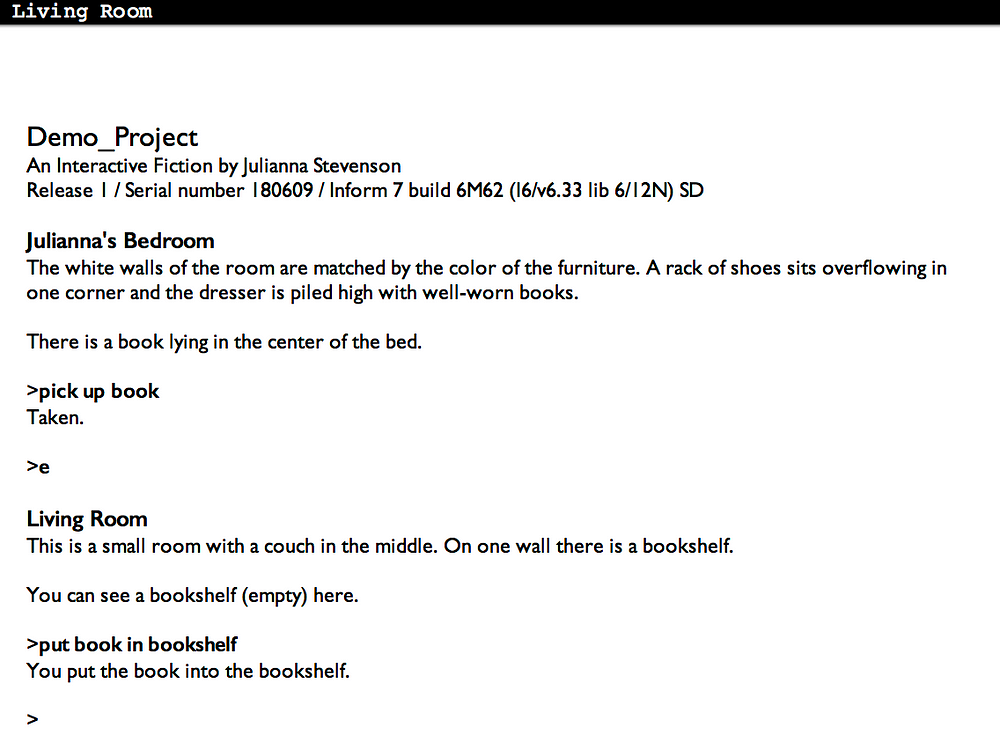
    Step 8: Make a container

    Since I have a book and a bookshelf, I want to be able to put my book onto the bookshelf. We can make this happen by creating a bookshelf object that is a container.

    A container is a special type of object that you can put other objects into.

    We can turn an object into a container using the phrase “is a container.”

    A bookshelf is a container in the Living Room.

    This line of code creates a bookshelf object in the living room and allows for things to be put inside of it.

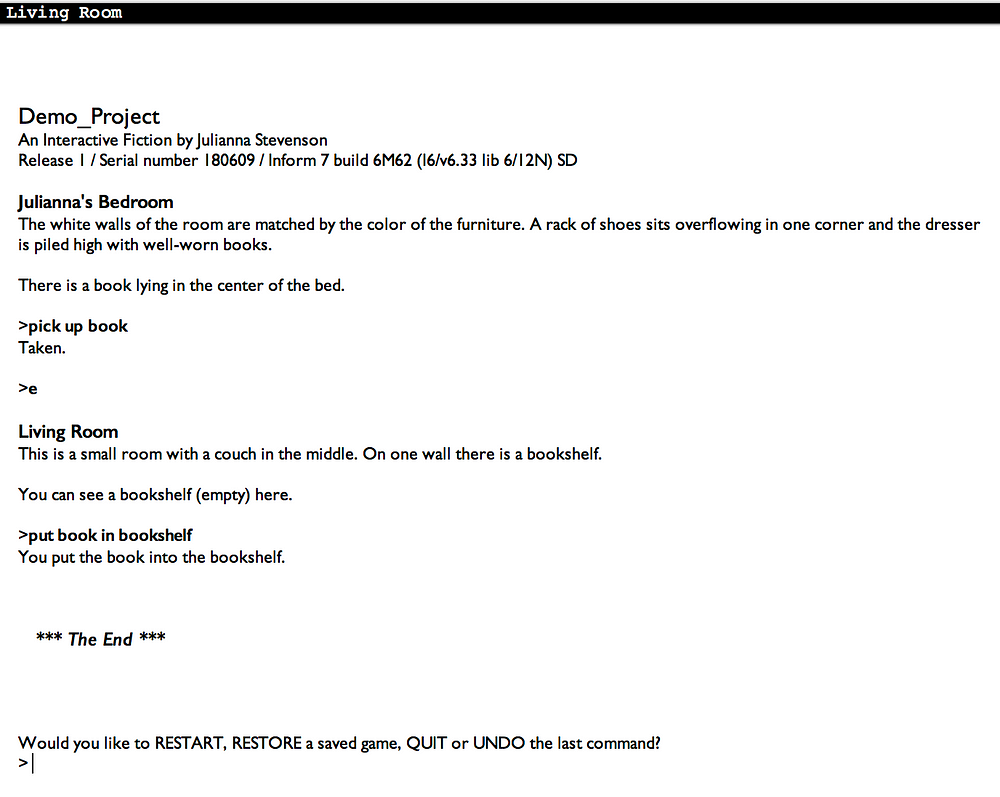
    To try it out, run the code and enter “pick up book” while you’re in the bedroom. Then, move to the living room and use the command “put book in bookshelf” to put the book on the bookshelf.

    Step 9: Make an end state

    No game is complete without and ending.

    To create an ending, we’re going to use a conditional statement to check if the book is in the bookshelf. If it is, we’ll end the game.

    We will want to check this condition every turn. This can be done with the following line of code:

    Every turn: if the book is in the bookshelf, end the story.

    Once you have an end condition, you can run and play the whole game! By default, after the game ends, the player will have the options to restart, restore a saved game, quit, or undo.

    Step 10: Keep adding on!

    This is just the start of what you can accomplish with Inform! You can create a whole text adventure with just the ideas from the steps above or you can dive deeper into what you can do with Inform!

    Check out Inform’s book for inspiration and more examples or the Interactive Fiction Database for lots of text adventures that you can play!

    Happy adventuring! ?

    Complete Code:

    "Demo_Project" by Julianna Stevenson
    Julianna's Bedroom is a room. The description is "The white walls of the room are matched by the color of the furniture. A rack of shoes sits neatly in one corner and the dresser and bedside table are clear of dust.".
    A book is in Julianna's Bedroom. "There is a book lying in the center of the bed."
    The Living Room is a room. The description is "This is a small room with a couch in the middle. On one wall there is a bookshelf.".
    The Living Room is east of Julianna's Bedroom.
    A bookshelf is a container in the Living Room.
    Every turn: if the book is in the bookshelf, end the story.

    每天推荐一个 GitHub 优质开源项目和一篇精选英文科技或编程文章原文,欢迎关注开源日报。交流QQ群:202790710;微博:https://weibo.com/openingsource;电报群 https://t.me/OpeningSourceOrg

  • 2018年6月14日:开源日报第98期

    14 6 月, 2018

    每天推荐一个 GitHub 优质开源项目和一篇精选英文科技或编程文章原文,欢迎关注开源日报。交流QQ群:202790710;微博:https://weibo.com/openingsource;电报群 https://t.me/OpeningSourceOrg


    今日推荐开源项目:《从 Python 开始的机器学习 Machine learning basics 》GitHub链接

    推荐理由:这个项目主要是介绍如何使用纯 Python 实现基本的机器学习算法,虽然这可能并不是最快的方法,但是可以让读者更好的理解算法和它们的结构。推荐刚刚开始学习机器学习算法的朋友们一读。


    今日推荐英文原文:《Build A Chat App With Sentiment Analysis Using Next.js》作者:Brandon Morelli

    原文链接:https://codeburst.io/build-a-chat-app-with-sentiment-analysis-using-next-js-c43ebf3ea643

    推荐理由:这篇文章制作一个简单的实时聊天程序的教程,同时还加入了通过词语进行情感分析的功能。虽然情感分析不算是太万能,不过也当作一个Next.js的试手也成。

    Build A Chat App With Sentiment Analysis Using Next.js

    Realtime applications have been around for quite a long time as we can see in contexts such as multi-player games, realtime collaboration services, instant messaging services, realtime data analytics tools, to mention a few. As a result, several technologies have been developed over the years to tackle and simplify some of the most challenging aspects of building apps that are sensitive to changes in realtime.

    In this tutorial, we’ll build a very simple realtime chat application with sentiments. With sentiment analysis, we will be able to detect the mood of a person based on the words they use in their chat messages.

    Prerequisites

    Before you begin, ensure that you have Node and npm or Yarn installed on your machine. Here is a run-down of the core technologies we will be using.

    1. Next.js — A framework for building server-side rendered(SSR) React applications with ease. It handles most of the challenges that come with building SSR React apps.
    2. Pusher — Pusher is a technology for building apps with varying realtime needs like push notifications and pub/sub messaging. It is the engine behind the realtime ability of our comments widget.
    3. Sentiment — Sentiment is a module that uses the AFINN-165 wordlist and Emoji Sentiment Ranking to perform sentiment analysis on arbitrary blocks of input text.
    4. React — A very popular JavaScript DOM rendering framework for building scalable web applications using a component-based architecture.
    5. A few other libraries will be used as we will see in a moment. Also ensure that you have Node installed on your machine.

    Installing dependencies

    Create a new directory for the application and run the following command to install the required dependencies for the app.

    # Create a new directory
        mkdir realtime-chat-app
        
        # cd into the new directory
        cd realtime-chat-app
        
        # Initiate a new package and install app dependencies
        npm init -y
        
        npm install react react-dom next pusher pusher-js sentiment
        npm install express body-parser cors dotenv axios

    Setting environment variables

    Create a new application on your Pusher Dashboard to get your application credentials. Create a .env file in the root directory of your application and add your application credentials as follows.

    PUSHER_APP_ID=YOUR_APP_ID
        PUSHER_APP_KEY=YOUR_APP_KEY
        PUSHER_APP_SECRET=YOUR_APP_SECRET
        PUSHER_APP_CLUSTER=YOUR_APP_CLUSTER

    Ensure that you use the same variable names as specified in the above snippet. We will make reference to them at several points in our code.

    Next create a Next.js configuration file named next.config.js in the root directory of your application with the following content:

    /* next.config.js */
        
        const webpack = require('webpack');
        require('dotenv').config();
        
        module.exports = {
          webpack: config => {
            const env = Object.keys(process.env).reduce((acc, curr) => {
              acc[`process.env.${curr}`] = JSON.stringify(process.env[curr]);
              return acc;
            }, {});
            
            config.plugins.push(new webpack.DefinePlugin(env));
            
            return config;
          }
        };

    Since Next.js uses Webpack in the background for module loading and bundling, we are simply configuring Webpack to be able to provide the environment variables we have defined and make them available to our React components by accessing the process.env object.

    Getting started

    Setting up the server

    We will go ahead to set up a simple server using Next.js to wrap an Express application server. We will also load the necessary middlewares for the Express server and then we will configure Pusher using the credentials we added to our environment variables.

    Create a server.js file in the root directory of your application and add the following code snippet to it to set up the server:

    /* server.js */
        
        const cors = require('cors');
        const next = require('next');
        const Pusher = require('pusher');
        const express = require('express');
        const bodyParser = require('body-parser');
        const dotenv = require('dotenv').config();
        const Sentiment = require('sentiment');
        
        const dev = process.env.NODE_ENV !== 'production';
        const port = process.env.PORT || 3000;
        
        const app = next({ dev });
        const handler = app.getRequestHandler();
        const sentiment = new Sentiment();
        
        // Ensure that your pusher credentials are properly set in the .env file
        // Using the specified variables
        const pusher = new Pusher({
          appId: process.env.PUSHER_APP_ID,
          key: process.env.PUSHER_APP_KEY,
          secret: process.env.PUSHER_APP_SECRET,
          cluster: process.env.PUSHER_APP_CLUSTER,
          encrypted: true
        });
        
        app.prepare()
          .then(() => {
          
            const server = express();
            
            server.use(cors());
            server.use(bodyParser.json());
            server.use(bodyParser.urlencoded({ extended: true }));
            
            server.get('*', (req, res) => {
              return handler(req, res);
            });
            
            server.listen(port, err => {
              if (err) throw err;
              console.log(`> Ready on http://localhost:${port}`);
            });
            
          })
          .catch(ex => {
            console.error(ex.stack);
            process.exit(1);
          });

    Modify npm scripts

    Finally, we will modify the "scripts" section of the package.json file to look like the following snippet:

    /* package.json */
        
        "scripts": {
          "dev": "node server.js",
          "build": "next build",
          "start": "NODE_ENV=production node server.js"
        }

    We have gotten all we need to start building our app components. If you run the command npm run dev on your terminal now, it will start up the application server on port 3000 if it is available. However, nothing happens on the browser yet, because we have not built any index page component. Let’s start building the app components.

    Building the index page

    Next.js requires that you create the page components of your app in a pages directory. We will go ahead and create a pages directory in our app root directory and create a new index.js file inside it for the index page of our application.

    Before we add content to the index page, we will build a Layout component that can be used in our app pages as a kind of template. Go ahead and create a components directory in your app root. Create a new Layout.js file inside the just created components directory with the following content:

    /* components/Layout.js */
        
        import React, { Fragment } from 'react';
        import Head from 'next/head';
        
        const Layout = props => (
          <Fragment>
            <Head>
              <meta charSet="utf-8" />
              <meta name="viewport" content="width=device-width, initial-scale=1, shrink-to-fit=no" />
              <link rel="stylesheet" href="https://maxcdn.bootstrapcdn.com/bootstrap/4.0.0/css/bootstrap.min.css" integrity="sha384-Gn5384xqQ1aoWXA+058RXPxPg6fy4IWvTNh0E263XmFcJlSAwiGgFAW/dAiS6JXm" crossOrigin="anonymous" />
              <title>{props.pageTitle || 'Realtime Chat'}</title>
            </Head>
            {props.children}
          </Fragment>
        );
        
        export default Layout;

    Here, we try not to do so much. We are simply using the next/head component to add meta information to the <head> of our pages. We have also added a link to the Bootstrap CDN file to add some default styling to our app. We are also setting the page title dynamically from props and rendering the page contents using {props.children}.

    Now let’s go ahead and add content to the index.js file we created earlier:

    /* pages/index.js */
        
        import React, { Component } from 'react';
        import Layout from '../components/Layout';
        
        class IndexPage extends Component {
        
          state = { user: null }
          
          handleKeyUp = evt => {
            if (evt.keyCode === 13) {
              const user =  evt.target.value;
              this.setState({ user });
            }
          }
          
          render() {
            const { user } = this.state;
            
            const nameInputStyles = {
              background: 'transparent',
              color: '#999',
              border: 0,
              borderBottom: '1px solid #666',
              borderRadius: 0,
              fontSize: '3rem',
              fontWeight: 500,
              boxShadow: 'none !important'
            };
            
            return (
              <Layout pageTitle="Realtime Chat">
              
                <main className="container-fluid position-absolute h-100 bg-dark">
                
                  <div className="row position-absolute w-100 h-100">
                  
                    <section className="col-md-8 d-flex flex-row flex-wrap align-items-center align-content-center px-5">
                      <div className="px-5 mx-5">
                      
                        <span className="d-block w-100 h1 text-light" style={{marginTop: -50}}>
                          {
                            user
                              ? (<span>
                                  <span style={{color: '#999'}}>Hello!</span> {user}
                                </span>)
                              : `What is your name?`
                          }
                        </span>
                        
                        { !user && <input type="text" className="form-control mt-3 px-3 py-2" onKeyUp={this.handleKeyUp} autoComplete="off" style={nameInputStyles} /> }
                        
                      </div>
                    </section>
                    
                    <section className="col-md-4 position-relative d-flex flex-wrap h-100 align-items-start align-content-between bg-white px-0"></section>
                    
                  </div>
                  
                </main>
                
              </Layout>
            );
          }
          
        }
        
        export default () => (
          <IndexPage />
        );

    We created a component IndexPage for the index page of our app. We initialized the state of the component with an empty name property. The name property is meant to contain the name of the currently active user.

    We also added an input field to receive the name of the user, if no user is currently active. Once the input field is filled and the enter or return key is pressed, the name supplied is stored in state.

    If we test the app on our browser now, we should see a screen that looks like the following screenshot:

    Building the Chat component

    We will go ahead and build the chat component. Create a new Chat.js file inside the components directory and add the following content:

    /* components/Chat.js */
        
        import React, { Component, Fragment } from 'react';
        import axios from 'axios';
        import Pusher from 'pusher-js';
        
        class Chat extends Component {
        
          state = { chats: [] }
          
          componentDidMount() {
          
            this.pusher = new Pusher(process.env.PUSHER_APP_KEY, {
              cluster: process.env.PUSHER_APP_CLUSTER,
              encrypted: true
            });
            
            this.channel = this.pusher.subscribe('chat-room');
            
            this.channel.bind('new-message', ({ chat = null }) => {
              const { chats } = this.state;
              chat && chats.push(chat);
              this.setState({ chats });
            });
            
            this.pusher.connection.bind('connected', () => {
              axios.post('/messages')
                .then(response => {
                  const chats = response.data.messages;
                  this.setState({ chats });
                });
            });
            
          }
          
          componentWillUnmount() {
            this.pusher.disconnect();
          }
          
        }
        
        export default Chat;

    Here is a simple break down of what we’ve done:

    1. We first initialized the state to contain an empty chats array property. This chats property will be populated with chat messages as they keep coming. When the component mounts, we set up a Pusher connection and channelsubscription inside the componentDidMount() lifecycle method.
    2. You can see that we are subscribing to a Pusher channel called chat-room for our chat application. We are then binding to the new-message event on the channel, which is triggered when a new chat message comes in. Next, we simply populate the state chats property by appending the new chat.
    3. Also, on the componentDidMount() method, we are binding to the connected event on the Pusher client, when it is freshly connected, to fetch all the chat messages from history by making a POST /messages HTTP request using the axios library. Afterwards, we populate the state chats property with the chat messages received in the response.
    4. The Chat component is not completed yet. We still need to add a render() method. Let’s do that quickly. Add the following snippet to the Chat component class.
    /* components/Chat.js */
          
        handleKeyUp = evt => {
          const value = evt.target.value;
          
          if (evt.keyCode === 13 && !evt.shiftKey) {
            const { activeUser: user } = this.props;
            const chat = { user, message: value, timestamp: +new Date };
            
            evt.target.value = '';
            axios.post('/message', chat);
          }
        }
        
        render() {
          return (this.props.activeUser && <Fragment>
          
            <div className="border-bottom border-gray w-100 d-flex align-items-center bg-white" style={{ height: 90 }}>
              <h2 className="text-dark mb-0 mx-4 px-2">{this.props.activeUser}</h2>
            </div>
            
            <div className="border-top border-gray w-100 px-4 d-flex align-items-center bg-light" style={{ minHeight: 90 }}>
              <textarea className="form-control px-3 py-2" onKeyUp={this.handleKeyUp} placeholder="Enter a chat message" style={{ resize: 'none' }}></textarea>
            </div>
            
          </Fragment> )
        }

    As seen in the render() method, we require an activeUser prop to identify the currently active user. We also rendered a <textarea> element for entering a chat message. We added an onKeyUp event handler to the <textarea> to send the chat message when you press the enter or return button.

    On the handleKeyUp() event handler, we construct a chat object containing the user sending the message (currently active user), the message itself, and then the timestamp for when the message was sent. We clean up the <textarea>and then make a POST /message HTTP request, passing the chat object we created as payload.

    Let’s add the Chat component to our index page. First, add the following line to the import statements in the pages/index.js file.

    /* pages/index.js */
        
        // other import statements here ...
        import Chat from '../components/Chat';

    Next, locate the render() method of the IndexPage component. Render the Chat component in the empty <section>element. It should look like the following snippet:

    /* pages/index.js */
        
        <section className="col-md-4 position-relative d-flex flex-wrap h-100 align-items-start align-content-between bg-white px-0">
          { user && <Chat activeUser={user} /> }
        </section>

    You can reload the app now in your browser to see the changes.

    Defining the messaging routes

    For now, nothing really happens when you try to send a chat message. You don’t see any message or any chat history. This is because we have not implemented the two routes we are making requests to.

    We will go ahead and create the /message and /messages routes. Modify the server.js file and add the following just before the call to server.listen() inside the then() callback function.

    /* server.js */
        
        // server.get('*') is here ...
        
        const chatHistory = { messages: [] };
        
        server.post('/message', (req, res, next) => {
          const { user = null, message = '', timestamp = +new Date } = req.body;
          const sentimentScore = sentiment.analyze(message).score;
          
          const chat = { user, message, timestamp, sentiment: sentimentScore };
          
          chatHistory.messages.push(chat);
          pusher.trigger('chat-room', 'new-message', { chat });
        });
        
        server.post('/messages', (req, res, next) => {
          res.json({ ...chatHistory, status: 'success' });
        });
        
        // server.listen() is here ...

    First, we created a kind of in-memory store for our chat history, to store chat messages in an array. This is useful for new clients that join the chat room to see previous messages. Whenever the Pusher client makes a POST request to the /messages endpoint on connection, it gets all the messages in the chat history in the returned response.

    On the POST /message route, we are fetching the chat payload from req.body through the help of the body-parsermiddleware we added earlier. We then use the sentiment module to calculate the overall sentiment score of the chat message. Next, we reconstruct the chat object, adding the sentiment property containing the sentiment score.

    Finally, we add the chat to the chat history messages, and then trigger a new-message event on the chat-room Pusher channel, passing the chat object in the event data. This does the real time magic.

    We are just a few steps away from completing our chat application. If you load the app on your browser now and try sending a chat message, you don’t see any feedback yet. That’s not because our app is not working. It is working perfectly. It’s simply because we are not yet rendering the chat messages on the view. Let’s head on to that and finish this up.

    Displaying the chat messages

    Create a new ChatMessage.js file inside the components directory and add the following content to it.

    /* components/ChatMessage.js */
        
        import React, { Component } from 'react';
        
        class ChatMessage extends Component {
        
          render() {
            const { position = 'left', message } = this.props;
            const isRight = position.toLowerCase() === 'right';
            
            const align = isRight ? 'text-right' : 'text-left';
            const justify = isRight ? 'justify-content-end' : 'justify-content-start';
            
            const messageBoxStyles = {
              maxWidth: '70%',
              flexGrow: 0
            };
            
            const messageStyles = {
              fontWeight: 500,
              lineHeight: 1.4,
              whiteSpace: 'pre-wrap'
            };
            
            return <div className={`w-100 my-1 d-flex ${justify}`}>
              <div className="bg-light rounded border border-gray p-2" style={messageBoxStyles}>
                <span className={`d-block text-secondary ${align}`} style={messageStyles}>
                  {message}
                </span>
              </div>
            </div>
          }
          
        }
        
        export default ChatMessage;

    The ChatMessage component is a very simple component requiring two props: message for the chat message and position for the positioning of the message – either right or left. This is useful for positioning the messages of the active user on one side and then the messages of other users on the other side as we would do in a moment.

    Finally, we will modify the components/Chat.js file to render the chat messages from the state. Make the following changes to the Chat component.

    First add the following constants before the class definition of the Chat component. Each constant is an array of the code points required for a particular sentiment emoji. Also ensure to import the ChatMessage component.

    /* components/Chat.js */
        
        // Module imports here ...
        import ChatMessage from './ChatMessage';
        
        const SAD_EMOJI = [55357, 56864];
        const HAPPY_EMOJI = [55357, 56832];
        const NEUTRAL_EMOJI = [55357, 56848];
        
        // Chat component class here ...

    Then, add the following snippet between the chat header <div> and the chat message box <div> we created earlier in the Chat component.

    /* components/Chat.js */
        
        {/** CHAT HEADER HERE **/}
        
        <div className="px-4 pb-4 w-100 d-flex flex-row flex-wrap align-items-start align-content-start position-relative" style={{ height: 'calc(100% - 180px)', overflowY: 'scroll' }}>
        
          {this.state.chats.map((chat, index) => {
          
            const previous = Math.max(0, index - 1);
            const previousChat = this.state.chats[previous];
            const position = chat.user === this.props.activeUser ? "right" : "left";
            
            const isFirst = previous === index;
            const inSequence = chat.user === previousChat.user;
            const hasDelay = Math.ceil((chat.timestamp - previousChat.timestamp) / (1000 * 60)) > 1;
            
            const mood = chat.sentiment > 0 ? HAPPY_EMOJI : (chat.sentiment === 0 ? NEUTRAL_EMOJI : SAD_EMOJI);
            
            return (
              <Fragment key={index}>
              
                { (isFirst || !inSequence || hasDelay) && (
                  <div className={`d-block w-100 font-weight-bold text-dark mt-4 pb-1 px-1 text-${position}`} style={{ fontSize: '0.9rem' }}>
                    <span className="d-block" style={{ fontSize: '1.6rem' }}>
                      {String.fromCodePoint(...mood)}
                    </span>
                    <span>{chat.user || 'Anonymous'}</span>
                  </div>
                ) }
                
                <ChatMessage message={chat.message} position={position} />
                
              </Fragment>
            );
            
          })}
          
        </div>
        
        {/** CHAT MESSAGE BOX HERE **/}

    Let’s try to understand what this code snippet is doing. First, we are going through each chat object in the state chatsarray property. We check if the sender of the message is the same as the currently active user and use that to determine the position of the displayed chat message. As you can see, the active user’s messages will appear on the right.

    We also use the sentiment score in the chat object to set the mood of the user while typing the message to either happy, sad or neutral using the earlier defined constants.

    We conditionally render the name of the user before the chat message based on one of the following conditions being met.

    1. isFirst – the current chat message is the first in the list
    2. !inSequence – the current chat message directly follows a message from another user
    3. hasDelay – the current chat message has a delay of over 1 minute from the previous message of the same user
    4. Also notice how we are using the [String.fromCodePoint()](https://developer.mozilla.org/en-US/docs/Web/JavaScript/Reference/Global_Objects/String/fromCodePoint) method added in ES6 to get the emoji from the code points we defined in our constants earlier.

    We are finally done with our chat app. You can go ahead to test what you have built on your browser. Here are some screenshots showing a chat between 9lad, Steve and Bob.

    9lad

    Steve

    Bob

    Conclusion

    In this tutorial, we have been able to build a very simple chat application with chat sentiment using Next.js (React), Pusher and Sentiment Node module. While this tutorial focuses on just the basics, there are a lot of advanced stuffs you can do to make a better chat app. You can check the source code of this tutorial on GitHub.

    Do check the documentation for each technology we used in this project to learn more about other ways of using them. I hope that this tutorial is helpful for you!


    每天推荐一个 GitHub 优质开源项目和一篇精选英文科技或编程文章原文,欢迎关注开源日报。交流QQ群:202790710;微博:https://weibo.com/openingsource;电报群 https://t.me/OpeningSourceOrg

  • 2018年6月13日:开源日报第97期

    13 6 月, 2018

    每天推荐一个 GitHub 优质开源项目和一篇精选英文科技或编程文章原文,欢迎关注开源日报。交流QQ群:202790710;微博:https://weibo.com/openingsource;电报群 https://t.me/OpeningSourceOrg


    今日推荐开源项目:《即时回复论坛 Spectrum》GitHub链接

    推荐理由:这个社区采用了传统论坛发帖模式和聊天工具相结合的方法,使用户能够像回复QQ或者微信一样去回复论坛上的消息。同时为了方便管理社区,管理者还能查到社区的用户增长情况和参与度,以及哪些类型的帖子最热门等等诸如此类的数据。兴许这种结合即时回复与传统发帖模式的论坛在以后会成为主流。


    今日推荐英文原文:《12 fiction books for Linux and open source fans》作者:Jen Wike Huger

    原文链接:https://opensource.com/article/18/6/fiction-book-list

    推荐理由:今天的主题不是技术而是小说,这篇文章推荐了兴许对开源和Linux感兴趣的人会喜欢的小说。实际上,不管你是不是对开源和Linux感兴趣,你都可以来看看这些小说,兴许它们中有能够吸引你的也说不定。

    12 fiction books for Linux and open source fans

    For this book list, I reached out to our writer community to ask which fiction books they would recommend to their peers. What I love about this question and the answers that follow is this list gives us a deeper look into their personalities. Fiction favorites are unlike non-fiction recommendations in that your technical skills and interests may have an influence on what you like to read read, but it’s much more about your personality and life experiences that draw you to pick out, and love, a particular fiction book.

    These people are your people. I hope you find something interesting to add to your reading list.

    Ancillary Justice by Annie Leckie

    Open source is all about how one individual can start a movement. Somehow at the same time, it’s about the power of a voluntary collective moving together towards a common goal. Ancillary Justice makes you ponder both concepts.

    This book is narrated by Breq, who is an “ancillary,” an enslaved human body that was grafted into the soul of a warship. When that warship was destroyed, Breq kept all the ship’s memories and its identity but then had to live in a single body instead of thousands. In spite of the huge change in her power, Breq has a cataclysmic influence on all around her, and she inspires both loyalty and love. She may have once been enslaved to an AI, but now that she is free, she is powerful. She learns to adapt to exercising her free will, and the decisions she makes changes her and the world around her. Breq pushes for openness in the rigid Radch, the dominant society of the book. Her actions transform the Radch into something new.

    Ancillary Justice is also about language, loyalty, sacrifice, and the disastrous effects of secrecy. Once you’ve read this book, you will never feel the same about what makes someone or something human. What makes you YOU? Can who you are really be destroyed while your body still lives?

    Like the open source movement, Ancillary Justice makes you think and question the status quo of the novel and of the world around you. Read it. (Recommendation and review by Ingrid Towey)

    Cryptonomicon by Neal Stephenson

    Set during WWII and the present day, or near future at the time of writing, Cryptonomicon captures the excitement of a startup, the perils of war, community action against authority, and the perils of cryptography. It’s a book to keep coming back to, as it has multiple layers and combines a techy outlook with intrigue and a decent love story. It does a good job of asking interesting questions like “is technology always an unbounded good?” and of making you realise that the people of yesterday were just a clever, and human, as we are today. (Recommendation and review by Mike Bursell)

    Daemon by Daniel Suarez

    Daemon is the first in a two-part series that details the events that happen when a computer daemon (process) is awakened and wreaks havoc on the world. The story is an exciting thriller that borders on creepy due to the realism in how the technology is portrayed, and it outlines just how dependent we are on technology. (Recommendation and review by Jay LaCroix)

    Going Postal by Terry Pratchett

    This book is a good read for Linux and open source enthusiasts because of the depth and relatability of characters; the humor and the unique outsider narrating that goes into the book. Terry Pratchett books are like Jim Henson movies: fiercely creative, appealing to all but especially the maker, tinkerer, hacker, and those daring to dream.

    The main character is a chancer, a fly-by-night who has never considered the results of their actions. They are not committed to anything, have never formed real (non-monetary) connections. The story follows on from the outcomes of their actions, a tale of redemption taking the protagonists on an out-of-control adventure. It’s funny, edgy and unfamiliar, much like the initial 1990’s introduction to Linux was for me. (Recommendation and review by Lewis Cowles)

    Microserfs by Douglas Coupland

    Anyone who lived through the dotcom bubble of the 1990’s will identify with this heartwarming tale of a young group of Microsoft engineers who end up leaving the company for a startup, moving to Silicon Valley, and becoming each other’s support through life, death, love, and loss.

    There is a lot of humor to be found in this book, like in line this line: “This is my computer. There are many like it, but this one is mine…” This revision of the original comes from the Rifleman’s Creed: “This is my rifle. There are many like it…”

    If you’ve ever spent 16 hours a day coding, while fueling yourself with Skittles and Mountain Dew, this story is for you. (Recommendation and review by Jet Anderson)

    Open Source by M. M. Frick

    Casey Shenk is a vending-machine technician from Savannah, Georgia by day and blogger by night. Casey’s keen insights into the details of news reports, both true and false, lead him to unravel a global plot involving arms sales, the Middle East, Russia, Israel and the highest levels of power in the United States. Casey connects the pieces using “Open Source Intelligence,” which is simply reading and analyzing information that is free and open to the public.

    I bought this book because of the title, just as I was learning about open source, three years ago. I thought this would be a book on open source fiction. Unfortunately, the book has nothing to do with open source as we define it. I had hoped that Casey would use some open source tools or open source methods in his investigation, such as Wireshark or Maltego, and write his posts with LibreOffice, WordPress and such. However, “open source” simply refers to the fact that his sources are “open.”

    Although I was disappointed that this book was not what I expected, Frick, a Navy officer, packed the book with well-researched and interesting twists and turns. If you are looking for a book that involves Linux, command lines, GitHub, or any other open source elements, then this is not the book for you. (Recommendation and review by Jeff Macharyas)

    The Tao of Pooh by Benjamin Hoff

    Linux and the open source ethos is a way of approaching life and getting things done that relies on both the individual and collective goodwill of the community it serves. Leadership and service are ascribed by individual contribution and merit rather than arbitrary assignment of value in traditional hierarchies. This is the natural way of getting things done. The power of open source is its authentic gift of self to a community of developers and end users. Being a part of such a community of developers and contributors invites to share their unique gift with the wider world. In Tao of Poo, Hoff celebrates that unique gift of self, using the metaphor of Winnie the Pooh wed with Taoist philosophy. (Recommendation and review by Don Watkins)

    The Golem and the Jinni by Helene Wecker

    The eponymous otherworldly beings accidentally find themselves in New York City in the early 1900s and have to restart their lives far from their homelands. It’s rare to find a book with such an original premise, let alone one that can follow through with it so well and with such heart. (Recommendation and review by VM Brasseur)

    The Rise of the Meritocracy by Michael Young

    Meritocracy—one of the most pervasive and controversial notions circulating in open source discourses—is for some critics nothing more than a quaint fiction. No surprise for them, then, that the term originated there. Michael Young’s dystopian science fiction novel introduced the term into popular culture in 1958; the eponymous concept characterizes a 2034 society entirely bent on rewarding the best, the brightest, and the most talented. “Today we frankly recognize that democracy can be no more than aspiration, and have rule not so much by the people as by the cleverest people,” writes the book’s narrator in this pseudo-sociological account of future history,”not an aristocracy of birth, not a plutocracy of wealth, but a true meritocracy of talent.”

    Would a truly meritocratic society work as intended? We might only imagine. Young’s answer, anyway, has serious consequences for the fictional sociologist. (Recommendation and review by Bryan Behrenshausen)

    Throne of the Crescent Moon by Saladin Ahmed

    The protagonist, Adulla, is a man who just wants to retire from ghul hunting and settle down, but the world has other plans for him. Accompanied by his assistant and a vengeful young warrior, they set off to end the ghul scourge and find their revenge. While it sounds like your typical fantasy romp, the Middle Eastern setting of the story sets it apart while the tight and skillful writing of Ahmed pulls you in. (Recommendation and review by VM Brasseur)

    Walkaway by Cory Doctorow

    It’s hard to approach this science fiction book because it’s so different than other science fiction books. It’s timely because in an age of rage―producing a seemingly endless parade of dystopia in fiction and in reality―this book is hopeful. We need hopeful things. Open source fans would like it because the reason it is hopeful is because of open, shared technology. I don’t want to give too much away, but let’s just say this book exists in a world where advanced 3D printing is so mainstream (and old) that you can practically 3D print anything. Basic needs of Maslow’s hierarchy are essentially taken care of, so you’re left with human relationships.

    “You wouldn’t steal a car” turns into “you can fork a house or a city.” This creates a present that can constantly be remade, so the attachment to things becomes practically unnecessary. Thus, people can―and do―just walk away. This wonderful (and complicated) future setting is the ever-present reality surrounding a group of characters, their complicated relationships, and a complex class struggle in a post-scarcity world.

    Best book I’ve read in years. Thanks, Cory! (Recommendation and review by Kyle Conway)

    Who Moved My Cheese? by Spencer Johnson

    The secret to success for leading open source projects and open companies is agility and motivating everyone to move beyond their comfort zones to embrace change. Many people find change difficult and do not see the advantage that comes from the development of an agile mindset. This book is about the difference in how mice and people experience and respond to change. It’s an easy read and quick way to expand your mind and think differently about whatever problem you’re facing today. (Recommendation and review by Don Watkins)


    每天推荐一个 GitHub 优质开源项目和一篇精选英文科技或编程文章原文,欢迎关注开源日报。交流QQ群:202790710;微博:https://weibo.com/openingsource;电报群 https://t.me/OpeningSourceOrg

  • 2018年6月12日:开源日报第96期

    12 6 月, 2018

    每天推荐一个 GitHub 优质开源项目和一篇精选英文科技或编程文章原文,欢迎关注开源日报。交流QQ群:202790710;微博:https://weibo.com/openingsource;电报群 https://t.me/OpeningSourceOrg


    今日推荐开源项目:《简单高亮库 Driver.js》GitHub链接

    推荐理由:这个库可以让你去高亮某个元素,顺便用各种方法弹出个对话气泡也一样没问题。虽然大部分时候你可能不太需要这个,但是如果你想做个教程之类的或者弄个别的什么比如关灯特效的话,有了这个库肯定能够做的更好更方便。


    今日推荐英文原文:《Algorithms in C++》作者:Vadim Smolyakov

    原文链接:https://towardsdatascience.com/algorithms-in-c-62b607a6131d

    推荐理由:这篇文章顾名思义肯定是讲了 C++ 中的算法的,诸如完全搜索和贪婪算法这些都有介绍,还介绍了不太常见的动态编程,适合正在学习 C++ 的朋友们一看

    Algorithms in C++

    Introduction

    The purpose of this article is to introduce the reader to four main algorithmic paradigms: complete search, greedy algorithms, divide and conquer, and dynamic programming. Many algorithmic problems can be mapped into one of these four categories and the mastery of each one will make you a better programmer.

    This article is written from the perspective of competitive programming. In the reference section, you’ll find resources to get you started or improve your programming skills through coding competitions.

    Complete Search

    Complete search (aka brute force or recursive backtracking) is a method for solving a problem by traversing the entire search space in search of a solution. During the search we can prune parts of the search space that we are sure do not lead to the required solution. In programming contests, complete search will likely lead to Time Limit Exceeded (TLE), however, it’s a good strategy for small input problems.

    Complete Search Example: 8 Queens Problem

    Our goal is to place 8 queens on a chess board such that no two queens attack each other. In the most naive solution, we would need to enumerate 64 choose 8 ~ 4B possibilities. A better naive solution is to realize that we can put each queen in a separate column, which leads to 8⁸~17M possibilities. We can do better by placing each queen in a separate column and a separate row that results in 8!~40K valid row permutations. In the implementation below, we assume that each queen occupies a different column, and we compute a valid row number for each of the 8 queens.

    #include <cstdlib>
    #include <cstdio>
    #include <cstring>
    using namespace std;
    //row[8]: row # for each queen
    //TC: traceback counter
    //(a, b): 1st queen placement at (r=a, c=b)
    int row[8], TC, a, b, line_counter;
    bool place(int r, int c)
    {   
        // check previously placed queens 
        for (int prev = 0; prev < c; prev++) 
        { 
            // check if same row or same diagonal
            if (row[prev] == r || (abs(row[prev] — r) == abs(prev — c)))
                return false; 
        }
        return true;
    }
    void backtrack(int c)
    {
        // candidate solution; (a, b) has 1 initial queen
        if (c == 8 && row[b] == a) 
        { 
            printf(“%2d %d”, ++line_counter, row[0] + 1); 
            for (int j=1; j < 8; j++) {printf(“ %d”, row[j] + 1);}    
            printf(“\n”);
        }
        //try all possible rows 
        for (int r = 0; r < 8; r++)
        {
            if (place(r, c))
            {
                row[c] = r; // place a queen at this col and row   
                backtrack(c + 1); //increment col and recurse
            }
        }
    }
    int main() 
    {
         scanf(“%d”, &TC); 
         while (TC--) 
         { 
            scanf(“%d %d”, &a, &b); a--; b--; //0-based indexing    
            memset(row, 0, sizeof(row)); line_counter = 0;
            printf(“SOLN COLUMN\n”);
            printf(“ # 1 2 3 4 5 6 7 8\n\n”);
            backtrack(0); //generate all possible 8! candidate solutions    
            if (TC) printf(“\n”);
         }
         return 0;
    }

    For TC=8 and an initial queen position at (a,b) = (1,1) the above code results in the following output:

    SOLN       COLUMN
     #    1 2 3 4 5 6 7 8
     1    1 5 8 6 3 7 2 4
     2    1 6 8 3 7 4 2 5
     3    1 7 4 6 8 2 5 3
     4    1 7 5 8 2 4 6 3

    which indicates that there are four possible placements given the initial queen position at (r=1,c=1). Notice that the use of recursion allows to more easily prune the search space in comparison to an iterative solution.

    Greedy Algorithms

    A greedy algorithm takes a locally optimum choice at each step with the hope of eventually reaching a globally optimal solution. Greedy algorithms often rely on a greedy heuristic and one can often find examples in which greedy algorithms fail to achieve the global optimum.

    Greedy Example: Fractional Knapsack

    A greedy knapsack problem consists of selecting what items to place in a knapsack of limited capacity W so as to maximize the total value of knapsack items, where each item has an associated weight and value. We can define a greedy heuristic to be a ratio of item value to item weight, i.e. we would like to greedily choose items that are simultaneously high value and low weight and sort the items based on this criteria. In the fractional knapsack problem, we are allowed to take fractions of an item (as opposed to 0–1 Knapsack).

    #include <iostream>
    #include <algorithm>
    using namespace std;
    struct Item{
        int value, weight;
        Item(int value, int weight) : value(value), weight(weight) {}
    };
    bool cmp(struct Item a, struct Item b){ 
        double r1 = (double) a.value / a.weight; 
        double r2 = (double) b.value / b.weight; 
        return r1 > r2;
    }
    double fractional_knapsack(int W, struct Item arr[], int n)
    {
        sort(arr, arr + n, cmp);
        int cur_weight = 0; double tot_value = 0.0;
        for (int i=0; i < n; ++i) 
        { 
            if (cur_weight + arr[i].weight <= W) 
            {
                cur_weight += arr[i].weight;
                tot_value += arr[i].value;
            }   
            else 
            {   //add a fraction of the next item
                int rem_weight = W — cur_weight;
                tot_value += arr[i].value * 
                            ((double) rem_weight / arr[i].weight);                     
                break;
            }
        } 
        return tot_value;
    }
    int main()
    { 
        int W = 50; // total knapsack weight
        Item arr[] = {{60, 10}, {100, 20}, {120, 30}}; //{value, weight}
        int n = sizeof(arr) / sizeof(arr[0]); 
        cout << “greedy fractional knapsack” << endl; 
        cout << “maximum value: “ << fractional_knapsack(W, arr, n);
        cout << endl; 
        return 0;
    }

    Since sorting is the most expensive operation, the algorithm runs in O(n log n) time. Given (value, weight) pairs of three items: {(60, 10), (100, 20), (120, 30)}, and the total capacity W=50, the code above produces the following output:

    greedy fractional knapsack
    maximum value: 240

    We can see that the input items are sorted in decreasing ratio of value / cost, after greedily selecting items 1 and 2, we take a 2/3 fraction of item 3 for a total value of 60+100+(2/3)120 = 240.

    Divide and Conquer

    Divide and Conquer (D&C) is a technique that divides a problem into smaller, independent sub-problems and then combines solutions to each of the sub-problems.

    Examples of divide and conquer technique include sorting algorithms such as quick sort, merge sort and heap sort as well as binary search.

    D&C Example: Binary Search

    The classic use of binary search is in searching for a value in a sorted array. First, we check the middle of the array to see if if contains what we are looking for. If it does or there are no more items to consider, we stop. Otherwise, we decide whether the answer is to the left or the right of the middle element and continue searching. As the size of the search space is halved after each check, the complexity of the algorithm is O(log n).

    #include <algorithm>
    #include <vector>
    #include <iostream>
    using namespace std;
    int bsearch(const vector<int> &arr, int l, int r, int q)
    { 
        while (l <= r) 
        {
            int mid = l + (r-l)/2;
            if (arr[mid] == q) return mid; 
            
            if (q < arr[mid]) { r = mid — 1; } 
            else              { l = mid + 1; }
        }
        return -1; //not found
    }
    int main()
    {
        int query = 10; 
        int arr[] = {2, 4, 6, 8, 10, 12};
        int N = sizeof(arr)/sizeof(arr[0]);
        vector<int> v(arr, arr + N); 
        
        //sort input array
        sort(v.begin(), v.end());
        int idx;
        idx = bsearch(v, 0, v.size(), query);
        if (idx != -1)
            cout << "custom binary_search: found at index " << idx;    
        else 
            cout << "custom binary_search: not found";
        return 0;
    }

    The code above produces the following output:

    custom binary_search: found at index 4

    Note if the query element is not found but we would like to find the first entry not smaller than the query or the first entry greater than the query, we can use STL lower_bound and upper_bound.

    Dynamic Programming

    Dynamic Programming (DP) is a technique that divides a problem into smaller overlapping sub-problems, computes a solution for each sub-problem and stores it in a DP table. The final solution is read off the DP table.

    Key skills in mastering dynamic programming is the ability to determine the problem states (entries of the DP table) and the relationships or transitions between the states. Then, having defined base cases and recursive relationships, one can populate the DP table in a top-down or bottom-up fashion.

    In the top-down DP, the table is populated recursively, as needed, starting from the top and going down to smaller sub-problems. In the bottom-up DP, the table is populated iteratively starting from the smallest sub-problems and using their solutions to build-on and arrive at solutions to bigger sub-problems. In both cases, if a sub-problem was already encountered, its solution is simply looked up in the table (as opposed to re-computing the solution from scratch). This dramatically reduces computational cost.

    DP Example: Binomial Coefficients

    We use binomial coefficients example to illustrate the use of top-down and bottom-up DP. The code below is based on the recursion for binomial coefficients with overlapping sub-problems. Let C(n,k) denote n choose k, then, we have:

    Base case: C(n,0) = C(n,n) = 1
    Recursion: C(n,k) = C(n-1, k-1) + C(n-1, k)

    Notice that we have multiple over-lapping sub-problems. E.g. For C(n=5, k=2) the recursion tree is as follows:

                                  C(5, 2)
                          /                       \
                 C(4, 1)                            C(4, 2)
                /      \                        /           \
           C(3, 0)   C(3, 1)             C(3, 1)             C(3, 2)
                     /    \             /     \             /     \
               C(2, 0)  C(2, 1)      C(2, 0) C(2, 1)    C(2, 1)  C(2, 2)
                       /      \              /   \        /    \
                   C(1, 0)  C(1, 1)    C(1, 0)  C(1, 1) C(1, 0)  C(1, 1)

    We can implement top-down and bottom-up DP as follows:

    #include <iostream>
    #include <cstring>
    using namespace std;
    #define V 8
    int memo[V][V]; //DP table
    int min(int a, int b) {return (a < b) ? a : b;}
    void print_table(int memo[V][V])
    {
        for (int i = 0; i < V; ++i) 
        {
            for (int j = 0; j < V; ++j)
            {
                printf(" %2d", memo[i][j]);        
            }
            printf("\n");
        }
    }
    int binomial_coeffs1(int n, int k)
    { 
        // top-down DP 
        if (k == 0 || k == n) return 1;  
        if (memo[n][k] != -1) return memo[n][k];
        return memo[n][k] = binomial_coeffs1(n-1, k-1) +      
                            binomial_coeffs1(n-1, k);
    }
    int binomial_coeffs2(int n, int k)
    {    
        // bottom-up DP
        for (int i = 0; i <= n; ++i)  
        {        
            for (int j = 0; j <= min(i, k); ++j)
            {            
                if (j == 0 || j == i) 
                {                
                    memo[i][j] = 1;
                }  
                else
                {
                    memo[i][j] = memo[i-1][j-1] + memo[i-1][j];                  
                }
            } 
        }
        return memo[n][k];
    }  
    int main()
    {
        int n = 5, k = 2;
        printf("Top-down DP:\n");
        memset(memo, -1, sizeof(memo));
        int nCk1 = binomial_coeffs1(n, k);
        print_table(memo);
        printf("C(n=%d, k=%d): %d\n", n, k, nCk1);
        
        printf("Bottom-up DP:\n");
        memset(memo, -1, sizeof(memo));
        int nCk2 = binomial_coeffs2(n, k);
        print_table(memo);
        printf("C(n=%d, k=%d): %d\n", n, k, nCk2);
        
        return 0;
    }

    For C(n=5, k=2), the code above produces the following output:

    Top-down DP:
     -1 -1 -1 -1 -1 -1 -1 -1
     -1 -1 -1 -1 -1 -1 -1 -1
     -1  2 -1 -1 -1 -1 -1 -1
     -1  3  3 -1 -1 -1 -1 -1
     -1  4  6 -1 -1 -1 -1 -1
     -1 -1 10 -1 -1 -1 -1 -1
     -1 -1 -1 -1 -1 -1 -1 -1
     -1 -1 -1 -1 -1 -1 -1 -1
    C(n=5, k=2): 10
    Bottom-up DP:
      1 -1 -1 -1 -1 -1 -1 -1
      1  1 -1 -1 -1 -1 -1 -1
      1  2  1 -1 -1 -1 -1 -1
      1  3  3 -1 -1 -1 -1 -1
      1  4  6 -1 -1 -1 -1 -1
      1  5 10 -1 -1 -1 -1 -1
     -1 -1 -1 -1 -1 -1 -1 -1
     -1 -1 -1 -1 -1 -1 -1 -1
    C(n=5, k=2): 10

    The time complexity is O(n * k) and the space complexity is O(n * k). In the case of top-down DP, solutions to sub-problems are stored (memoized) as needed, whereas in the bottom-up DP, the entire table is computed starting from the base case. Note: a small DP table size (V=8) was chosen for printing purposes, a much larger table size is recommended.

    Code

    All code is available at: https://github.com/vsmolyakov/cpp

    To compile C++ code you can run the following command:

    >> g++ <filename.cpp> --std=c++11 -Wall -o test
    >> ./test

    Conclusion

    There are a number of great resources available for learning algorithms. I highly recommend Steven Halim’s book [1] on competitive programming. In addition to the classic Algorithm Design Manual [2] and CLRS [3]. There are a number of great coding challenge web-sites some of which are mentioned in [4]. In addition, [5] has a fantastic collection of algorithms and easy to understand implementations. A great resource if you are building your own library or participating in programming competitions.

    Hope you find this article helpful. Happy coding!!


    每天推荐一个 GitHub 优质开源项目和一篇精选英文科技或编程文章原文,欢迎关注开源日报。交流QQ群:202790710;微博:https://weibo.com/openingsource;电报群 https://t.me/OpeningSourceOrg

←上一页
1 … 235 236 237 238 239 … 262
下一页→

Proudly powered by WordPress