• 开源镜像
  • 开源沙龙
  • 媛宝
  • 猿帅
  • 注册
  • 登录
  • 息壤开源生活方式平台
  • 加入我们

开源日报

  • 2018年6月23日:开源日报第107期

    23 6 月, 2018

    每天推荐一个 GitHub 优质开源项目和一篇精选英文科技或编程文章原文,欢迎关注开源日报。交流QQ群:202790710;微博:https://weibo.com/openingsource;电报群 https://t.me/OpeningSourceOrg


    今日推荐开源项目:《玩minecraft吧 gocraft》GitHub链接

    推荐理由:这个项目是个用Go写的minecraft,对,它真的是个minecraft。虽然比正常的mc少了不少东西,但是本身用Go重写mc就是个很厉害的事情了。顺带一提,作者的灵感是来源于一个用C写mc的项目,有兴趣的同学也可以去看一看。

    Craft: https://github.com/fogleman/Craft


    今日推荐英文原文:《A Feature Selection Tool for Machine Learning in Python》作者:William Koehrsen

    原文链接:https://towardsdatascience.com/a-feature-selection-tool-for-machine-learning-in-python-b64dd23710f0

    推荐理由:这篇文章介绍了一个能够在机器学习中进行特征选择的工具,众所周知,选择合适高效的特征将会让机器学习更好的达到目的,所以推荐给对机器学习感兴趣的同学。

    A Feature Selection Tool for Machine Learning in Python

    Feature selection, the process of finding and selecting the most useful features in a dataset, is a crucial step of the machine learning pipeline. Unnecessary features decrease training speed, decrease model interpretability, and, most importantly, decrease generalization performance on the test set.

    Frustrated by the ad-hoc feature selection methods I found myself applying over and over again for machine learning problems, I built a class for feature selection in Python available on GitHub. The FeatureSelector includes some of the most common feature selection methods:

    1. Features with a high percentage of missing values
    2. Collinear (highly correlated) features
    3. Features with zero importance in a tree-based model
    4. Features with low importance
    5. Features with a single unique value

    In this article we will walk through using the FeatureSelector on an example machine learning dataset. We’ll see how it allows us to rapidly implement these methods, allowing for a more efficient workflow.

    The complete code is available on GitHub and I encourage any contributions. The Feature Selector is a work in progress and will continue to improve based on the community needs!


    Example Dataset

    For this example, we will use a sample of data from the Home Credit Default Risk machine learning competition on Kaggle. (To get started with the competition, see this article). The entire dataset is available for download and here we will use a sample for illustration purposes.

    The competition is a supervised classification problem and this is a good dataset to use because it has many missing values, numerous highly correlated (collinear) features, and a number of irrelevant features that do not help a machine learning model.

    Creating an Instance

    To create an instance of the FeatureSelector class, we need to pass in a structured dataset with observations in the rows and features in the columns. We can use some of the methods with only features, but the importance-based methods also require training labels. Since we have a supervised classification task, we will use a set of features and a set of labels.

    (Make sure to run this in the same directory as feature_selector.py )

    from feature_selector import FeatureSelector
    # Features are in train and labels are in train_labels
    fs = FeatureSelector(data = train, labels = train_labels)

    Methods

    The feature selector has five methods for finding features to remove. We can access any of the identified features and remove them from the data manually, or use the remove function in the Feature Selector.

    Here we will go through each of the identification methods and also show how all 5 can be run at once. The FeatureSelector additionally has several plotting capabilities because visually inspecting data is a crucial component of machine learning.

    Missing Values

    The first method for finding features to remove is straightforward: find features with a fraction of missing values above a specified threshold. The call below identifies features with more than 60% missing values (bold is output).

    fs.identify_missing(missing_threshold = 0.6)
    17 features with greater than 0.60 missing values.

    We can see the fraction of missing values in every column in a dataframe:

    fs.missing_stats.head()

    To see the features identified for removal, we access the ops attribute of the FeatureSelector , a Python dict with features as lists in the values.

    missing_features = fs.ops['missing']
    missing_features[:5]
    ['OWN_CAR_AGE',
     'YEARS_BUILD_AVG',
     'COMMONAREA_AVG',
     'FLOORSMIN_AVG',
     'LIVINGAPARTMENTS_AVG']

    Finally, we have a plot of the distribution of missing values in all feature:

    fs.plot_missing()

    Collinear Features

    Collinear features are features that are highly correlated with one another. In machine learning, these lead to decreased generalization performance on the test set due to high variance and less model interpretability.

    The identify_collinear method finds collinear features based on a specified correlation coefficient value. For each pair of correlated features, it identifies one of the features for removal (since we only need to remove one):

    fs.identify_collinear(correlation_threshold = 0.98)
    21 features with a correlation magnitude greater than 0.98.

    A neat visualization we can make with correlations is a heatmap. This shows all the features that have at least one correlation above the threshold:

    fs.plot_collinear()

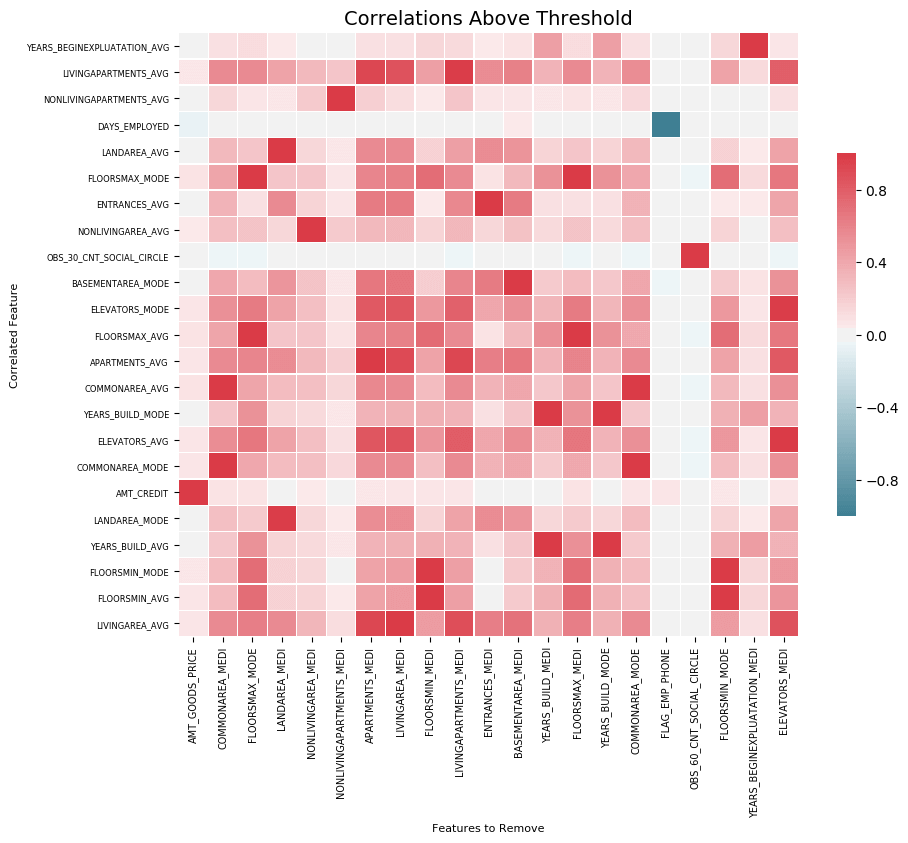
    As before, we can access the entire list of correlated features that will be removed, or see the highly correlated pairs of features in a dataframe.

    # list of collinear features to remove
    collinear_features = fs.ops['collinear']
    # dataframe of collinear features
    fs.record_collinear.head()

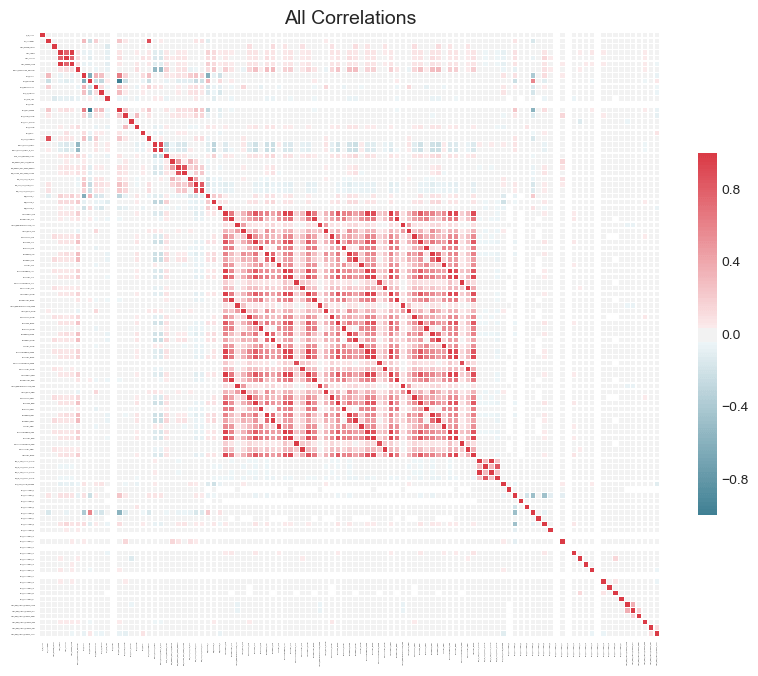
    If we want to investigate our dataset, we can also make a plot of all the correlations in the data by passing in plot_all = True to the call:

    Zero Importance Features

    The previous two methods can be applied to any structured dataset and are deterministic — the results will be the same every time for a given threshold. The next method is designed only for supervised machine learning problems where we have labels for training a model and is non-deterministic. The identify_zero_importance function finds features that have zero importance according to a gradient boosting machine (GBM) learning model.

    With tree-based machine learning models, such as a boosting ensemble, we can find feature importances. The absolute value of the importance is not as important as the relative values, which we can use to determine the most relevant features for a task. We can also use feature importances for feature selection by removing zero importance features. In a tree-based model, the features with zero importance are not used to split any nodes, and so we can remove them without affecting model performance.

    The FeatureSelector finds feature importances using the gradient boosting machine from the LightGBM library. The feature importances are averaged over 10 training runs of the GBM in order to reduce variance. Also, the model is trained using early stopping with a validation set (there is an option to turn this off) to prevent overfitting to the training data.

    The code below calls the method and extracts the zero importance features:

    # Pass in the appropriate parameters
    fs.identify_zero_importance(task = 'classification', 
                                eval_metric = 'auc', 
                                n_iterations = 10, 
                                 early_stopping = True)
    # list of zero importance features
    zero_importance_features = fs.ops['zero_importance']
    63 features with zero importance after one-hot encoding.

    The parameters we pass in are as follows:

    • task : either “classification” or “regression” corresponding to our problem
    • eval_metric: metric to use for early stopping (not necessary if early stopping is disabled)
    • n_iterations : number of training runs to average the feature importances over
    • early_stopping: whether or not use early stopping for training the model

    This time we get two plots with plot_feature_importances:

    # plot the feature importances
    fs.plot_feature_importances(threshold = 0.99, plot_n = 12)
    124 features required for 0.99 of cumulative importance

    On the left we have the plot_n most important features (plotted in terms of normalized importance where the total sums to 1). On the right we have the cumulative importance versus the number of features. The vertical line is drawn at threshold of the cumulative importance, in this case 99%.

    Two notes are good to remember for the importance-based methods:

    • Training the gradient boosting machine is stochastic meaning the feature importances will change every time the model is run

    This should not have a major impact (the most important features will not suddenly become the least) but it will change the ordering of some of the features. It also can affect the number of zero importance features identified. Don’t be surprised if the feature importances change every time!

    • To train the machine learning model, the features are first one-hot encoded. This means some of the features identified as having 0 importance might be one-hot encoded features added during modeling.

    When we get to the feature removal stage, there is an option to remove any added one-hot encoded features. However, if we are doing machine learning after feature selection, we will have to one-hot encode the features anyway!

    Low Importance Features

    The next method builds on zero importance function, using the feature importances from the model for further selection. The function identify_low_importance finds the lowest importance features that do not contribute to a specified total importance.

    For example, the call below finds the least important features that are not required for achieving 99% of the total importance:

    fs.identify_low_importance(cumulative_importance = 0.99)
    123 features required for cumulative importance of 0.99 after one hot encoding.
    116 features do not contribute to cumulative importance of 0.99.

    Based on the plot of cumulative importance and this information, the gradient boosting machine considers many of the features to be irrelevant for learning. Again, the results of this method will change on each training run.

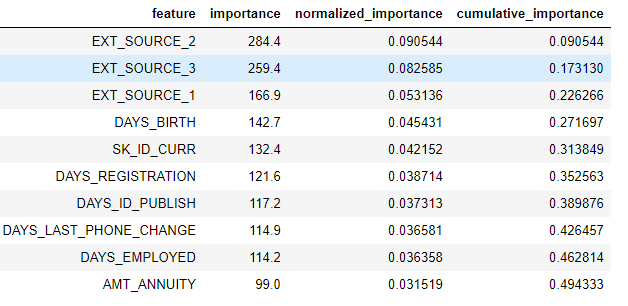
    To view all the feature importances in a dataframe:

    fs.feature_importances.head(10)

    The low_importance method borrows from one of the methods of using Principal Components Analysis (PCA) where it is common to keep only the PC needed to retain a certain percentage of the variance (such as 95%). The percentage of total importance accounted for is based on the same idea.

    The feature importance based methods are really only applicable if we are going to use a tree-based model for making predictions. Besides being stochastic, the importance-based methods are a black-box approach in that we don’t really know why the model considers the features to be irrelevant. If using these methods, run them several times to see how the results change, and perhaps create multiple datasets with different parameters to test!

    Single Unique Value Features

    The final method is fairly basic: find any columns that have a single unique value. A feature with only one unique value cannot be useful for machine learning because this feature has zero variance. For example, a tree-based model can never make a split on a feature with only one value (since there are no groups to divide the observations into).

    There are no parameters here to select, unlike the other methods:

    fs.identify_single_unique()
    4 features with a single unique value.

    We can plot a histogram of the number of unique values in each category:

    fs.plot_unique()

    One point to remember is NaNs are dropped before calculating unique values in Pandas by default.

    Removing Features

    Once we’ve identified the features to discard, we have two options for removing them. All of the features to remove are stored in the ops dict of the FeatureSelector and we can use the lists to remove features manually. Another option is to use the remove built-in function.

    For this method, we pass in the methods to use to remove features. If we want to use all the methods implemented, we just pass in methods = 'all'.

    # Remove the features from all methods (returns a df)
    train_removed = fs.remove(methods = 'all')
    ['missing', 'single_unique', 'collinear', 'zero_importance', 'low_importance'] methods have been run
    
    Removed 140 features.

    This method returns a dataframe with the features removed. To also remove the one-hot encoded features that are created during machine learning:

    train_removed_all = fs.remove(methods = 'all', keep_one_hot=False)
    Removed 187 features including one-hot features.

    It might be a good idea to check the features that will be removed before going ahead with the operation! The original dataset is stored in the data attribute of the FeatureSelector as a back-up!

    Running all Methods at Once

    Rather than using the methods individually, we can use all of them with identify_all. This takes a dictionary of the parameters for each method:

    fs.identify_all(selection_params = {'missing_threshold': 0.6,    
                                        'correlation_threshold': 0.98, 
                                        'task': 'classification',    
                                        'eval_metric': 'auc', 
                                        'cumulative_importance': 0.99})
    151 total features out of 255 identified for removal after one-hot encoding.

    Notice that the number of total features will change because we re-ran the model. The remove function can then be called to discard these features.

    Conclusions

    The Feature Selector class implements several common operations for removing features before training a machine learning model. It offers functions for identifying features for removal as well as visualizations. Methods can be run individually or all at once for efficient workflows.

    The missing, collinear, and single_unique methods are deterministic while the feature importance-based methods will change with each run. Feature selection, much like the field of machine learning, is largely empirical and requires testing multiple combinations to find the optimal answer. It’s best practice to try several configurations in a pipeline, and the Feature Selector offers a way to rapidly evaluate parameters for feature selection.

    As always, I welcome feedback and constructive criticism. I want to emphasis that I’m looking for help on the FeatureSelector. Anyone can contribute on GitHub and I appreciate advice from those who just uses the tool! I can also be reached on Twitter @koehrsen_will.


    每天推荐一个 GitHub 优质开源项目和一篇精选英文科技或编程文章原文,欢迎关注开源日报。交流QQ群:202790710;微博:https://weibo.com/openingsource;电报群 https://t.me/OpeningSourceOrg


  • 2018年6月22日:开源日报第106期

    22 6 月, 2018

    每天推荐一个 GitHub 优质开源项目和一篇精选英文科技或编程文章原文,欢迎关注开源日报。交流QQ群:202790710;微博:https://weibo.com/openingsource;电报群 https://t.me/OpeningSourceOrg


    今日推荐开源项目:《我居然在GitHub上看别人做面包 The Bread Code》GitHub链接

    推荐理由:我们可以在动漫,漫画,游戏各种地方看见各种料理方法,然后今天终于……在 GitHub 上面你能够看到如何做面包了。对,这个项目完全不讲代码,而是教你如何做面包,从最基础的基类面包到各种派生的面包,还有特别型的不加酵母的酸面包,有烤箱的同学可以自己在家里试试看了。


    今日推荐英文原文:《An overview of Visual Studio Code for front-end developers》作者:Vinh Le

    原文链接:https://medium.freecodecamp.org/an-overview-of-visual-studio-code-for-front-end-developers-49a4aa0771fb

    推荐理由:这篇文章是作者对自身使用 VS Code 的经验介绍,如果你还没有找到自己最喜欢的编辑器,不妨可以看看这篇文章了解一下 VS Code。

    An overview of Visual Studio Code for front-end developers

    No matter whether you are a code newbie or a seasoned developer, code editor is an imperative part of your work. The problem, especially if you are a beginner, is that there are tons of choices for IDEs. And many of them share similar features, functionalities, and even UI. As a result, choosing the right IDE might actually take more time and effort that you thought.

    If your question right now is: “which code editor should I start with?” then I would reply: “It depends, my friend.” Choosing a particular IDE significantly depends on a few factors: what type of developer you are, what kinds of environments you mostly work with, or whether you have an exclusive built-in feature that you absolutely need to get jobs done.

    I would say that the way to choose one is to try and explore them all, and then pick what suits you best.

    Choosing the right code editor for you

    As most newbies do, I started with Notepad++ as my first code editor. This is perhaps one of the simplest IDEs that I’ve tried. Later on, as my needs started to require more advanced functionality from the editor, I tried out Brackets, Atom, then Visual Studio Code.

    After a decent amount of experimenting, VSCode became my favorite. It impressed me with its modern UI, a wide availability of extensions, as well as great features such as built-in Git and terminal.

    The main purpose of this blog is not to compare different IDEs, but to discuss my experience with VSCode. So in this post, I will:

    • show a brief introduction to VSCode
    • introduce the particular theme I’ve installed
    • discuss helpful extensions I use
    • show you how I leverage VSCode’s features to enhance my workflow.

    Let’s get into it!

    But first, what is VSCode anyway?

    Visual Studio Code (VSCode) is a source code editor developed by Microsoft that can be run on Windows, macOS, and Linux. It is free, open-source, and provides support for debugging as well as built-in Git version control, syntax highlights, snippets, and so on. The UI of VSCode is highly customizable, as users can switch to different themes, keyboard shortcuts, and preferences.

    VSCode was originally announced in 2015 as an open-source project hosted on GitHub before releasing to the web a year later. Since then, Microsoft’s code editor has been gaining popularity among developers.

    In the Stack Overflow 2018 Developer Survey, VSCode was ranked as the most popular development environment with around 35% out of over 100,000 respondents saying they use it. More stunningly, this figure is around 39% in the web development field.

    And with monthly updates, users can expect to enjoy an even better experience — bug fixes, stability, and performance boosts are frequently pushed.

    Theme: Color and Font

    If you’re like me, and you care about theme of your IDE, finding an appropriate font and theme color is very important. I personally prefer a dark theme and hate the default Consolas font of VSCode on Windows.

    So the Monokai color theme and FiraCode font are my current choices. This combination brings a high contrast which I find very pleasant to work with.

    • To install a theme, click the Setting icon => Color Theme => Choose the theme that you like
    • Find installation guideline of FiraCode here.
    • You can also check out OneDarkPro, another great dark theme: in Extensions (Ctrl + Shift + X on Windows), search for OneDarkPro, click Install, and select it from the Color Theme.

    Useful extensions (Extensions => Search => Install)

    These are some of my favorite extensions:

    • Beautify: Beautify code in place and make your code more readable
    • Bracket Pair Colorizer: allows matching brackets to be identified with colours
    The colors of ( and { are separated right?
    • ESLint: a must-have extension for React or JavaScript developers in general. ESLint is used to find problems and typos within your code, and allows you to mark that typo. It also suggests solutions.
    • HTML Snippets: add rich language support for the HTML Markup such as auto-close tags.
    • JavaScript (ES6) code snippets: pretty self-explanatory
    • Live Server: launch a local server with live reload features for your HTML or PHP site
    • Markdown Preview Enhanced: run live server for your markdown file.
    • Material Icon Theme: provides icons based on Google’s Material Design. To activate, click Setting => File Icon Theme => Select Material Icon Theme
    • Prettier: beautifully format your JavaScript/ TypeScript/ CSS code.

    Customize your UI

    You can customize almost everything, from font-family and font-size of your code to line-height, by:

    • Going to User Settings (Ctrl + ,)
    • Searching for keywords related to your desired customization
    • Clicking the Edit button on the left side of the settings and choosing Replace in Settings
    • Changing the value of the setting that you just chose.

    In my current setup, I set the fontSize to 14, lineHeight to 22, and tabSize to 3 for my personal preference (and for good readability).

    Things I wish I’d known since the beginning

    Apart from these themes and extensions, I would like to share with you how I use VSCode’s great features to boost productivity. These are all things that I didn’t know as a beginner, and that would’ve been very helpful for leveraging and facilitating my workflow.

    Integrated Terminals

    It is kind of inevitable that the more time you are in software development, the more important the Terminal becomes. As a JavaScript developer, I use the Terminal to install packages, run the development server, or even push changes in my current repository to GitHub.

    In the beginning, I mostly took care of those tasks with Windows Command Prompt or Git Bash later on. If you use Windows, then you may know how dumb and annoying CMD can be. Git Bash is a nice tool, but switching between apps when you are working is not really a pleasant experience.

    VSCode truly solves this problem for me with its fantastic terminal. And the cool thing is you can easily set it up to work the same way as Git Bash, but right inside VSCode! You then have an awesome combination.

    To access the VSCode terminal, use Ctrl + ` (left side of your 1 key). Then the Terminal will pop up.

    From here, you can do tons of cool things like create a new terminal or kill the existing one. You can also split-view as well as side-view them.

    It is cool to have multiple terminals built right in your code editor, isn’t it?

    Source Control (Git)

    When you are working on a repository and constantly need to make changes, you would normally find the terminal to commit recent changes, wouldn’t you? Well, VSCode gives you an awesome built-in tool to control your versions.

    By clicking the Git icon located in the left panel or using Ctrl + Shift + G (Windows), you have easy access to Source Control. In here, you can do all the Git thingies. So convenient, isn’t it?

    How do all these things enhance my workflow — and how can they make yours better, too?

    After a decent amount of time working with VSCode, I strongly believe its key value is based in its all-in-one environment. All of my needs and tasks within my workflow as a Front-end developer is nicely and flawlessly handled.

    To make these advantages clearer, let me walk you through my normal workflow.

    Let’s say I got some ideas working on a new Music app created by React. I normally start a project by creating a blank folder — so I’ll create a new folder named music_react. After that, I can immediately open the project in VSCode by choosing a right-click option.

    Once I am in my working project, I can quickly create the file and folders with shortcuts in the left panel.

    In this project, I want to use the create-react-app initialization. Therefore, I may need to install that package — not a big deal. I open my terminal by typing Ctrl + `. Amazingly, the terminal automatically navigates to my exact directory. There is no need to change directories anymore.

    After entering in the command line to install the npm package, all I need to do is to wait until all dependencies are installed.

    I also want to publish my project on GitHub, so I should probably initialize a Git repository at first. After the packages are installed, I type a Git initialization command right in my terminal as well.

    Once Git is successfully installed, I can commit all pending changes right in the Source Control on the left panel.

    Then I can continue to work on my project as normal. Besides, I can push all changes to GitHub from my terminal if I want to.

    Wrapping up

    So that’s my normal workflow in the VSCode environment. I understand that this varies significantly depending on what type of developer you are. A back-end developer might have a completely different workflow compared to mine.

    However, if you are a front-end developer who is just getting to know VSCode, and you want to check it out before getting into it, I hope that this article gives you insight and helps enhance your productivity. After all, my biggest inspiration to write this small guideline is because I could not really find any thorough review of VSCode for newcomers. As a result, this blog hopefully can bring you some value.

    Lastly, if your setup is different than mine or there are great extensions that you think are nice to have, don’t hesitate to share in the comments. I am excited to hear from you!


    每天推荐一个 GitHub 优质开源项目和一篇精选英文科技或编程文章原文,欢迎关注开源日报。交流QQ群:202790710;微博:https://weibo.com/openingsource;电报群 https://t.me/OpeningSourceOrg

  • 2018年6月21日:开源日报第105期

    21 6 月, 2018

    每天推荐一个 GitHub 优质开源项目和一篇精选英文科技或编程文章原文,欢迎关注开源日报。交流QQ群:202790710;微博:https://weibo.com/openingsource;电报群 https://t.me/OpeningSourceOrg


    今日推荐开源项目:《加特技的交互 layerJS》GitHub链接

    推荐理由:这个JS库可以让用户在和你的网页交互时具有更好的特效,它给你提供了诸如滑条和画布型 UI 这样的交互方法,你只需要把网站上的内容放进去,它就可以帮你完成剩下有关于交互的工作。它能够在电脑上也发挥它的交互作用,也能够与现有的框架诸如 Angular, VueJS, React, jQuery 等一起使用,这一点还是不用担心的。它在官网上也提供了例子,让初学者也可以照葫芦画瓢的去使用。


    今日推荐英文原文:《Python for Data Science: 8 Concepts You May Have Forgotten》作者:Conor Dewey

    原文链接:https://towardsdatascience.com/python-for-data-science-8-concepts-you-may-have-forgotten-i-did-825966908393

    推荐理由:这篇文章介绍了在数据科学中你可能经常用到但是老是忘的8个概念,实际上即使你不玩数据科学,在日常中你兴许也会用到比如 Map 或者 Lambda 这样简单好用的功能,推荐给使用 Python 的朋友一读

    Python for Data Science: 8 Concepts You May Have Forgotten

    The Problem

    If you’ve ever found yourself looking up the same question, concept, or syntax over and over again when programming, you’re not alone.

    I find myself doing this constantly.

    While it’s not unnatural to look things up on StackOverflow or other resources, it does slow you down a good bit and raise questions as to your complete understanding of the language.

    We live in a world where there is a seemingly infinite amount of accessible, free resources looming just one search away at all times. However, this can be both a blessing and a curse. When not managed effectively, an over-reliance on these resources can build poor habits that will set you back long-term.

    Source: xkcd

    Personally, I find myself pulling code from similar discussion threads several times, rather than taking the time to learn and solidify the concept so that I can reproduce the code myself the next time.

    This approach is lazy and while it may be the path of least resistance in the short-term, it will ultimately hurt your growth, productivity, and ability to recall syntax (cough, interviews) down the line.

    The Goal

    Recently, I’ve been working through an online data science course titled Python for Data Science and Machine Learning on Udemy (Oh God, I sound like that guy on Youtube). Over the early lectures in the series, I was reminded of some concepts and syntax that I consistently overlook when performing data analysis in Python.

    In the interest of solidifying my understanding of these concepts once and for all and saving you guys a couple of StackOverflow searches, here’s the stuff that I’m always forgetting when working with Python, NumPy, and Pandas.

    I’ve included a short description and example for each, however for your benefit, I will also include links to videos and other resources that explore each concept more in-depth as well.

    One-Line List Comprehension

    Writing out a for loop every time you need to define some sort of list is tedious, luckily Python has a built-in way to address this problem in just one line of code. The syntax can be a little hard to wrap your head around but once you get familiar with this technique you’ll use it fairly often.

    Source: Trey Hunner

    See the example above and below for how you would normally go about list comprehension with a for loop vs. creating your list with in one simple line with no loops necessary.

    x = [1,2,3,4]
    out = []
    for item in x:
        out.append(item**2)
    print(out)
    [1, 4, 9, 16]
    # vs.
    x = [1,2,3,4]
    out = [item**2 for item in x]
    print(out)
    [1, 4, 9, 16]

    Lambda Functions

    Ever get tired of creating function after function for limited use cases? Lambda functions to the rescue! Lambda functions are used for creating small, one-time and anonymous function objects in Python. Basically, they let you create a function, without creating a function.

    The basic syntax of lambda functions is:

    lambda arguments: expression

    Note that lambda functions can do everything that regular functions can do, as long as there’s just one expression. Check out the simple example below and the upcoming video to get a better feel for the power of lambda functions:

    double = lambda x: x * 2
    print(double(5))
    10

    Map and Filter

    Once you have a grasp on lambda functions, learning to pair them with the map and filter functions can be a powerful tool.

    Specifically, map takes in a list and transforms it into a new list by performing some sort of operation on each element. In this example, it goes through each element and maps the result of itself times 2 to a new list. Note that the list function simply converts the output to list type.

    # Map
    seq = [1, 2, 3, 4, 5]
    result = list(map(lambda var: var*2, seq))
    print(result)
    [2, 4, 6, 8, 10]

    The filter function takes in a list and a rule, much like map, however it returns a subset of the original list by comparing each element against the boolean filtering rule.

    # Filter
    seq = [1, 2, 3, 4, 5]
    result = list(filter(lambda x: x > 2, seq))
    print(result)
    [3, 4, 5]

    Arange and Linspace

    For creating quick and easy Numpy arrays, look no further than the arange and linspace functions. Each one has their specific purpose, but the appeal here (instead of using range), is that they output NumPy arrays, which are typically easier to work with for data science.

    Arange returns evenly spaced values within a given interval. Along with a starting and stopping point, you can also define a step size or data type if necessary. Note that the stopping point is a ‘cut-off’ value, so it will not be included in the array output.

    # np.arange(start, stop, step)
    np.arange(3, 7, 2)
    array([3, 5])

    Linspace is very similar, but with a slight twist. Linspace returns evenly spaced numbers over a specified interval. So given a starting and stopping point, as well as a number of values, linspace will evenly space them out for you in a NumPy array. This is especially helpful for data visualizations and declaring axes when plotting.

    # np.linspace(start, stop, num)
    np.linspace(2.0, 3.0, num=5)
    array([ 2.0,  2.25,  2.5,  2.75, 3.0])

    What Axis Really Means

    You may have ran into this when dropping a column in Pandas or summing values in NumPy matrix. If not, then you surely will at some point. Let’s use the example of dropping a column for now:

    df.drop('Column A', axis=1)
    df.drop('Row A', axis=0)

    I don’t know how many times I wrote this line of code before I actually knew why I was declaring axis what I was. As you can probably deduce from above, set axis to 1 if you want to deal with columns and set it to 0 if you want rows. But why is this? My favorite reasoning, or atleast how I remember this:

    df.shape
    (# of Rows, # of Columns)

    Calling the shape attribute from a Pandas dataframe gives us back a tuple with the first value representing the number of rows and the second value representing the number of columns. If you think about how this is indexed in Python, rows are at 0 and columns are at 1, much like how we declare our axis value. Crazy, right?

    Concat, Merge, and Join

    If you’re familiar with SQL, then these concepts will probably come a lot easier for you. Anyhow, these functions are essentially just ways to combine dataframes in specific ways. It can be difficult to keep track of which is best to use at which time, so let’s review it.

    Concat allows the user to append one or more dataframes to each other either below or next to it (depending on how you define the axis).

    Merge combines multiple dataframes on specific, common columns that serve as the primary key.

    Join, much like merge, combines two dataframes. However, it joins them based on their indices, rather than some specified column.

    Check out the excellent Pandas documentation for specific syntax and more concrete examples, as well as some special cases that you may run into.

    Pandas Apply

    Think of apply as a map function, but made for Pandas DataFrames or more specifically, for Series. If you’re not as familiar, Series are pretty similar to NumPy arrays for the most part.

    Apply sends a function to every element along a column or row depending on what you specify. You might imagine how useful this can be, especially for formatting and manipulating values across a whole DataFrame column, without having to loop at all.

    Pivot Tables

    Last but certainly not least is pivot tables. If you’re familiar with Microsoft Excel, then you’ve probably heard of pivot tables in some respect. The Pandas built-in pivot_table function creates a spreadsheet-style pivot table as a DataFrame. Note that the levels in the pivot table are stored in MultiIndex objects on the index and columns of the resulting DataFrame.

    Wrapping up

    That’s it for now. I hope a couple of these overviews have effectively jogged your memory regarding important yet somewhat tricky methods, functions, and concepts you frequently encounter when using Python for data science. Personally, I know that even the act of writing these out and trying to explain them in simple terms has helped me out a ton.

    If you’re interested in receiving my weekly rundown of interesting articles and resources focused on data science, machine learning, and artificial intelligence, then subscribe to Self Driven Data Science using the form below!


    每天推荐一个 GitHub 优质开源项目和一篇精选英文科技或编程文章原文,欢迎关注开源日报。交流QQ群:202790710;微博:https://weibo.com/openingsource;电报群 https://t.me/OpeningSourceOrg

  • 2018年6月20日:开源日报第104期

    20 6 月, 2018

    每天推荐一个 GitHub 优质开源项目和一篇精选英文科技或编程文章原文,欢迎关注开源日报。交流QQ群:202790710;微博:https://weibo.com/openingsource;电报群 https://t.me/OpeningSourceOrg


    今日推荐开源项目:《使用CSS的正确姿势 CSS Protips》GitHub链接

    推荐理由:这个项目记载了许多使用 CSS 时方便的小技巧,比如每个格子都等宽的表格,让元素垂直居中,使用 unset 把所有属性变为默认值等等,兴许它们之中就有一些能够解决你经常遇上的问题。


    今日推荐英文原文:《Does your team write good code?》作者:Henrik Haugberg

    原文链接:https://medium.com/techtive/does-your-team-write-good-code-8b1dcec6404d

    推荐理由:团队开发合作中好的代码库会让你们事半功倍,这篇文章就是介绍形成一个好的代码库的方法的。

    Does your team write good code?

    Digital services and applications can look amazing while built on a terrible codebase that requires large amounts of work and maintenance. Or they can look outdated and uninspiring while the architecture below is top quality.

    Design and code quality are two completely different aspects of a product. A bad code base leads to a number of challenges:

    • Steep learning curve for new developers.
    • Development of new features requires more time.
    • Rewriting existing code takes longer.
    • More maintenance.
    • Errors occur more often.
    • Reduced performance.
    • Less attractive to work with.

    It is quite common for work on a bad code base to take 3–5 times longer compared to a good one. If your team on average spend 3 times as much time on developing your product compared to what they could have done, is that enough reason to focus more on code quality?

    The problem a that all such comparisons are based on assumptions and rough estimates. Developers’ work can not be measured in quality in the same way as many other roles. For this reason, it is much easier to prioritize the development of demanded and marketable features.

    How can you, as responsible for the team, know how good or bad your code base is if you do not work in it yourself? It is important to find terms and language that makes it possible to understand a little more of what’s happening under the hood (without being a mechanic yourself). It’s a bit too easy to say “We have a lot of legacy”.

    Focus areas may vary between different technologies, but here are some important elements for a good code base.

    1. Established language standards

    Many programming languages change. New versions of the language allow syntax and functionality that have gone through an extensive process before they become part of the standard. There are big variations in how quickly such changes are taken into use. What has become a part of the standard should be used in cases where it is appropriate. Old ways to solve the same issues create unnecessary extra work.

    2. Syntax & unwritten standards

    Most internet communities for a given language establish some habits over time for how the language is written. It goes right down to the smallest syntax. Single quotes or double quotes? Brackets? Camel case? Lower or upper case class names? A team must decide what is best for their needs. But the longer you deviate from what is most common in all examples, documentation and people’s habits, and the less consistent you are through the company’s codebases, the longer it takes to work on the code. Not least for new people.

    Use a linter if you do not already, and keep discussions on what rules are in use and why!

    3. Readability

    Code readability is linked to everything from syntax and comments, to architecture and naming of variables and features. Imagine reading a whole book where the whole text is written in a single continuous section? That’s how it is to read the code with low readability. Even for the developer who wrote it, long afterwards. Space and comments in code are as sections and chapters / headings in a book or article. Good readability is important!

    4. Modularized (loosely coupled)

    Codebases tend to end up like spider webs. All parts are interrelated, and if anything happens, the entire network is affected. This has led to an ever increasing focus on building code as loosely coupled components. Clearly defined roles for each area of the architecture. More code reuse. Fixed patterns for how data structures are built up, processes, microservices, etc. Avoid the code base becoming a huge monolith where refactoring always involves high costs.

    5. Community-driven dependencies

    Twenty years ago, all the wheels had to be invented in all projects. Fortunately, this is not the case today. There are huge amounts of open-source libraries that try to simplify logic and resolve issues that occur frequently. Use what’s in the community, and contribute yourself too. Or create your own open source module if you find something that you think others may need. It leads to more modular code, greater prerogatives for writing good tests, you contribute to the community, and becoming more visible as tech company.

    6. Programming paradigm

    There are many programming paradigms that can be used as part of the architecture of a code base. Object-oriented programming, functional programming and similar paradigms, have advantages and disadvantages. Think about what and why and if you see good reasons to change the architecture, do not leave it because it may involve a little comprehensive rewriting job. Make it parallel to other tasks, and phase out the old over time.

    7. Design patterns / flow

    It is important to think about how the logic and data flow in the code. Are things thrown back and forth in all directions? Do certain groups of logic and modules have responsibility for predefined steps? There are many patterns for programming architecture. MVC, MVP, PAC, MVVM, etc. Whether you follow a predefined pattern or not, this has a significant impact on code quality. Go to Italy for spaghetti.

    8. Logic

    Programming is more than just structure and syntax. How you actually solve the individual task also has a big impact. No matter how much you try to keep the building blocks loosely connected, there will always be many dependencies back and forth. The way this is linked together has a great impact on usage and scalability. In this area there is experience that counts. One must have experienced and solved similar challenges earlier to know the advantages and disadvantages of different solutions and patterns. Avoid messy logic. And not least, discuss solutions with colleagues! Share each other’s experiences and learn from what has been done on the project earlier. Give yourself room to rewrite where you consider it appropriate.

    9. Standardization

    When you code, you are an architect in one form or another every single day. Not for anything that will stand still in the same place every day, but something dynamic, that will be a part of people’s habits. How often do the habits change? It’s all too easy to just solve the problem you see there and then, without thinking about whether it could be built into a standard. A standard for this code base. Or for this company. A small standard that is followed in similar solutions and similar needs. The needs in technical architecture always repeats! Certainly with small variations and unique local needs, but look for patterns. Standardization is difficult, but probably the most important thing to increase code base quality! Standards must be able to change, but with higher threshold than other logic. This leads to reduced workload for all development, less maintenance and more satisfied developers!

    “Don’t leave broken windows!”
    – The Pragmatic Programmer by Andrew Hunt and David Thomas

    The most important focus is: do not let bad code become a habit! If you do not add cornices or fix the small hole in the wallpaper at home, you will get used to it and it will never be done. But people who are visiting will notice it. Do not let the weaknesses in the code reside. Can you live with “good enough”? Yes absolutely! But what cost does it bring over time, and what could you achieve if code quality was maintained at a higher level?


    每天推荐一个 GitHub 优质开源项目和一篇精选英文科技或编程文章原文,欢迎关注开源日报。交流QQ群:202790710;微博:https://weibo.com/openingsource;电报群 https://t.me/OpeningSourceOrg

←上一页
1 … 233 234 235 236 237 … 262
下一页→

Proudly powered by WordPress