VR and AR games, distributed computing and increased capabilities
A brief history of the development of virtual and augmented reality
Virtual reality (VR) and augmented reality (AR) technology has been stimulating the imaginations of gamers all over the world for several years: it’s incredibly exciting to immerse yourself in a new universe just sitting at home on the PC or your smartphone. The first developments in this industry emerged in the middle of the last century, when a pioneer of VR, Morton Heilig, introduced the first virtual simulator, “Sensorama”. Heilig believed his invention was the logical result of the evolution of art.
The amazing fact is that these new devices clearly demonstrated effects that were only partly disclosed by painting, photography and cinema together — portraying the visual world in all its glory, the way it is perceived by the human eye.
Morton Heilig “Cinema of the Future”, 1955
Sensorama machine designed by Morton Heilig
The first portable virtual reality devices appeared in the 60s and were used for military purposes. As for VR games, the first developments were made in 1993 by Sega, a company well-known to the generations of the 80s and 90s. Unfortunately, this release was a failure: the Genesis console caused dizziness and nausea, so sales were cancelled, and the VR game industry was suspended for another 10 years.
VR technology exploded in popularity in 2012, when Oculus launched a Kickstarter campaign to fund the production of a VR helmet. Three years later, sales of the first VR helmet, Oculus Rift CV1, began, which led to a massive fund flow to the industry.
Investments and market overview
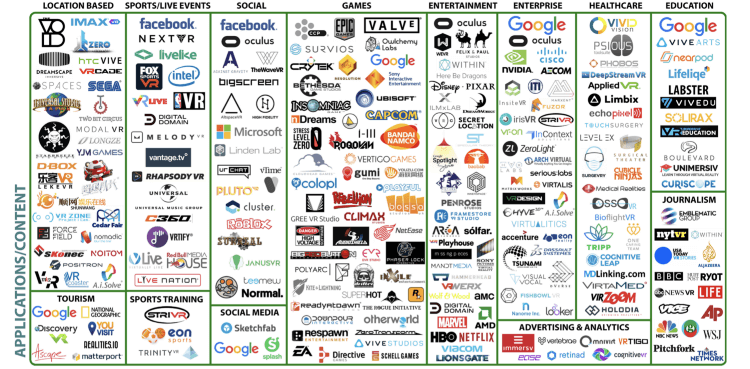
According to the report of the Virtual Reality Fund, the total investment amount in the industry in 2017 exceeded $2.3 billion, and the number of companies in the VR industry reached 450.
Companies involved in VR development in the second half of 2017, according to the VR Fund report
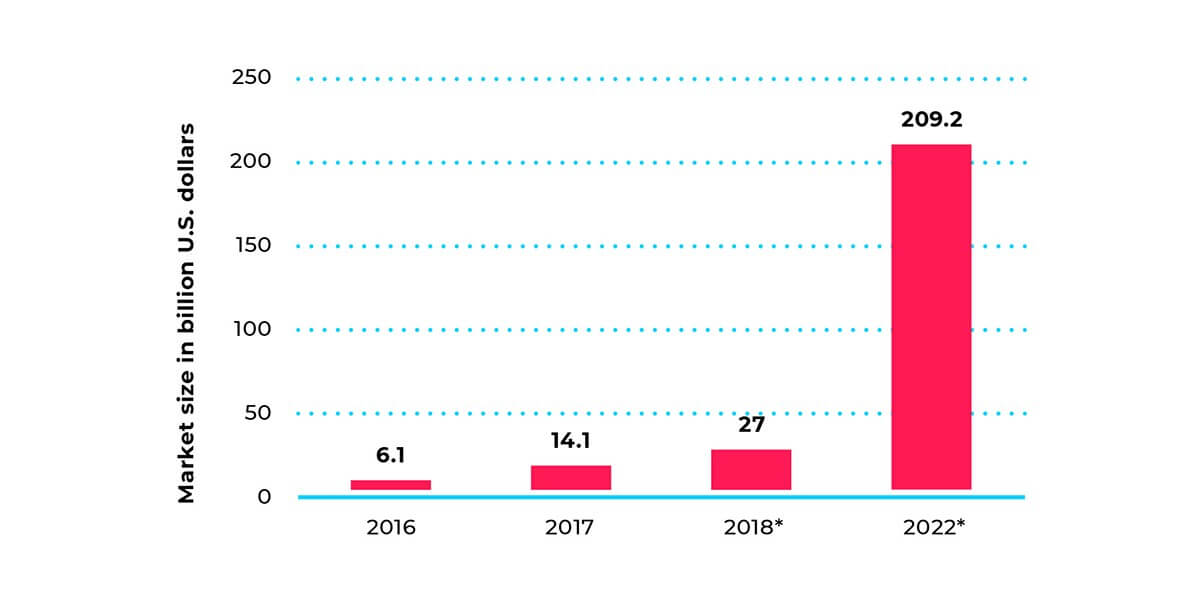
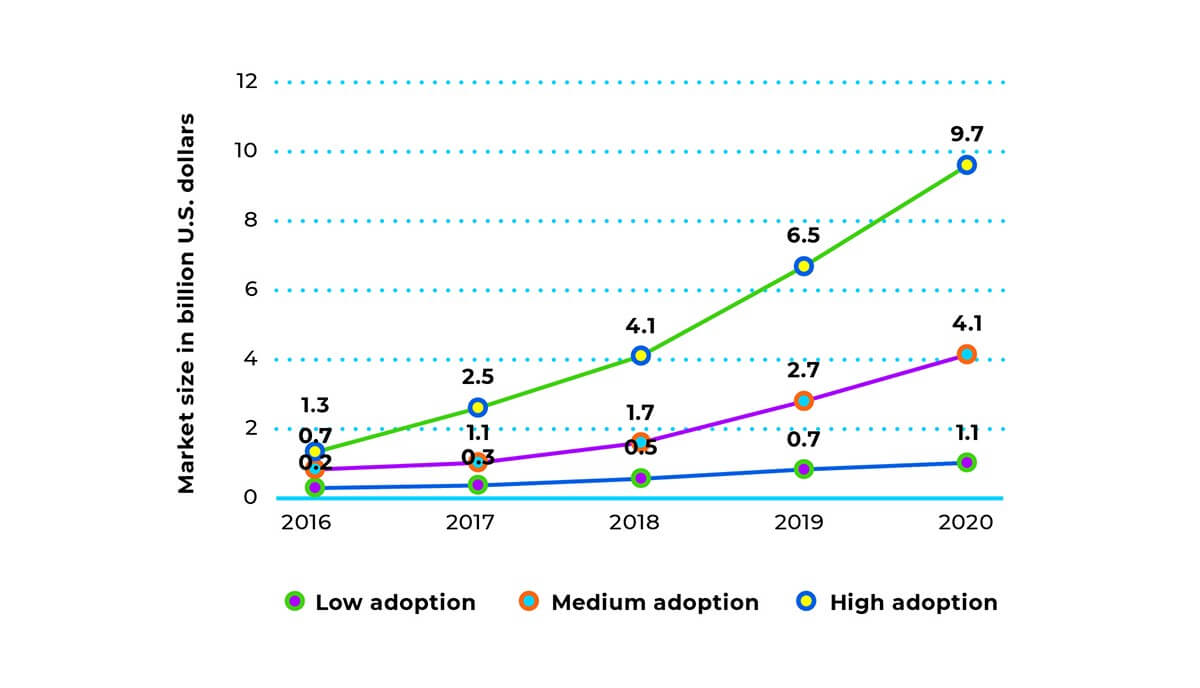
According to predictions by Statista.com, the total volume of the VR and AR markets in 2020 will have increased by more than 14 times compared to 2017.
Source: statista.com
The service has also forecasted various scenarios of sales volume changes for VR and AR devices for the period from 2016 to 2020. Even in the worst case scenario, the sales volume is expected to grow 5 times over 4 years.
Source: statista.com
According to a report by OrbisResearch.com published in 2017 and entitled “The Gaming Market of Augmented Reality (AR) — global drivers, limits, opportunities, trends and forecasts up to 2023”, Microsoft, Google, Apple, Sony, Nintendo, Niantic, Cast AR, and Gamar are the largest players in the AR industry.
According to Think Mobiles, the most popular AR game is Pokemon GO, which was even mentioned in the Guinness Book of World Records. It is believed that Pokemon GO is a modernized version of Quake 2000, where it was possible to pursue monsters in reality using a special VR helmet with sensors and cameras. This helmet was quite expensive, which had a negative impact on the popularity of the game.
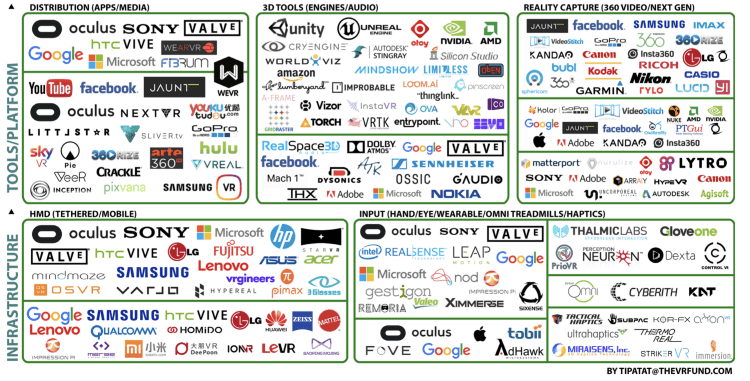
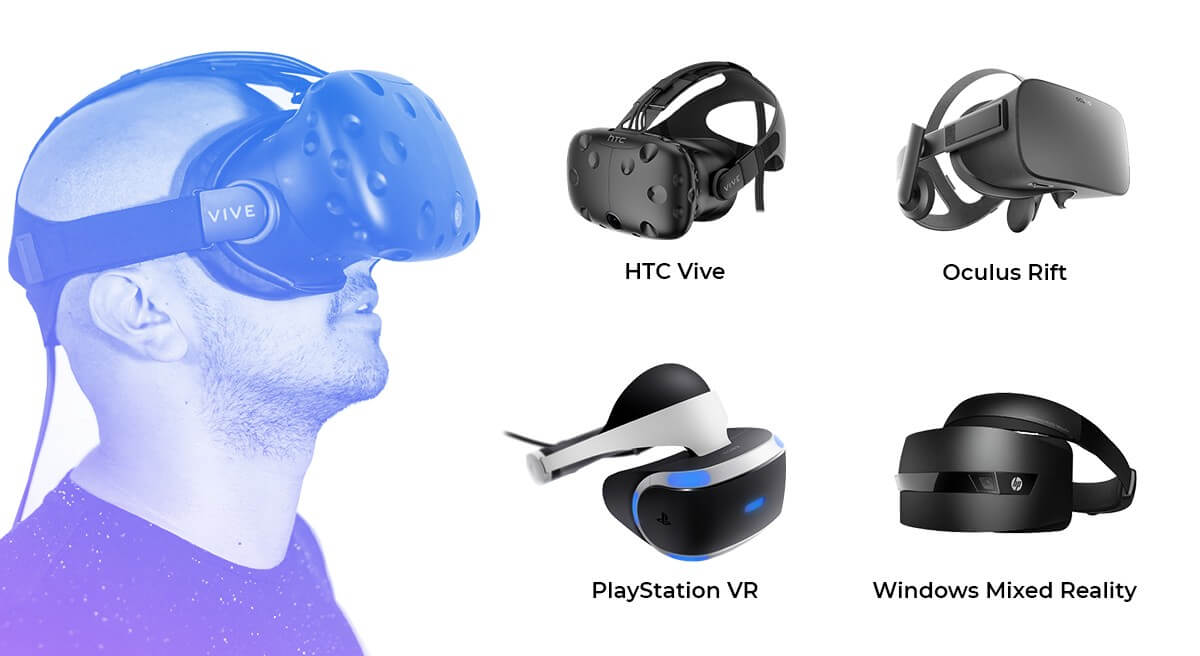
Now the VR industry is represented by the portable products of HTC Vive, Oculus Rift, PlayStation VR, and Windows Mixed Reality, and VR technology has been integrated into such popular games as Minecraft, Fallout 4, and TES: Skyrim.
VR sets existing on the market in 2018
The main development problems in the VR and AR industries
Despite the rapid development and the growing capitalization of the AR and VR industries, the developers need to solve a number of major problems.
The high cost of VR helmets, the inadequate realism of the image and pixelation, the unregulated depth of focus, and the lack of computing power — all these factors have a negative impact on the popularization of the technology.
The capacity of Pokemon GO developer Niantic’s server was severely inadequate when the game was first launched, which resulted in user complaints. This problem could have been solved using decentralized computers such as SONM.
According to Gartner Analytics, more than 262.5 million computational devices were manufactured in 2017, including desktop PCs and laptops. There are more than one billion personal computers all over the world, and this number greatly exceeds the total number of computational devices and supercomputers in all data centers.
The main expense for game developers is renting computing capacities from data centers. Conversely, the computers of ordinary users (miners) are idle for several months. The main idea of SONM is the monetization of such resources using a special marketplace, where personal PC owners can lease their computing power.
Source: sonm.com
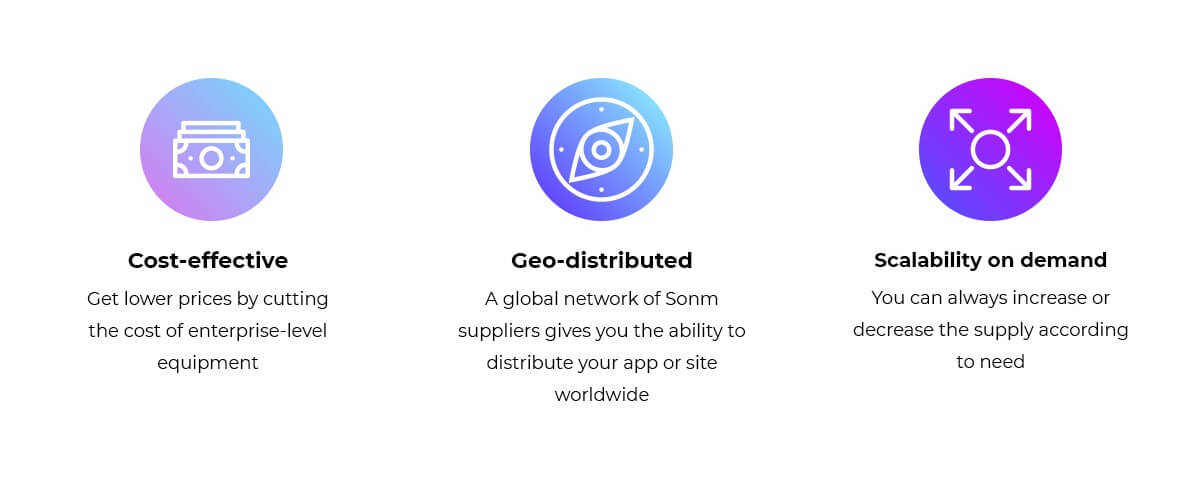
Thus, SONM has a number of advantages:
Low costs
Renting computing capacity is cheaper due to the use of consumer-grade PCs without the servicing expenses of data centers.
Better geographical coverage
Some cities or even countries contain no data centers, but miners and personal computers are everywhere.
A large number of video cards
Usually, video cards are used for rendering on a PC, but now there are other uses — machine learning, server rendering — that can be employed for modern games in the VR or AR area.
Using blockchain for VR and AR games
In 2017, the Decentraland project initially raised $24 million in 35 seconds. Development began in 2015, when the proof of concept was introduced: a certificate of ownership of virtual real estate, recorded using blockchain technology. The virtual real estate is represented as a grid, each pixel containing metadata that identifies the owner and color of the pixel.
Source: Decentraland Blog
At the end of 2016, the development of the LAND virtual world, where you can buy, sell, or lease land, began. Every land plot has its own unique coordinates (x, y) and contains information about the owner as well as a link to the content description file stored in the BitTorrent and Kademlia DHT networks. All new land plots are adjacent to existing ones, and thus, Decentraland has created a continuous virtual world. Also, Decentraland plans to found the first virtual metropolis, Genesis City.
Decentraland belongs to the users: they create content, have their own properties, and live “their lives”, which significantly distinguishes this project from other, similar ones.
Another project in this area is VibeHub — a virtual social platform for musicians, gamers, and education specialists. The startup uses a system of smart contracts to form agreements between platform participants, such as when a performer needs a videographer to record a clip, and a student needs grammar lessons. The project also creates holograms of famous people and places them in virtual worlds.
Source: VibeHub
Monetization is generated through the creation and subsequent sale of unique goods based on the platform.
Other developers in the VR/AR industry are Virtual Universe, Crypto Space, and other, but their projects only have vague prospects.
Summary
There is no doubt that VR and AR technologies are the future. The growing market capitalization, alternative solutions in obtaining computing power, emerging new technologies — these all have a great impact on the balance of the game market. Blockchain technology is not yet widespread, but the expansion of VR and AR technologies may soon change this situation.
Do you have anything to add? Leave a comment and share your opinion — I would be happy to answer you.
Here’s how you can make better use of JavaScript arrays
Quick read, I promise. Over the last few months, I noticed that the exact same four mistakes kept coming back through the pull requests I checked. I’m also posting this article because I’ve made all these mistakes myself! Let’s browse them to make sure we correctly use Array methods!
Replacing Array.indexOf with Array.includes
“If you’re looking for something in your Array, use Array.indexOf.” I remember reading a sentence like this one in my course when I was learning JavaScript. The sentence is quite true, no doubt!
Array.indexOf “returns the first index at which a given element can be found,” says the MDN documentation. So, we use the returned index later in our code, and Array.indexOf is the solution.
But, what if we only need to know if our array contains a value or not? Seems like a yes/no question, a boolean question I would say. For this case, I recommend using Array.includes which returns a boolean.
Array.filter is a very helpful method. It creates a new array from another one with all items passing the callback argument. As indicated by its name, we must use this method for filtering, and for getting a shorter array.
But, if we know our callback function can return only one item, I would not recommend it — for example, when using a callback argument filtering through a unique ID. In this case, Array.filter would return a new array containing only one item. By looking for a specific ID, our intention may be to use the only value contained in the array, making this array useless.
Let’s talk about the performance. To return all items matching the callback function, Array.filter must browse the entire array. Furthermore, let’s imagine that we have hundreds of items satisfying our callback argument. Our filtered array would be pretty big.
To avoid these situations, I recommend Array.find. It requires a callback argument like Array.filter, and it returns the value of the first element satisfying this callback. Furthermore, Array.find stops as soon as an item satisfies the callback. There is no need to browse the entire array.
I admit I’ve made this mistake many times. Then, a kind friend told me to check the MDN documentation for a better way. Here’s the thing: this is very similar to our Array.indexOf/Array.includes case above.
In the previous case, we saw Array.find requires a callback as an argument and returns an element. Is Array.find the best solution if we need to know whether our array contains a value or not? Probably not, because it returns a value, not a boolean. With an array containing objects, Array.find would return an entire object while we may only need a boolean. This could cause performance issues.
For this case, I recommend using Array.some which returns the needed boolean.
Using Array.reduce instead of chaining Array.filter and Array.map
Let’s face it, Array.reduce isn’t simple to understand. It’s true! But, if we run Array.filter, then Array.map it feels like we’re missing something, right?
I mean, we browse the array twice here. The first time to filter and create a shorter array, the second time a create a new array (again!) containing new values based on the ones we obtained from Array.filter. To get our new array, we used two Array methods. Each method has its own callback function and an array that we cannot use later — the one created by Array.filter.
To avoid low performances on this subject, my advice is to use Array.reduce instead. Same result, better code! Array.reduce allows you to filter and add the satisfying items into an accumulator. As an example, this accumulator can be a number to increment, an object to fill, a string or an array to concat.
In our case, since we’ve been using Array.map, I recommend using Array.reduce with an array to concat as an accumulator. In the following example, depending on the value for env, we will add it into our accumulator or leave this accumulator as is.
Hope this helps. Be sure to leave comments if you have any thoughts on this article or have any other use cases to show. And if you found it helpful, give me some claps ?. Thanks for reading!
This morning I found myself summarizing my favorite bits from a talk that I enjoyed at Google Cloud Next in San Francisco, What’s New with TensorFlow?
Then I thought about it for a moment and couldn’t see a reason not to share my super-short summary with you (except maybe that you might not watch the video — you totally should check it out, the speaker is awesome) so here goes…
#1 It’s a powerful machine learning framework
TensorFlow is a machine learning framework that might be your new best friend if you have a lot of data and/or you’re after the state-of-the-art in AI: deep learning. Neural networks. Big ones. It’s not a data science Swiss Army Knife, it’s the industrial lathe… which means you can probably stop reading if all you want to do is put a regression line through 20-by-2 spreadsheet.
Discovered with the help of TensorFlow, the planet Kepler-90i makes the Kepler-90 system the only other system we know of that has eight planets in orbit around a single star. No system has been found with more than eight planets, so I guess that means we’re tied with Kepler-90 for first place (for now). Learn more here.
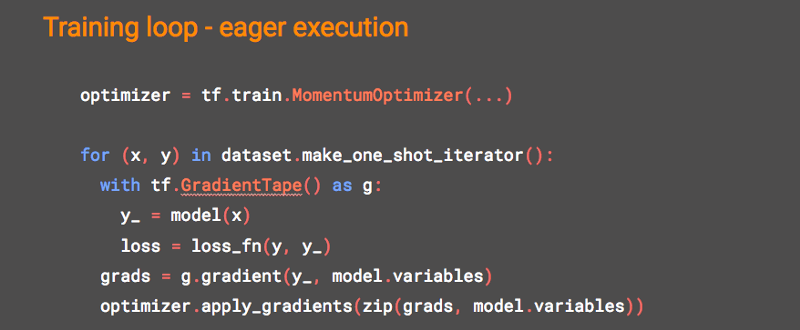
If you tried TensorFlow in the old days and ran away screaming because it forced you to code like an academic/alien instead of like a developer, come baaaack!
TensorFlow eager execution lets you interact with it like a pure Python programmer: all the immediacy of writing and debugging line-by-line instead of holding your breath while you build those huge graphs. I’m a recovering academic myself (and quite possibly an alien), but I’ve been in love with TF eager execution since it came out. So eager to please!
#3 You can build neural networks line-by-line
Keras + TensorFlow = easier neural network construction!
Keras is all about user-friendliness and easy prototyping, something old TensorFlow sorely craved more of. If you like object oriented thinking and you like building neural networks one layer at a time, you’ll love tf.keras. In just the few lines of code below, we’ve created a sequential neural network with the standard bells and whistles like dropout (remind me to wax lyrical about my metaphors for dropout sometime, they involve staplers and the flu).
Oh, you like puzzles, do you? Patience. Don’t think too much about staplers.
#4 It’s not only Python
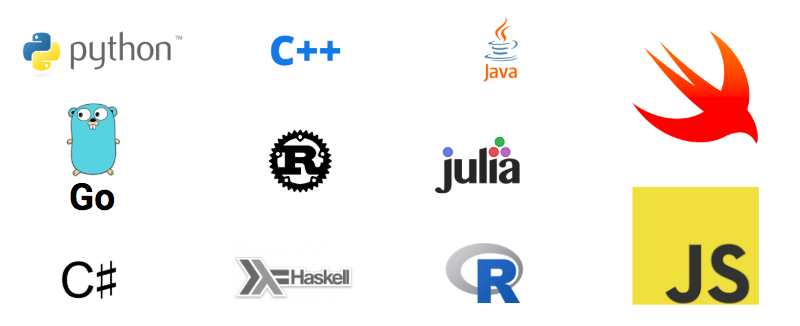
Okay, you’ve been complaining about TensorFlow’s Python monomania for a while now. Good news! TensorFlow is not just for Pythonistas anymore. It now runs in many languages, from R to Swift to JavaScript.
#5 You can do everything in the browser
Speaking of JavaScript, you can train and execute models in the browser with TensorFlow.js. Go nerd out on the cool demos, I’ll still be here when you get back.
Real-time Human Pose Estimation in the browser with TensorFlow.js. Turn on your camera for a demo here. Or don’t get out of your chair. ¯\_(ツ)_/¯ Up to you.
#6 There’s a Lite version for tiny devices
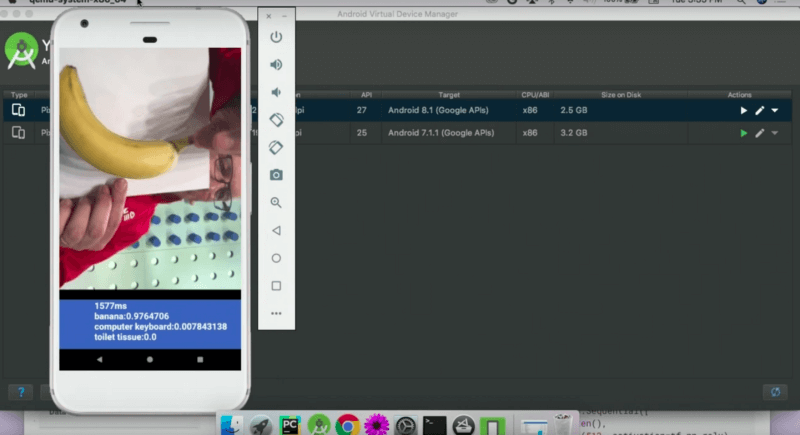
Got a clunker desktop from a museum? Toaster? (Same thing?) TensorFlow Lite brings model execution to a variety of devices, including mobile and IoT, giving you more than a 3x boost in inference speedup over original TensorFlow. Yes, now you can get machine learning on your Raspberry Pi or your phone. In the talk, Laurence does a brave thing by live-demoing image classification on an Android emulator in front of thousands… and it works.
1.6 seconds to compute? Check! Banana with over 97% probability? Check! Toilet tissue? Well, I’ve been to a few countries where I suppose a sheet of paper like the one Laurence is holding up counts.
#7 Specialized hardware just got better
If you’re tired of waiting for your CPU to finish churning through your data to train your neural network, you can now get your hands on hardware specially designed for the job with Cloud TPUs. The T is for tensor. Just like TensorFlow… coincidence? I think not! A few weeks ago, Google announced version 3 TPUs in alpha.
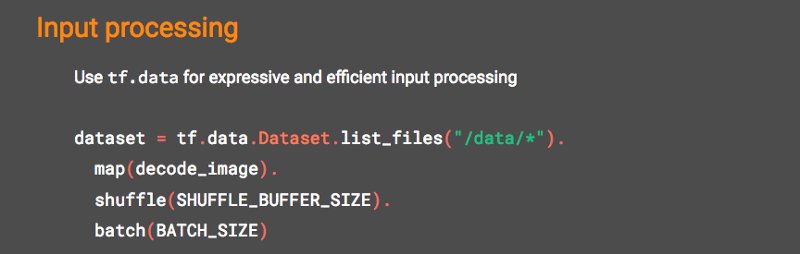
#8 The new data pipelines are much improved
What’s that you’re doing with numpy over there? In case you wanted to do it in TensorFlow but then rage-quit, the tf.data namespace now makes your input processing in TensorFlow more expressive and efficient. tf.data gives you fast, flexible, and easy-to-use data pipelines synchronized with training.
#9 You don’t need to start from scratch
You know what’s not a fun way to get started with machine learning? A blank new page in your editor and no example code for miles. With TensorFlow Hub, you can engage in a more efficient version of the time-honored tradition of helping yourself to someone else’s code and calling it your own (otherwise known as professional software engineering).
TensorFlow Hub is a repository for reusable pre-trained machine learning model components, packaged for one-line reuse. Help yourself!
While we’re on the subject of community and not struggling alone, you might like to know that TensorFlow just got an official YouTube channel and blog.
That concludes my summary, so here’s the full talk to entertain you for the next 42 minutes.
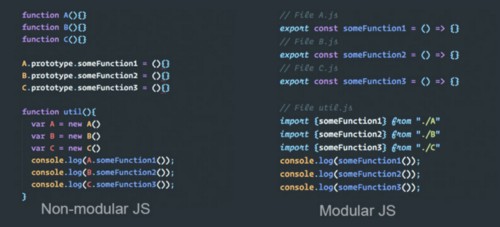
Learn the basics of the JavaScript module system and build your own library
Lately we all have been hearing a lot about “JavaScript Modules”. Everyone is likely wondering what to do with them, and how do they even play a vital role in our daily lives…?
So what the heck is the JS module system? ?
As JavaScript development gets more and more widespread, namespaces and dependencies get much more difficult to handle. Different solutions have been developed to deal with this problem in the form of module systems.
Why is understanding the JS Module System important?
Let me tell you a story.
Telling stories is as basic to human beings as eating. More so, in fact, for while food makes us live, stories are what make our lives worth living – Richard Kearney
Why am I even talking about all this stuff?
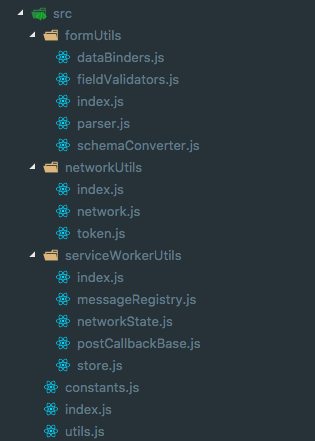
So, my day job is to design and architect projects, and I quickly realized that there were many common functionalities required across projects. I always ended up copy-pasting those functionalities to new projects over and over again.
The problem was that whenever one piece of the code changed, I needed to manually sync those changes across all my projects. To avoid all these tedious manual tasks, I decided to extract the common functionalities and compose an npm package out of them. This way, others on the team would be able to re-use them as dependencies and simply update them whenever a new release was rolled out.
This approach had some advantages:
If there was some change in the core library, then a change only had to be made in one place without refactoring all the applications’ code for the same thing.
All the applications remained in sync. Whenever a change was made, all the applications just needed to run the “npm update” command.
Source code of library
So, next step was to publish the library. Right? ?
This was the toughest part, because there were a bunch of things bouncing around in my head, like:
How do I make the tree shakeable?
What JS module systems should I target (commonjs, amd, harmony).
Should I transpile the source?
Should I bundle the source?
What files should I publish?
Everyone of us has had these kind of questions bubbling in our heads while creating a library. Right?
I’ll try to address all the above questions now.
Different Types of JS Module Systems ?
1. CommonJS
Implemented by node
Used for the server side when you have modules installed
No runtime/async module loading
import via “require”
export via “module.exports”
When you import you get back an object
No tree shaking, because when you import you get an object
No static analyzing, as you get an object, so property lookup is at runtime
You always get a copy of an object, so no live changes in the module itself
Poor cyclic dependency management
Simple Syntax
// File log.js
function log(){
  console.log('Example of CJS module system');
}
// expose log to other modules
module.exports = { log }

// File index.js
var logModule = require('./log');
logModule.log();
CommonJS Example
2. AMD: Async Module Definition
Implemented by RequireJs
Used for the client side (browser) when you want dynamic loading of modules
Import via “require”
Complex Syntax
// File log.js
define(['logModule'], function(){
    // export (expose) foo for other modules
    return {
        log: function(){
          console.log('Example of AMD module system');
      }
    };
 });

// File index.js
require(['log'], function (logModule) {
  logModule.log();
});
AMD Example
3. UMD: Universal Module Definition
Combination of CommonJs + AMD (that is, Syntax of CommonJs + async loading of AMD)
Can be used for both AMD/CommonJs environments
UMD essentially creates a way to use either of the two, while also supporting the global variable definition. As a result, UMD modules are capable of working on both client and server.
// File log.js
(function (global, factory) {
  if (typeof define === "function" && define.amd) {
    define(["exports"], factory);
  } else if (typeof exports !== "undefined") {
    factory(exports);
  } else {
    var mod = {
      exports: {}
    };
    factory(mod.exports);
    global.log = mod.exports;
  }
})(this, function (exports) {
  "use strict";

  function log() {
    console.log("Example of UMD module system");
  }
  // expose log to other modules
  exports.log = log;
});
UMD Example
4. ECMAScript Harmony (ES6)
Used for both server/client side
Runtime/static loading of modules supported
When you import, you get back bindings value (actual value)
Import via “import” and export via “export”
Static analyzing — You can determine imports and exports at compile time (statically) — you only have to look at the source code, you don’t have to execute it
Tree shakeable, because of static analyzing supported by ES6
Always get an actual value so live changes in the module itself
Better cyclic dependency management than CommonJS
// File log.js
const log = () => {
  console.log('Example of ES module system');
}
export default log

// File index.js
import log from "./log"
log();
Harmony/ES Example
So now you know all about different types of JS module systems and how they have evolved.
Although the ES Harmony module system is supported by all the tools and modern browsers, we never know when publishing libraries how our consumers might utilize them. So we must always ensure that our libraries work in all environments.
Let’s dive in deeper and design a sample library to answer all the questions related to publishing a library in the proper way.
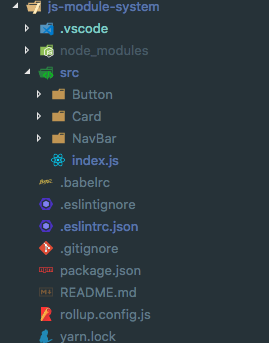
I’ve built a small UI library (you can find the source code on GitHub), and I’ll share all my experiences and explorations for transpiling, bundling, and publishing it.
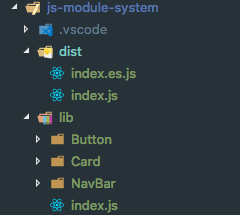
Directory Structure
Here we have a small UI library which has 3 components: Button, Card, and NavBar. Let’s transpile and publish it step by step.
Best practices before publishing ?
Tree Shaking ?
Tree shaking is a term commonly used in the context of JavaScript for dead-code elimination. It relies on the static structure of ES2015 module syntax, that is, import and export. The name and concept have been popularized by the ES2015 module bundler rollup.
Webpack and Rollup both support Tree Shaking, meaning we need to keep certain things in mind so that our code is tree shakeable.
// File shakebake.js
const shake = () => console.log('shake');
const bake = () => console.log('bake');

//can be tree shaken as we export as es modules
export { shake, bake };

// File index.js
import { shake } from './shakebake.js'
// only shake is included in the output

// File shakebake.js
const shake = () => console.log('shake');
const bake = () => console.log('bake');

//cannot be tree shaken as we have exported an object
export default { shake, bake };

// File index.js
import { shake } from './shakebake.js'
// both shake and bake are included in the output
Tree Shaking Example
2. Publish all module variants
We should publish all the module variants, like UMD and ES, because we never know which browser/webpack versions our consumers might use this library/package in.
Even though all the bundlers like Webpack and Rollup understand ES modules, if our consumer is using Webpack 1.x, then it cannot understand the ES module.
The main field of the package.json file is usually used to point to the UMD version of the library/package.
You might be wondering — how can I release the ES version of my library/package? ?
The module field of the package.json is used to point to the ES version of the library/package. Previously, many fields were used like js:next and js:main , but module is now standardized and is used by bundlers as a lookup for the ES version of the library/package.
Less well-known fact: Webpack uses resolve.mainfields to determine which fields in package.json are checked.
Performance Tip: Always try to publish the ES version of your library/package as well, because all the modern browsers now support ES modules. So you can transpile less, and ultimately you’ll end up shipping less code to your users. This will boost your application’s performance.
So now what’s next? Transpilation or Bundling? What tools should we use?
Ah, here comes the trickiest part! Let’s dive in. ?
Webpack vs Rollup vs Babel?
These are all the tools we use in our day to day lives to ship our applications/libraries/packages. I cannot imagine modern web development without them — #blessed. Therefore, we cannot compare them, so that would be the wrong question to ask! ❌
Each tool has it’s own benefits and serves different purpose based on your needs.
Let’s look at each of these tools now:
Webpack
Webpack is a great module bundler ? that is widely accepted and mostly used for building SPAs. It gives you all the features out of the box like code splitting, async loading of bundles, tree shaking, and so on. It uses the CommonJS module system.
PS:Webpack-4.0.0 alpha is already out ?. Hopefully with the stable release it will become the universal bundler for all types of module systems.
RollupJS
Rollup is also a module bundler similar to Webpack. However, the main advantage of rollup is that it follows new standardized formatting for code modules included in the ES6 revision, so you can use it to bundle the ES module variant of your library/package. It doesn’t support async loading of bundles.
Babel
Babel is a transpiler for JavaScript best known for its ability to turn ES6 code into code that runs in your browser (or on your server) today. Remember that it just transpiles and doesn’t bundle your code.
My advice: use Rollup for libraries and Webpack for apps.
Transpile (Babel-ify) the source or Bundle it
Again there’s a story behind this one. ?
I spent most of my time trying to figure out the answer to this question when I was building this library. I started digging out my node_modules to lookup all the great libraries and check out their build systems.
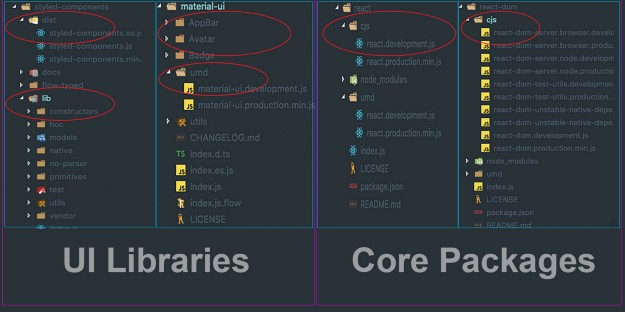
Libraries vs Packages build output comparision
After looking at the build output for different libraries/packages, I got a clear picture of what different strategies the authors of these libraries might have had in mind before publishing. Below are my observations.
As you can see in the above image, I’ve divided these libraries/packages into two groups based on their characteristics:
UI Libraries (styled-components, material-ui)
Core Packages (react, react-dom)
If you’re a good observer ? you might have figured out the difference between these two groups.
UI Libraries have a dist folder that has the bundled and minified version for ES and UMD/CJS module systems as a target. There is a lib folder that has the transpiled version of the library.
Core Packages have just one folder which has the bundled and minified version for CJS or UMD module system as a target.
But why is there a difference in build output of UI libraries and Core Packages? ?
UI Libraries
Imagine if we just publish the bundled version of our library and host it on CDN. Our consumer will use it directly in a<script/> tag. Now if my consumer wants to use just the <Button/> component, they have to load the entire library. Also, in a browser, there is no bundler which will take care of tree shaking, and we’ll end up shipping the whole library code to our consumer. We don’t want this.
<script type="module">
import {Button} from "https://unpkg.com/uilibrary/index.js";
</script>
Now if we simply transpile the src into lib and host the lib on a CDN, our consumers can actually get whatever they want without any overhead. “Ship less, load faster”. ✅
<script type="module">
import {Button} from "https://unpkg.com/uilibrary/lib/button.js";
</script>
Core Packages
Core packages are never utilized via the <script/> tag, as they need to be part of main application. So we can safely release the bundled version (UMD, ES) for these kinds of packages and leave the build system up to the consumers.
For example, they can use the UMD variant but no tree shaking, or they can use the ES variant if the bundler is capable of identifying and getting the benefits of tree shaking.
But…what about our question: should we transpile (Babelify) the source or bundle it? ?
For the UI Library, we need to transpile the source with Babel with the es module system as a target, and place it in lib. We can even host the lib on a CDN.
We should bundle and minify the source using rollup for cjs/umd module system and es module system as a target. Modify the package.json to point to the proper target systems.
"main": "dist/index.js", // for umd/cjs builds
"module": "dist/index.es.js", // for es build
...
}
For core packages, we don’t need the lib version.
We just need to bundle and minify the source using rollup for cjs/umd module system and es module system as a target. Modify the package.json to point to the proper target systems, same as above.
Tip: We can host the dist folder on the CDN as well, for the consumers who are willing to download the whole library/package via <script/> tag.
How should we build this?
We should have different scripts for each target system in package.json . You can find the rollup config in the GitHub repo.
In package.json , the "files" field is an array of file patterns that describes the entries to be included when your package is installed as a dependency. If you name a folder in the array, then it will also include the files inside that folder.
We will include the lib and dist folders in "files" field in our case.
// package.json
{
...
"files": ["dist", "lib"]
...
}
Finally the library is ready to publish. Just type the npm run build command in the terminal, and you can see the following output. Closely look at the dist and lib folders. ?
Ready to publish ?
Wrap up
Wow! Where does the time go? That was a wild ride, but I sincerely hope it gave you a better understanding of the JavaScript Module system and how you can create your own library and publish it.
Just make sure you take care of the following things:
Make it Tree Shakeable. ?
Target at least ES Harmony and CJS module systems. ?
Use Babel and Bundlers for libraries. ?
Use Bundlers for Core packages. ?
Set the module field of package.json to point to the ES version of your module (PS: It helps in tree shaking). ?
Publish the folders which have transpiled as well as bundled versions of you module. ?