• 开源镜像
  • 开源沙龙
  • 媛宝
  • 猿帅
  • 注册
  • 登录
  • 息壤开源生活方式平台
  • 加入我们

开源日报

  • 2018年10月27日:开源日报第233期

    27 10 月, 2018

    每天推荐一个 GitHub 优质开源项目和一篇精选英文科技或编程文章原文,欢迎关注开源日报。交流QQ群:202790710;微博:https://weibo.com/openingsource;电报群 https://t.me/OpeningSourceOrg


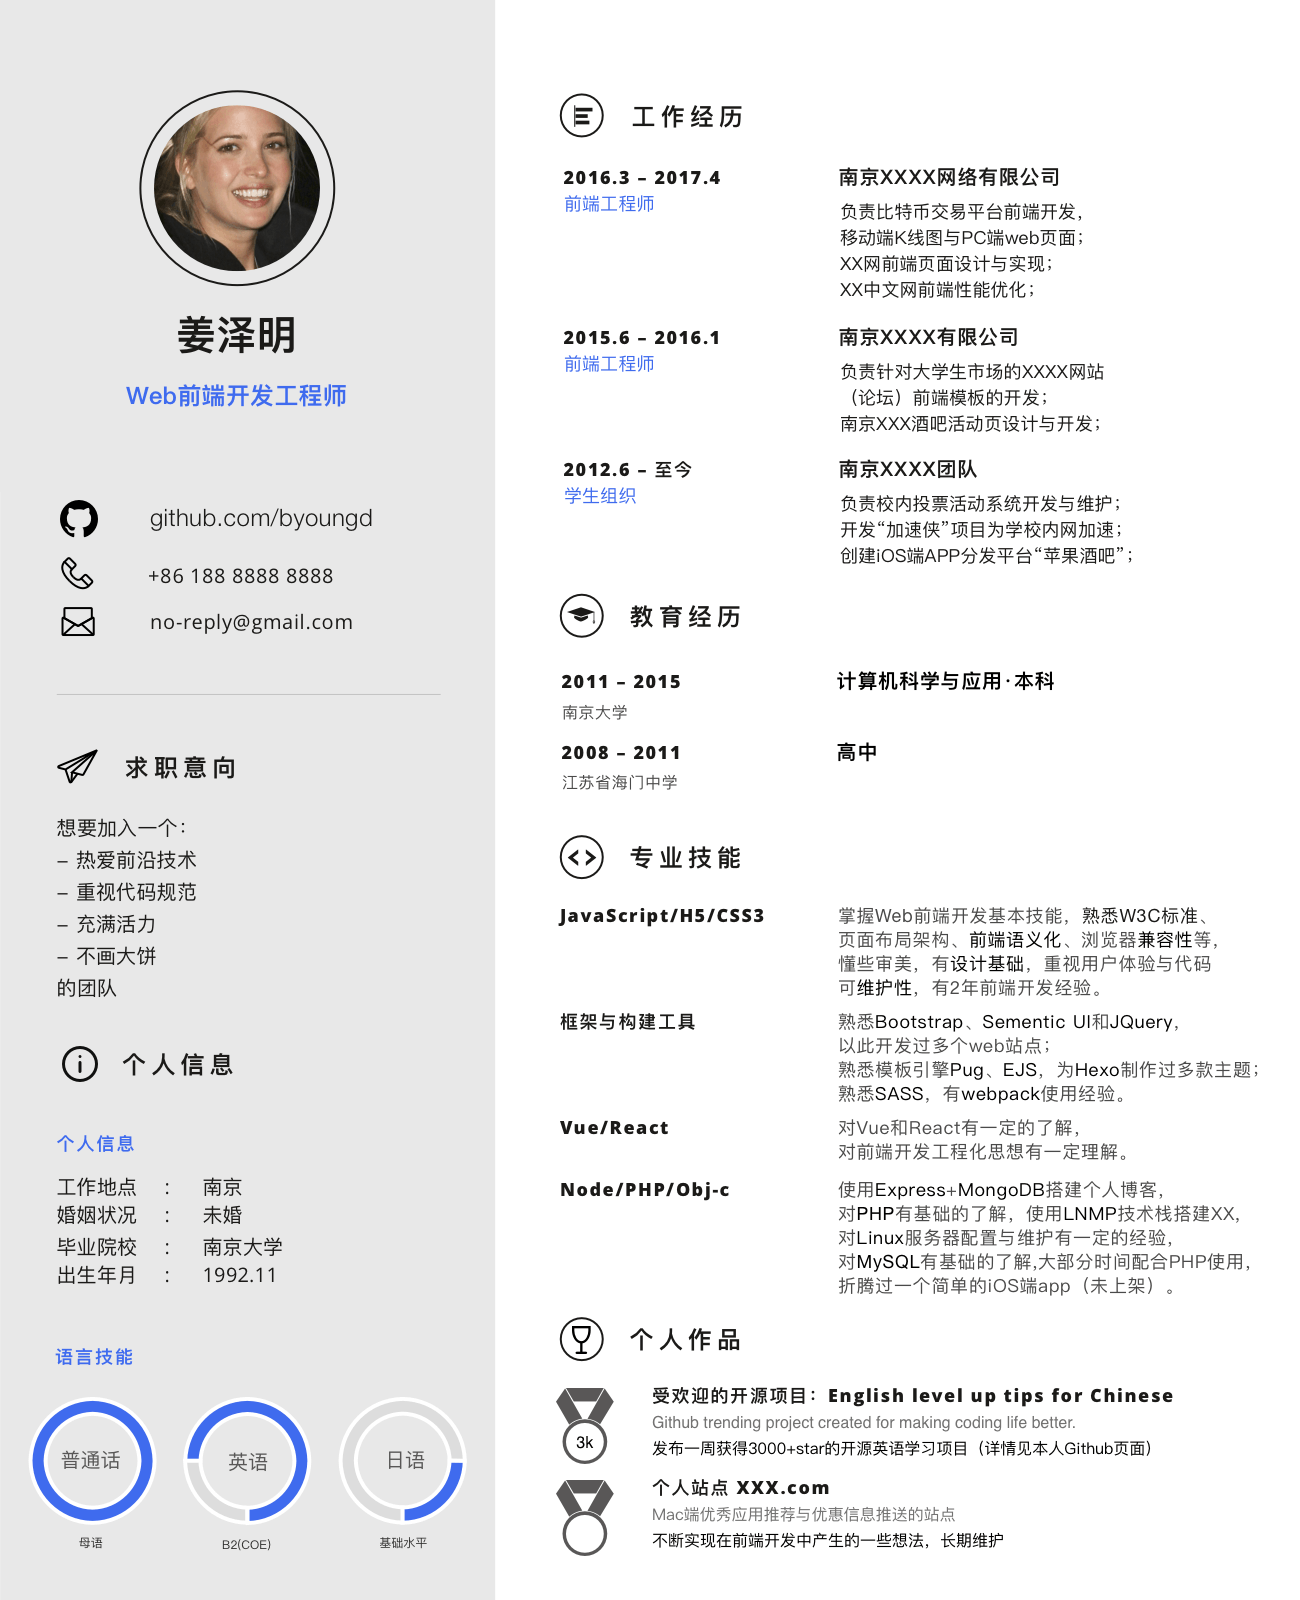
    今日推荐开源项目:《简历模版 Resume-template-for-Front-End-Developer》传送门:GitHub链接

    推荐理由:如果你正在搜索一份简历模版,这个项目肯定能作为一个好的参考,模版上包含了工作经历,个人信息与作品和专业技能水平等等你肯定需要在简历上提供的资料,而且排版看起来也相当整洁,即使现在不需要面试,以后需要模版的时候也可以将它作为一个不错的选择。


    今日推荐英文原文:《100 Days Of Code in Open Source》作者:Wajahat Karim

    原文链接:https://android.jlelse.eu/100-days-of-code-in-open-source-3ceb38474a89

    推荐理由:作者尝试着连续100天在 GitHub 上做出贡献之后学到的东西,实际上这甚至招来了一些 offer,这兴许就是付出者终有回报的体现了。

    100 Days Of Code in Open Source

    What I got in 100 days and what you can get from Open Source?

    My GitHub Contributions Graph

    Let me start by saying this. Open Source is just great. You will never know what kind of surprise is coming next and how? In this article, I’m going to tell you a story of 100 days and what kind of surprises I got. So, without further delay, let’s get started.


    First questions first! Why open source?

    Open source is all about sharing and caring. It teaches you collaboration. It teaches you to appreciate others hard work. It teaches you to respect the licenses and avoid piracy. It teaches you to make things better by contributing yourself. And it teaches you a lot of other things.

    And with the 20th anniversary of Open Source passed recently, and Microsoft’s acquisition of GitHub, the largest repository hosting platform of Open Source, its pretty self-explanatory that why open source is core part of software developers and software users.


    100 Days of Open Source

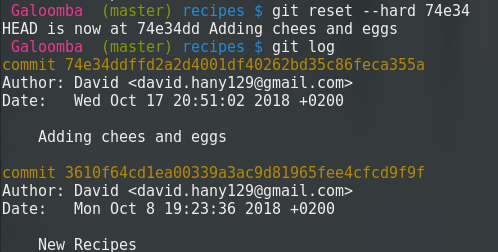
    I got into open source by a very interesting coincidence, which I shared in an article last year here. Since then, I have tried to contribute regularly. But, still I got some off days. As I was doing more open source, I was becoming addicted to it. And my heart wanted to put more and more code outside. In a matter of weeks, I started thinking about everything from open source perspective.

    My friend shared me an idea of the app. My first response was we will create it open source. I see any problem in Android Studio development and my first thought was to create the solution and put it open source. And then it didn’t matter how much stars I get on GitHub or whether it is good for developers or not. I just wanted to share more and more. But due to time constraints, I couldn’t keep it regular.

    wajahatkarim3 (Wajahat Karim)
    wajahatkarim3 has 69 repositories available. Follow their code on GitHub.github.com

    And then on 1st April, 2018, I made a promise to myself that I will not miss a single day of open source now. It was hard. Some days I was traveling. Some days I was with family. Some days I was busy with office workload. Some days I wanted to watch Game of Thrones. Some days I was sick. But, a promise is a promise. So, I kept contributing something daily. And today is the completion of 100 days of open source coding. And GitHub shows this in a very beautiful contribution graph.

    My GitHub Contribution Graph —No single gray box since April 1, 2018

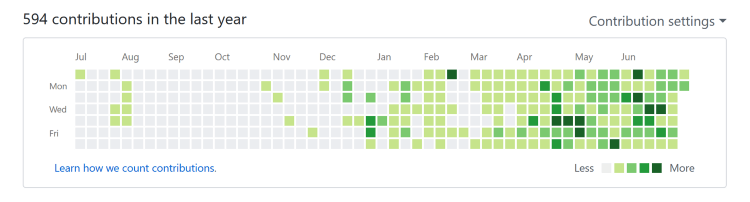
    You can see in the graph that how much I have struggled with the open source. This is just for the year, but there’s more before that as well. My most active months are last 6 months, where I have tried to remain more consistent and committed. And I haven’t missed a single day since April 1, 2018. And that’s the happiness I am sharing in this article today.


    Stats of My Contributions on Open Source

    I know you are eager to hear about what is it that I have done in 100 days. I say I have contributed something daily for consecutive 100 days. So what’s that something? Let’s look at the picture below for that.

    Stats of My 100 Days on GitHub

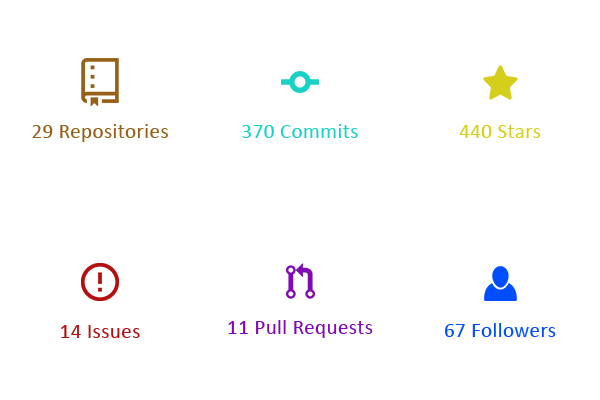
    So, I’ve created 29 repositories in 100 days. That makes about 1 repository in 3–4 days. It’s not necessary that you create repository after you finish previous project. I keep adding new repositories and keep working on different projects at different times.

    And 370 commits is like 4 commits every day. And you can imagine how much time it would take to make 4 commits. I believe 1–2 hours daily can give you 4 commits.

    The star is the way to show love on GitHub as we do clap on Medium. The 440 stars in 100 days means that I get about 4-5 stars daily. That’s actually pretty good in a perspective that about 4–5 new developers like your code everyday.

    The issues is the way to ask help on GitHub. There are plenty of Good-First-Issues on Github, if you are a new developer. So, solving issues on GitHub is also a contributing part. And I fixed 14 issues in my 100 days of code. That’s quite low number because I was too focused on my own projects to write code and creating my own issues.

    The pull request is like an achievement if it gets merged by the original owner of the repository. And 11 pull requests means that in every 10 days, 1 pull request has been merged. And that seems pretty good to me.

    Finally, the fans of your code, the followers. I got 67 followers in last 100 days. And that’s like more than 2 followers every day.


    The Surprises I Got in 100 Days

    Honestly, I never expected these. I was doing open source just to keep myself happy and active in developers community. It was giving me lots of good impression in my office, my friends, my community, and myself. So I kept going on. But, out of nowhere, I started getting different opportunities. These were the opportunities I couldn’t even dream of.

    Job Offers

    I have got 6 job offers from Canada, Germany, Singapore, China, and Australia. These came through email. And all emails started with line like this:

    Hello Wajahat,

    We saw your GitHub profile.

    Unfortunately, due to some personal issues and constraints, I can’t leave my country, Pakistan, at the moment. So I had to decline all these amazing job offers. But, I recommend the students and fellow developers to do open source and to avail these opportunities.

    Freelance Projects & Remote Work

    I got 4 freelance projects and 2 remote working paid offers on hourly basis. I did only 1 and declined all rest due to time constraints. Since, my lots of time is spent on work and then open source and writing, so it becomes a lot harder for me to focus on freelance or other projects. But, if you are any service providing developer or company, you should definitely put your code on GitHub and contribute more. This will bring lots of clients to your side as GitHub builds trust in clients’ minds about your code quality and ability to develop.

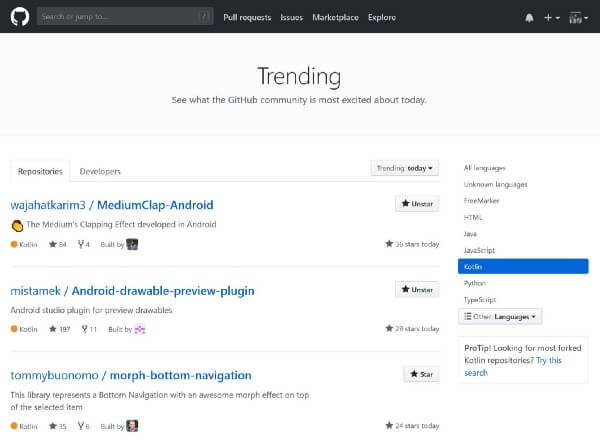
    A Library Became #1 on GitHub Trending for 2 Days

    As a developer, this is like a dream come true. I never expected this. I wouldn’t say that I was lucky. Rather I have got to say that:

    It took a lots of hard work, consistency, 1000s of lines of code, and 100s of hours spent on compiler to be in the list of GitHub Trending. Its NOT an overnight success story.

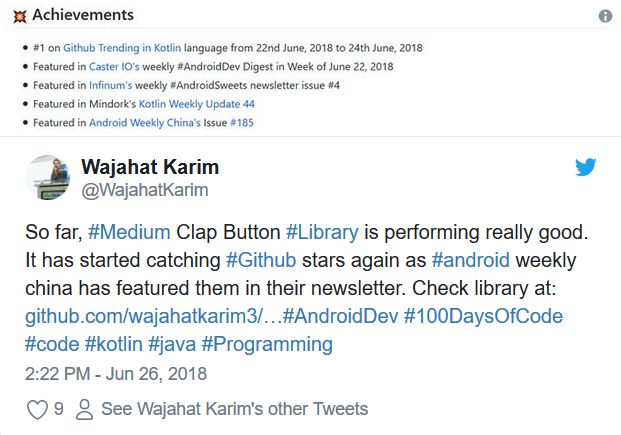
    The library was MediumClap-Android and it has so far 285 stars on Github.

    wajahatkarim3/MediumClap-Android
    MediumClap-Android – ? The Medium’s Clapping Effect developed in Androidgithub.com

    The library has been featured in various newsletters and was on GitHub Trending #1 for 2 days.

    MediumClap-Android is on #1 on GitHub Trending in Kotlin Language

    Recognition in Local and Global Community

    Its been about 2 years in Open Source and writing on Medium. But, its been just now that my work is getting recognition around the local and global community. The MediumClap-Android library has been featured in various newsletters, which I couldn’t expect for ever.


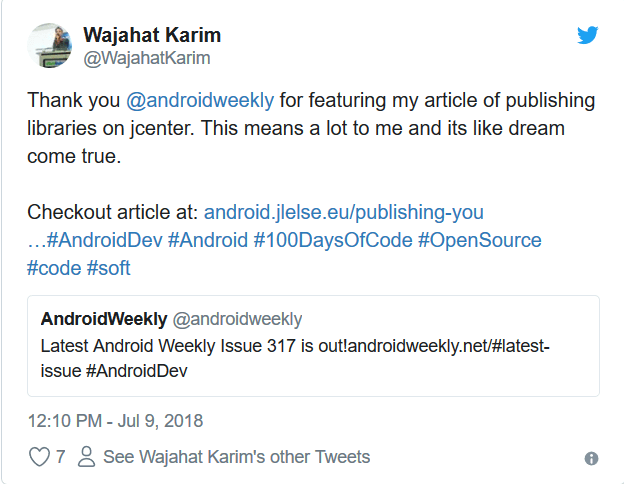
    And this week, Android Weekly featured my article in their hugely popular newsletter. And I believe that was all because of my consistent struggle and contributions in open source.


    Conclusion and What’s Next?

    My next is same as the current. I will keep doing open source and writing on Medium. And I would really recommend all the developers, new or experienced, to start contributions on open source and help each other and move forward a step towards better and collaborative software.

    In the end, I would like to thank you, the readers, the developers who use my libraries and codes on GitHub, the developers who has starred or forked my libraries, the newsletters who have featured my articles or libraries in their digests, and everyone who have helped me in any way to get me here at this stage. A very Big thanks to everyone.


    Wajahat Karim is an experienced android developer, an active open source contributor, and co-author of two books Learning Android Intents and Mastering Android Game Development with Unity. In his spare time, he likes to spend time with his family or do experiments on coding and open source, and loves to write about lots of things. Follow him on Twitter and Medium to get more updates about his work in Writing, Android and Open Source.

    Wajahat Karim (@WajahatKarim) | Twitter
    The latest Tweets from Wajahat Karim (@WajahatKarim). Android Developer. UI/UX Designer. Blogger. Writer…twitter.com

    Also, if you have any questions you’d like him to answer, contact him through his website at wajahatkarim.com with DEAR WAJAHAT in the subject line.


    每天推荐一个 GitHub 优质开源项目和一篇精选英文科技或编程文章原文,欢迎关注开源日报。交流QQ群:202790710;微博:https://weibo.com/openingsource;电报群 https://t.me/OpeningSourceOrg

  • 2018年10月26日:开源日报第232期

    26 10 月, 2018

    每天推荐一个 GitHub 优质开源项目和一篇精选英文科技或编程文章原文,欢迎关注开源日报。交流QQ群:202790710;微博:https://weibo.com/openingsource;电报群 https://t.me/OpeningSourceOrg


    今日推荐开源项目:《视频播放器 video.js》传送门:GitHub链接

    推荐理由:如果你想在你的浏览器上放一个视频播放器,兴许这个 video.js 就刚好合你的胃口。在开始之前你需要安装一下 Node.js ,然后就像平时写 HTML 一样使用元素就可以了;它们的 Readme 上也提供了示例以供照葫芦画瓢,如果想做些示例以外的调整可以参考文档。它们还提供了各种各样的插件,包括允许视频循环和添加播放列表之类的功能,当你需要的时候不妨查阅一下。顺带一提,这个播放器的使用量非常之大……根据排行榜上的说明大约有1/3的网站正在使用它,你可以看看这个了解详细信息。

    排行榜:https://trends.builtwith.com/media/VideoJS


    今日推荐英文原文:《All You need to know about Git P2.》作者:David Hany

    原文链接:https://medium.com/@Galoomba/all-you-need-to-know-about-git-p2-af13cd482ff2

    推荐理由:这一篇也是讲关于 Git 的知识的,如果你还没有看过 P1,可以从这里回去看看(传送门),依然以食谱为例子介绍 Git 中的常用命令

    All You need to know about Git P2.

    Git Commits.

    Last article we created our first commit saving the basic Burger Recipe that we loved, Check out part 1 if you missed it →https://bit.ly/2CQdPgl. Yet we didn’t help the chef to discover some new flavours without losing his old one as we promised .

    It’s time to play a little with the Ingredients

    For starters we will increase the quantity of eggs from 1 to 3 and add 2 cheese slices to the recipe.
    We open our text editor, Editing the Recipe, Testing it out, “yummy”.

    Good. It’s ready to be committed so we open the terminal using the git add command to add our changes to the Staging area and then git commit to commit our changes.

    Performing our second commit, We want to check if everything is alright

    Using the git log command we could view our commits history so let’s give it a shot to check if every thing is alright.

    There are 2 commits, Each of them have a unique ID and a commit message that should, in short, describe the commit purpose

    But by double checking the recipe we discover that we made a mistake. We misspelled cheese and that could cause misunderstanding.

    It’s possible to create a new commit fixing that misspell, But we want to keep our commit history more organized to be easier to maintain. Using the command git commit --amend --no-edit can help achieve this. The --no-edit part stands for what we don’t want to edit out off the commit message, We can renew the commit message using -m 'new message' instead of --no-edit .

    Tip: of course you have to add the file first

    Checking the commit history again, We discover that we have succeeded.

    But did that really work?!, Luckily there is the command git show that shows the recent edits that happened to our file.

    You can also view the difference between any two commits by using the command git diff <first commit ID> <second commit ID>. As we have mentioned in last article we can use the first 4 digits referring to the commit ID.

    The new recipe is ready but after discussion with the kitchen staff he decide to increase the white rolls from 4 to 5. So he decided to make a new commit increasing the quantity of white rolls.

    But that poses an important question, When should we commit ?!

    It’s good practice to make check points, And commit often as you reach one of those check points, others think that you should commit every time you have something working. whatever you choose you should always remember to commit, better safe than sorry.

    Let’s check the commit history to see if everything is okay.

    It’s all good and ready to be on stage. While the chef is cooking his new recipe we have to look over our commit history and think why we see the commit on top and not the one on the bottom!

    The HEAD

    The HEAD is typically a pointer that points to the current commit, you can change the HEAD position through many ways to check different commits.

    Check out a commit

    You can use the command git checkout <commit ID> to check a commit by its ID .

    For now don’t mind the note we will discuss that statement later. But as you can see it changed from master to 74e34. If you opened the BurgerRecipe by now you will be surprised that it changed to 4 white rolls instead of 5 as we committed last time.

    If we run git status to check our flow

    HEAD detached, what does that mean ?!

    When you run the command git checkout [commit ID] your Git files are rolled back to the state they were in when that commit was made. HEAD will now point to the commit you specified.

    Now we should check the git log to check if there are any changes.

    It looks like our 3rd commit got deleted!!

    Well, it didn’t. Each commit carries a link to the previous one, with checking out the ‘74e34’ commit we no longer have record to the ‘b2a7de’ commit.

    To return the HEAD to its position again we will check out the master. That will return the lost commit to commit history and we will discuss how it worked in the next article.

    The Chef recipe is finally ready but after testing it we become aware that 4 white rolls were enough. So we wanted to reset to the second commit and forget all about the 3rd one.

    We could do that by using the command git reset <option> <commit> , I will go with --hard as option as I don’t want anything related to the 3rd commit any more, You can check the different options in the documentation to find the one that fits your needs.

    And by any chance if you are working on a file and you have messed up something and want to return back to the last commit you made you can use git reset --hard HEAD.

    So far we’ve become so familiar with how commits work and how to move forward and backward and reset to the last commit you want , Next article we will get familiar with Branches what they mean and how to use them.

    →Today’s Commands

    git commit --amend --no-edit updates the last commit

    git show Show various types of objects

    git diff Show changes between commits, commit and working tree, etc

    git checkout Switch branches or restore working tree files

    git reset Reset current HEAD to the specified state


    每天推荐一个 GitHub 优质开源项目和一篇精选英文科技或编程文章原文,欢迎关注开源日报。交流QQ群:202790710;微博:https://weibo.com/openingsource;电报群 https://t.me/OpeningSourceOrg

  • 2018年10月25日:开源日报第231期

    25 10 月, 2018

    每天推荐一个 GitHub 优质开源项目和一篇精选英文科技或编程文章原文,欢迎关注开源日报。交流QQ群:202790710;微博:https://weibo.com/openingsource;电报群 https://t.me/OpeningSourceOrg


    今日推荐开源项目:《Unity UnityCsReference》传送门:GitHub链接

    推荐理由:相信不少游戏开发者都听说过 Unity,这个游戏引擎简单易用。而现在它们的开发团队在 GitHub 上发布了 C# 版本的源码以供参考,不过他们并不打算开源 Unity,所以也并不允许开发者修改或者重新发布这些源代码,想了解源码的朋友只能靠这个来满足好奇心了。在 Unity 的每个新版本发布之后,这个存储库都将会更新,所以不需要担心它会过时。


    今日推荐英文原文:《Understanding Design Patterns in JavaScript》作者:Sukhjinder Arora

    原文链接:https://blog.bitsrc.io/understanding-design-patterns-in-javascript-13345223f2dd

    推荐理由:在开始写代码之前,确立项目的目的与功能等等,然后选择合适的设计模式,好的设计模式可以让代码更容易理解维护。如果你还没有选择一种 JS 设计模式的话,这篇文章可以帮到你。

    Understanding Design Patterns in JavaScript

    Learn About Various Design Patterns in JavaScript

    Photo by NESA by Makers on Unsplash

    When you start a new project, you don’t immediately start coding. You first have to define the purpose and scope of the project, then list out the project features or specs. After you can either start coding or if you are working on a more complex project then you should choose a design pattern that best suits your project.

    What is a Design Pattern?

    In software engineering, a design pattern is a reusable solution for commonly occurring problems in software design. Design patterns represent the best practices used by the experienced software developers. A design pattern can be thought of as a programming template.

    Why use Design Patterns?

    Many programmers either think design patterns are a waste of time or they don’t know how to apply them appropriately. But using an appropriate design pattern can help you to write better and more understandable code, and the code can be easily maintained because it’s easier to understand.

    Most importantly, the design patterns give software developers a common vocabulary to talk about. They show the intent of your code instantly to someone learning the code.

    For example, if you are using decorator pattern in your project, then a new programmer would immediately know what that piece of code is doing, and they can focus more on solving the business problem rather than trying to understand what that code is doing.

    Now that we know what design patterns are, and why they are important, let’s dive into various design patterns used in JavaScript.


    Module Pattern

    A Module is a piece of self-contained code so we can update the Module without affecting the other parts of the code. Modules also allow us to avoid namespace pollution by creating a separate scope for our variables. We can also reuse modules in other projects when they are decoupled from other pieces of code.

    Modules are an integral part of any modern JavaScript application and help in keeping our code clean, separated and organized. There are many ways to create modules in JavaScript, one of which is Module pattern.

    Platforms like Bit can help turn modules and components into shared building blocks, which can be shared, discovered and developed from any project. With 0 refactoring, it’s a quick and scalable way to share and reuse code.

    Bit – Share and build with code components
    Bit helps you share, discover and use code components between projects and applications to build new features and…bitsrc.io

    Unlike other programming languages, JavaScript doesn’t have access modifiers, that is, you can’t declare a variable as private or public. So the Module pattern is also used to emulate the concept of encapsulation.

    This pattern uses IIFE (immediately-invoked function expression), closures and function scope to simulate this concept. For example:

    const myModule = (function() {
      
      const privateVariable = 'Hello World';
      
      function privateMethod() {
        console.log(privateVariable);
      }
    
      return {
        publicMethod: function() {
          privateMethod();
        }
      }
    
    })();
    
    myModule.publicMethod();

    As it’s IIFE, the code is immediately executed, and the returned object is assigned to the myModule variable. Due to closures, the returned object can still access the functions and variables defined inside the IIFE even after when IIFE has finished.

    So the variables and functions defined inside the IIFE are essentially hidden from the outer scope and thus making it private to the myModule variable.

    After the code is executed, the myModule variable looks like this:

    const myModule = {
      publicMethod: function() {
        privateMethod();
      }};

    So we can call the publicMethod() which will, in turn, call the privateMethod(). For example:

    // Prints 'Hello World'
    module.publicMethod();

    Revealing Module Pattern

    The Revealing Module pattern is a slightly improved version of the module pattern by Christian Heilmann. The problem with the module pattern is that we have to create new public functions just to call the private functions and variables.

    In this pattern, we map the returned object’s properties to the private functions that we want to reveal as public. That’s why it’s called Revealing Module pattern. For example:

    const myRevealingModule = (function() {
      
      let privateVar = 'Peter';
      const publicVar  = 'Hello World';
    
      function privateFunction() {
        console.log('Name: '+ privateVar);
      }
      
      function publicSetName(name) {
        privateVar = name;
      }
    
      function publicGetName() {
        privateFunction();
      }
    
      /** reveal methods and variables by assigning them to object     properties */
    
    return {
        setName: publicSetName,
        greeting: publicVar,
        getName: publicGetName
      };
    
    })();
    
    myRevealingModule.setName('Mark');
    
    // prints Name: Mark
    myRevealingModule.getName();

    This pattern makes it easier to understand which of our functions and variables can be accessed publicly, which helps in code readability.

    After the code is executed, the myRevealingModule looks like this:

    const myRevealingModule = {
      setName: publicSetName,
      greeting: publicVar,
      getName: publicGetName
    };

    We can call myRevealingModule.setName('Mark'), which is a reference to the inner publicSetName and myRevealingModule.getName(), which is a reference to the inner publicGetName. For example:

    myRevealingModule.setName('Mark');
    
    // prints Name: Mark
    myRevealingModule.getName();

    Advantages of Revealing Module pattern over Module Pattern:

    • We can change members from public to private and vice versa by modifying a single line in the return statement.
    • The returned object contains no function definitions, all right-hand side expressions are defined inside the IIFE, making the code clear and easy to read.

    ES6 Modules

    Before ES6, JavaScript didn’t have built-in modules, so developers had to rely on third-party libraries or the module pattern to implement modules. But with ES6, JavaScript has native modules.

    ES6 modules are stored in files. There can only be one module per file. Everything inside a module is private by default. Functions, variables, and classes are exposed using the export keyword. The code inside a module always runs in strict mode.

    Exporting a Module

    There are two ways to export a function and variable declaration:

    • By adding the export keyword in front of function and variable declaration. For example:
    // utils.js
    
    export const greeting = 'Hello World';
    
    export function sum(num1, num2) {
      console.log('Sum:', num1, num2);
      return num1 + num2;
    }
    
    export function subtract(num1, num2) {
      console.log('Subtract:', num1, num2);
      return num1 - num2;
    }
    
    // This is a private function
    
    function privateLog() {
      console.log('Private Function');
    }
    • By adding the export keyword at end of the code containing names of functions and variables we want to export. For example:
    // utils.js
    
    function multiply(num1, num2) {
      console.log('Multiply:', num1, num2);
      return num1 * num2;
    }
    
    function divide(num1, num2) {
      console.log('Divide:', num1, num2);
      return num1 / num2;
    }
    
    // This is a private function
    
    function privateLog() {
      console.log('Private Function');
    }
    
    export {multiply, divide};

    Importing a Module

    Similar to exporting a module, there are two ways to import a module by using the import keyword. For example:

    • Importing multiple items at one time
    // main.js
    
    // importing multiple items
    import { sum, multiply } from './utils.js';
    
    console.log(sum(3, 7));
    console.log(multiply(3, 7));
    • Importing all of a module
    // main.js
    
    // importing all of module
    
    import * as utils from './utils.js';
    
    console.log(utils.sum(3, 7));
    console.log(utils.multiply(3, 7));

    Imports and Exports can be aliased

    If you want to avoid naming collisions, you can change the name of export both during export as well as import. For example:

    • Renaming an export
    // utils.js
    
    function sum(num1, num2) {
      console.log('Sum:', num1, num2);
      return num1 + num2;
    }
    
    function multiply(num1, num2) {
      console.log('Multiply:', num1, num2);
      return num1 * num2;
    }
    
    export {sum as add, multiply};
    • Renaming an import
    // main.js
    
    import { add, multiply as mult } from './utils.js';
    
    console.log(add(3, 7));
    console.log(mult(3, 7));

    Singleton Pattern

    A Singleton is an object which can only be instantiated only once. A singleton pattern creates a new instance of a class if one doesn’t exist. If an instance exists, it simply returns a reference to that object. Any repeated calls to the constructor would always fetch the same object.

    JavaScript has always had singletons built-in to the language. We just don’t call them singletons, we call them object literal. For example:

    const user = {
      name: 'Peter',
      age: 25,
      job: 'Teacher',
      greet: function() {
        console.log('Hello!');
      }
    };

    Because each object in JavaScript occupies a unique memory location and when we call the user object, we are essentially returning reference to this object.

    If we try to copy the user variable into another variable and modify that variable. For example:

    const user1 = user;
    user1.name = 'Mark';

    We would see both of objects are modified because objects in JavaScript are passed by reference not by value. So there is only a single object in the memory. For example:

    // prints 'Mark'
    console.log(user.name);
    
    // prints 'Mark'
    console.log(user1.name);
    
    // prints true
    console.log(user === user1);

    Singleton pattern can be implemented using the constructor function. For example:

    let instance = null;
    
    function User() {
      if(instance) {
        return instance;
      }
    
      instance = this;
      this.name = 'Peter';
      this.age = 25;
      
      return instance;
    }
    
    const user1 = new User();
    const user2 = new User();
    
    // prints true
    console.log(user1 === user2);

    When this constructor function is called, it checks if the instance object exists or not. If the object doesn’t exist, it assigns the this variable to the instance variable. And if the object exists, it just returns that object.

    Singletons can also be implemented using the module pattern. For example:

    const singleton = (function() {
      let instance;
      
      function init() {
        return {
          name: 'Peter',
          age: 24,
        };
      }
    
      return {
        getInstance: function() {
          if(!instance) {
            instance = init();
          }
          
          return instance;
        }
      }
    })();
    
    const instanceA = singleton.getInstance();
    const instanceB = singleton.getInstance();
    
    // prints true
    console.log(instanceA === instanceB);

    In the above code, we are creating a new instance by calling the singleton.getInstance method. If an instance already exists, this method simply returns that instance, if the instance doesn’t exist, it creates a new instance by calling the init() function.

    Factory Pattern

    Factory Pattern is a pattern that uses factory methods to create objects without specifying the exact class or constructor function from which the object will be created.

    The factory pattern is used to create objects without exposing the instantiation logic. This pattern can be used when we need to generate a different object depending upon a specific condition. For example:

    class Car{
      constructor(options) {
        this.doors = options.doors || 4;
        this.state = options.state || 'brand new';
        this.color = options.color || 'white';
      }
    }
    
    class Truck {
      constructor(options) {
        this.doors = options.doors || 4;
        this.state = options.state || 'used';
        this.color = options.color || 'black';
      }
    }
    
    class VehicleFactory {
      createVehicle(options) {
        if(options.vehicleType === 'car') {
          return new Car(options);
        } else if(options.vehicleType === 'truck') {
          return new Truck(options);
          }
      }
    }

    Here I have created a Car and a Truck class (with some default values) which is used to create new car and truck objects. And I have defined a VehicleFactory class to create and return a new object based on vehicleType property received in the options object.

    const factory = new VehicleFactory();
    
    const car = factory.createVehicle({
      vehicleType: 'car',
      doors: 4,
      color: 'silver',
      state: 'Brand New'
    });
    
    const truck= factory.createVehicle({
      vehicleType: 'truck',
      doors: 2,
      color: 'white',
      state: 'used'
    });
    
    // Prints Car {doors: 4, state: "Brand New", color: "silver"}
    console.log(car);
    
    // Prints Truck {doors: 2, state: "used", color: "white"}
    console.log(truck);

    I have created a new object factory of VehicleFactory class. After that we can create a new Car or Truck object by calling factory.createVehicle and passing an options object with a vehicleType property with a value of car or truck.

    Decorator Pattern

    A Decorator pattern is used to extend the functionality of an object without modifying the existing class or constructor function. This pattern can be used to add features to an object without modifying the underlying code using them.

    A simple example of this pattern would be:

    function Car(name) {
      this.name = name;
    
      // Default values
      this.color = 'White';
    }
    
    // Creating a new Object to decorate
    const tesla= new Car('Tesla Model 3');
    
    // Decorating the object with new functionality
    
    tesla.setColor = function(color) {
      this.color = color;
    }
    
    tesla.setPrice = function(price) {
      this.price = price;
    }
    
    tesla.setColor('black');
    tesla.setPrice(49000);
    
    // prints black
    console.log(tesla.color);

    A more practical example of this pattern would be:

    Let’s say, the cost of a car differs depending upon the number of features it has. Without decorator pattern, we would have to create different classes for different combinations of features, each having a cost method to calculate the cost. For example:

    class Car() {
    }
    
    class CarWithAC() {
    }
    
    class CarWithAutoTransmission {
    }
    
    class CarWithPowerLocks {
    }
    
    class CarWithACandPowerLocks {
    }

    But with decorator pattern, we can create a base class Car and add the cost of different configuration to its object using the decorator functions. For example:

    class Car {
      constructor() {
      // Default Cost
      this.cost = function() {
      return 20000;
      }
    }
    }
    
    // Decorator function
    function carWithAC(car) {
      car.hasAC = true;
      const prevCost = car.cost();
      car.cost = function() {
        return prevCost + 500;
      }
    }
    
    // Decorator function
    function carWithAutoTransmission(car) {
      car.hasAutoTransmission = true;
       const prevCost = car.cost();
      car.cost = function() {
        return prevCost + 2000;
      }
    }
    
    // Decorator function
    function carWithPowerLocks(car) {
      car.hasPowerLocks = true;
      const prevCost = car.cost();
      car.cost = function() {
        return prevCost + 500;
      }
    }

    First, we create a base class Car for creating the Car objects. Then, we create the decorator for the feature we want to add onto it and pass the Car object as a parameter. Then we override the cost function of that object which returns the updated cost of the car and adds a new property to that object to indicate which feature has been added.

    To add a new feature, we could do something like this:

    const car = new Car();
    console.log(car.cost());
    
    carWithAC(car);
    carWithAutoTransmission(car);
    carWithPowerLocks(car);

    In the end, we can calculate the cost of the car like this:

    // Calculating total cost of the car
    console.log(car.cost());

    Conclusion

    We have learned about various design patterns used in JavaScript, but there are design patterns that I haven’t covered here, which can be implemented in JavaScript.

    While it’s important to know various design patterns, it’s also equally important to not to overuse them. Before using a design pattern, you should carefully consider if your problem fits that design pattern or not. To know if a pattern fits your problem, you should study the design pattern as well as the applications of that design pattern.

    That’s it and if you found this article helpful, please click the clap ?button below, you can also follow me on Medium and Twitter, and if you have any doubt, feel free to comment! I’d be happy to help 🙂


    Learn more

    SOLID Principles every Developer Should Know
    A short yet detailed introduction to understanding SOLID design principles.blog.bitsrc.io
    5 Tools For Faster Development In React
    5 tools to speed the development of your React application, focusing on components.blog.bitsrc.io
    Understanding Execution Context and Execution Stack in Javascript
    Understanding execution context and stack to become a better Javascript developer.blog.bitsrc.io

    每天推荐一个 GitHub 优质开源项目和一篇精选英文科技或编程文章原文,欢迎关注开源日报。交流QQ群:202790710;微博:https://weibo.com/openingsource;电报群 https://t.me/OpeningSourceOrg

  • 2018年10月24日:开源日报第230期

    24 10 月, 2018

    每天推荐一个 GitHub 优质开源项目和一篇精选英文科技或编程文章原文,欢迎关注开源日报。交流QQ群:202790710;微博:https://weibo.com/openingsource;电报群 https://t.me/OpeningSourceOrg


    今日推荐开源项目:《高等级主城和新手村庄合二为一 dev.to》传送门:GitHub链接

    推荐理由:一个为开发人员准备的讨论平台,上至高等级玩家下至初心者,无论你身处哪个等级你都可以参与讨论,在这里大家是平等的,你可以很快根据自己的经验找到合适自己的位置,你可以在这里看看别人发布的教程或者是解答疑问的过程来学习知识,亦或者把自己的问题放上去等待解答,这都取决于你自己。


    今日推荐英文原文:《Top JavaScript Trends To Look For In 2019》作者:Mantra Malhotra

    原文链接:https://hackernoon.com/which-top-javascript-trends-to-look-in-2019-528072bf0082

    推荐理由:JS 中流行的技术,包括一些流行框架和库,如果要着手开发新项目或者学习一些 JS 中的技术的话不妨看一下它们,它们之所以流行的原因自然是相比于其他同类技术拥有自己的优势,而这些优势在开发上可以更好的发挥作用。

    Top JavaScript Trends To Look For In 2019

    As we know that the digital world is multi-layered, several pieces of technology come together to offer you an experience through a smart screen.

    If you ever think about how web pages and websites are giving your business a boost, then there are many things behind the curtain. In this blog, we will break down such technologies/trends which you should know.

    The development of JavaScript is changing rapidly, especially in the last twelve months. 2018 was a year with a lot of action, changes and new initiatives in front-end web development. The race to become the preferred JavaScript framework has heated up, as more projects have started to choose to React js including Vue over Angular.

    If you are a startup or a small business, it is worth taking a look at all the new trends that have emerged over the past year. These new frameworks and integrations could be the key to putting your foot in the door of new innovative projects.

    Let’s take a look at the major trends in JavaScript so you are up to date and ahead of the game.

    1) GraphQL

    Many consider that GraphQL is the replacement for the REST APIs in the future. However, REST and GraphQL do not necessarily have to be competitors, and one is not better than the other for all applications.

    GraphQL is a query language that allows developers to make more specific requests from the server and package these requests in a simple way. GraphQL integrates with React through the Relay framework. It is an important trend for server requests and JavaScript APIs to advance, and it is another language that is worth trying.

    2) Reason

    Facebook is using Reason in production to drive the Messenger web application. The reason is a compilation of JavaScript language. It also includes a Reason React wrapper that allows you to write the Reason code that is compiled into React JS.

    The reason is a functional and static type programming language that can drive web applications on a single page. It allows you to write security code of type that plays well with JavaScript and OCaml.

    This is definitely an emerging trend that is worth seeing (and perhaps some experimentation with a parallel project) if you are a JavaScript developer.

    3) Next.js

    Next.js is a minimalist framework for JavaScript applications. Helps simplify the implementation experience of an application. When combined with React, you can get all the powerful React functionality at the same time you get a simple experience similar to Vue in terms of tools, code division, routing, etc.

    Next.js works to make your JavaScript run universally, whether on a server, computer or mobile device. It helps to create universal applications represented on the server with a minimum code and learning curve.

    It is definitely worth learning if you have not done it yet, especially because it works well with React to create powerful universal applications. 2018 will probably see continued growth for Next.js.

    4) ReactJS

    React is a JavaScript library for creating user interfaces maintained by Facebook. It is ideal for large web applications that use data and allow changes over time without reloading the page.

    React simplifies the creation of interactive user interfaces and can be used in combination with other libraries or JS frameworks such as AngularJS. React has the backing of Facebook and its community has grown along with its popularity.

    5) AngularJS

    Google maintains an open source framework based on JavaScript for front-end web applications that is known as AngularJS. It addresses many of the challenges encountered by developers when developing single-page applications.

    Backed by Google and supported by a diverse community, it was the dominant player in JavaScript. It is still an important force and used by many startups as well as already established businesses today.

    Conclusion:

    So far, we have covered some of the many emerging trends in the development of JavaScript and front-end web applications in this blog. Luckily, you have found something new to try for your business be it a startup or a large scale one.

    JavaScript is constantly changing, and there are likely to be new leading technologies for this date next year. Staying ahead of the curve is a challenge, but it is important for front-end developers who want to work at the top of their game on the most exciting projects.

    ValueCoders is a leading software development company in India having a team of expert JavaScript developers who have successfully delivered more than 4200 projects to 2500+ satisfied customers. It is also providing expert software testing services to its clients since 2004.


    每天推荐一个 GitHub 优质开源项目和一篇精选英文科技或编程文章原文,欢迎关注开源日报。交流QQ群:202790710;微博:https://weibo.com/openingsource;电报群 https://t.me/OpeningSourceOrg

←上一页
1 … 201 202 203 204 205 … 262
下一页→

Proudly powered by WordPress