推荐理由:说真的,在喜欢 Linux 的朋友心中,能向 Linux Kernel 提交代码可真的是一件至高无上的荣誉,这篇文章就是讲述作者的这个经历,来一起看看怎么做到的吧。
Submitting my first patch to the Linux kernel
Image by : opensource.com
I started using Linux three years ago while attending university, and I was fascinated to discover a different desktop environment. My professor introduced me to the Ubuntu operating system, and I decided to dual-boot it along with Windows on my laptop the same day.
Within three months, I had completely abandoned Windows and shifted to Fedora after hearing about the RPM Package Manager. I also tried running Debian for stability, but in early 2017 I realized Arch Linux suits all my needs for cutting-edge packages. Now I use it along with the KDE desktop and can customize it according to my needs.
I have always been intrigued by Linux hacks and the terminal instead of using ready-made unified installers. This led me to explore the Linux kernel tree and find a way to contribute to the community.Submitting my first patch to the Linux kernel was a breathtaking experience. I started the second week of February 2018, and it took me about an hour to clone the latest Linux kernel source tree on an 8-Mbps internet connection, and nearly all night to compile and build the 4.15 Arch Linux kernel. I followed the KernelNewbies guide and read the first three chapters of Linux Device Drivers, Third Edition. This book introduced me to the device drivers, along with the specific types, and described how to insert/remove them as a module during the runtime. The sample code in the book helped me create a hello world driver and experiment with the insmod and rmmod commands (the code samples in subsequent chapters are a bit outdated).
Many people advised me to read books on operating systems and Linux kernel development before contributing; others suggested following the KernelNewbies’ guide and using the bug-finding tools to fix errors. I followed the latter advice because I found exploring and experimenting with the code around errors is the best way to learn and understand the kernel code.
My first cleanup was removing the “out of memory” warning by running the checkpatch.pl script on the vt6656 driver directory. After adding the changelog and updating the patch, I submitted my first patch on February 10. After I added the changelog, I received an email from Greg Kroah-Hartman on February 12, stating that my patch had been added to the staging-next branch and would be ready to merge in the next major kernel release.
I recommend keeping your first patch simple; one or two lines will inspire you to contribute more. Keep in mind that quality, not quantity, is what matters. Before contributing to the TODO list of the drivers, you should acquire extensive knowledge of device drivers and the operating system. The thrill of contributing will keep you going.
我们可以看到,链接各个节点的线条颜色是黄色,这代表的是数据的类型。黄色是整型,橙色是浮点型( Luna 中被称为real),紫色是字符串型,列表(数组)是蓝色,含有多种数据类型的列表是绿色。每个节点的左端代表输入,右端代表输出。
数据类型:
就 Luna 目前的数据类型及处理来看,想要成为一门合格的面向对象的可视化语言还亟待完善。
Luna 目前支持三种基本数据类型:整型,真值(即浮点型),字符串,但三者直接的转换如1+1.5这种表达式尚不能被实现,因此在用于数据处理方面的话还较为麻烦。
关于自定义数据类型:
与 python 类似, Luna 可以靠类生成一个新对象,以此达到使用自定义数据类型的目的。
对象在 Luna 里具有不可变性。也就是说在其他语言里,你可能会使用counter.count += 1去改变对象。而在 Luna 里,如果你写foo = Circle 15.0, 无论如何使用它,foo将永远是Circle 15.0,除非你重定义foo。
构造类与方法:
以下是构造类和方法的文本说明:
class Shape:
Circle:
radius :: Real
Rectangle:
width  :: Real
height :: Real

def perimeter: case self of
Circle r: 2.0 * pi * r
Rectangle w h: 2.0 * w + 2.0 * h

def area: case self of
Circle r: pi * r * r
Rectangle w h: w * h
总结:
主要优势:
作为一款新型的可视化编程语言, Luna 更关注于数据的处理,这可以使任何需要使用计算机辅助进行数据处理的人都能快速的使用 Luna 进行编程。
主要缺陷:
目前的 Luna 在类和对象方面还有所欠缺。目前,没有办法使用可视化编辑器定义类和方法。
个人感觉 Luna 为了图形化程序流程在代码的灵活性上作出了很大的妥协,以至于cos=sin=5这样的连等表达式都无法一行写出,这对笔者这种喜爱语法糖的人来说还是比较不友好的QAQ,不过 Luna 本身侧重的就是那些有数据处理需求而又不太对编程或者说语法感冒的设计者,有兴趣的同学还是可以去 GitHub 上学习一下的。
Differences in organizational design don’t necessarily make some organizations better than others—just better suited to different purposes. Any style of organization must account for its models of ownership (the way tasks get delegated, assumed, executed) and responsibility (the way accountability for those tasks gets distributed and enforced). Conventional organizations and open organizations treat these issues differently, however, and those difference can be jarring for anyone hopping transitioning from one organizational model to another. But transitions are ripe for stumbling over—oops, I mean, learning from.
Let’s do that.
Ownership explained
In most organizations (and according to typical project management standards), work on projects proceeds in five phases:
Initiation: Assess project feasibility, identify deliverables and stakeholders, assess benefits
Planning (Design): Craft project requirements, scope, and schedule; develop communication and quality plans
Monitoring/Controlling: Manage project performance, risk, and quality of deliverables
Closing: Sign-off on completion requirements, release resources
The list above is not exhaustive, but I’d like to add one phase that is often overlooked: the “Adoption” phase, frequently needed for strategic projects where a change to the culture or organization is required for “closing” or completion.
Adoption: Socializing the work of the project; providing communication, training, or integration into processes and standard workflows.
Examining project phases is one way contrast the expression of ownership and responsibility in organizations.
Two models, contrasted
In my experience, “ownership” in a traditional software organization works like this.
A manager or senior technical associate initiates a project with senior stakeholders and, with the authority to champion and guide the project, they bestow the project on an associate at some point during the planning and execution stages. Frequently, but not always, the groundwork or fundamental design of the work has already been defined and approved—sometimes even partially solved. Employees are expected to see the project through execution and monitoring to completion.
Employees cut their teeth on a “starter project,” where they prove their abilities to a management chain (for example, I recall several such starter projects that were already defined by a manager and architect, and I was assigned to help implement them). Employees doing a good job on a project for which they’re responsible get rewarded with additional opportunities, like a coveted assignment, a new project, or increased responsibility.
An associate acting as “owner” of work is responsible and accountable for that work (if someone, somewhere, doesn’t do their job, then the responsible employee either does the necessary work herself or alerts a manager to the problem.) A sense of ownership begins to feel stable over time: Employees generally work on the same projects, and in the same areas for an extended period. For some employees, it means the development of deep expertise. That’s because the social network has tighter integration between people and the work they do, so moving around and changing roles and projects is rather difficult.
This process works differently in an open organization.
Associates continually define the parameters of responsibility and ownership in an open organization—typically in light of their interests and passions. Associates have more agency to perform all the stages of the project themselves, rather than have pre-defined projects assigned to them. This places additional emphasis on leadership skills in an open organization, because the process is less about one group of people making decisions for others, and more about how an associate manages responsibilities and ownership (whether or not they roughly follow the project phases while being inclusive, adaptable, and community-focused, for example).
Being responsible for all project phases can make ownership feel more risky for associates in an open organization. Proposing a new project, designing it, and leading its implementation takes initiative and courage—especially when none of this is pre-defined by leadership. It’s important to get continuous buy-in, which comes with questions, criticisms, and resistance not only from leaders but also from peers. By default, in open organizations this makes associates leaders; they do much the same work that higher-level leaders do in conventional organizations. And incidentally, this is why Jim Whitehurst, in The Open Organization, cautions us about the full power of “transparency” and the trickiness of getting people’s real opinions and thoughts whether we like them or not. The risk is not as high in a traditional organization, because in those organizations leaders manage some of it by shielding associates from heady discussions that arise.
The reward in an Open Organization is more opportunity—offers of new roles, promotions, raises, etc., much like in a conventional organization. Yet in the case of open organizations, associates have developed reputations of excellence based on their own initiatives, rather than on pre-sanctioned opportunities from leadership.
Thinking about adoption
Any discussion of ownership and responsibility involves addressing the issue of buy-in, because owning a project means we are accountable to our sponsors and users—our stakeholders. We need our stakeholders to buy-into our idea and direction, or we need users to adopt an innovation we’ve created with our stakeholders. Achieving buy-in for ideas and work is important in each type of organization, and it’s difficult in both traditional and open systems—but for different reasons.
Open organizations better allow highly motivated associates, who are ambitious and skilled, to drive their careers. But support for their ideas is required across the organization, rather than from leadership alone.
Penetrating a traditional organization’s closely knit social ties can be difficult, and it takes time. In such “command-and-control” environments, one would think that employees are simply “forced” to do whatever leaders want them to do. In some cases that’s true (e.g., a travel reimbursement system). However, with more innovative programs, this may not be the case; the adoption of a program, tool, or process can be difficult to achieve by fiat, just like in an open organization. And yet these organizations tend to reduce redundancies of work and effort, because “ownership” here involves leaders exerting responsibility over clearly defined “domains” (and because those domains don’t change frequently, knowing “who’s who”—who’s in charge, who to contact with a request or inquiry or idea—can be easier).
Open organizations better allow highly motivated associates, who are ambitious and skilled, to drive their careers. But support for their ideas is required across the organization, rather than from leadership alone. Points of contact and sources of immediate support can be less obvious, and this means achieving ownership of a project or acquiring new responsibility takes more time. And even then someone’s idea may never get adopted. A project’s owner can change—and the idea of “ownership” itself is more flexible. Ideas that don’t get adopted can even be abandoned, leaving a great idea unimplemented or incomplete. Because any associate can “own” an idea in an open organization, these organizations tend to exhibit more redundancy. (Some people immediately think this means “wasted effort,” but I think it can augment the implementation and adoption of innovative solutions. By comparing these organizations, we can also see why Jim Whitehurst calls this kind of culture “chaotic” in The Open Organization).
Two models of ownership
In my experience, I’ve seen very clear differences between conventional and open organizations when it comes to the issues of ownership and responsibility.
In an traditional organization:
I couldn’t “own” things as easily
I felt frustrated, wanting to take initiative and always needing permission
I could more easily see who was responsible because stakeholder responsibility was more clearly sanctioned and defined
I could more easily “find” people, because the organizational network was more fixed and stable
I more clearly saw what needed to happen (because leadership was more involved in telling me).
Over time, I’ve learned the following about ownership and responsibility in an open organization:
People can feel good about what they are doing because the structure rewards behavior that’s more self-driven
Responsibility is less clear, especially in situations where there’s no leader
In cases where open organizations have “shared responsibility,” there is the possibility that no one in the group identified with being responsible; often there is lack of role clarity (“who should own this?”)
More people participate
Someone’s leadership skills must be stronger because everyone is “on their own”; you are the leader.
Making it work
On the subject of ownership, each type of organization can learn from the other. The important thing to remember here: Don’t make changes to one open or conventional value without considering all the values in both organizations.
Sound confusing? Maybe these tips will help.
If you’re a more conventional organization trying to act more openly:
Allow associates to take ownership out of passion or interest that align with the strategic goals of the organization. This enactment of meritocracy can help them build a reputation for excellence and execution.
But don’t be afraid sprinkle in a bit of “high-level perspective” in the spirit of transparency; that is, an associate should clearly communicate plans to their leadership, so the initiative doesn’t create irrelevant or unneeded projects.
Involving an entire community (as when, for example, the associate gathers feedback from multiple stakeholders and user groups) aids buy-in and creates beneficial feedback from the diversity of perspectives, and this helps direct the work.
If you’re already an open organization, then you should remember:
Although associates initiate projects from “the bottom up,” leadership needs to be involved to provide guidance, input to the vision, and circulate centralized knowledge about ownership and responsibility creating a synchronicity of engagement that is transparent to the community.
Ownership creates responsibility, and the definition and degree of these should be something both associates and leaders agree upon, increasing the transparency of expectations and accountability during the project. Don’t make this a matter of oversight or babysitting, but rather a collaboration where both parties give and take—associates initiate, leaders guide; associates own, leaders support.
Leadership education and mentorship, as it pertains to a particular organization, needs to be available to proactive associates, especially since there is often a huge difference between supporting individual contributors and guiding and coordinating a multiplicity of contributions.
You may think you’re new to Linux, but you’re really not. There are 3.74 billion global internet users, and all of them use Linux in some way since Linux servers power 90% of the internet. Most modern routers run Linux or Unix, and the TOP500 supercomputers also rely on Linux. If you own an Android smartphone, your operating system is constructed from the Linux kernel.
In other words, Linux is everywhere.
But there’s a difference between using Linux-based technologies and using Linux itself. If you’re interested in Linux, but have been using a PC or Mac desktop, you may be wondering what you need to know to use the Linux command line interface (CLI). You’ve come to the right place.The following are the fundamental Linux commands you need to know. Each is simple and easy to commit to memory. In other words, you don’t have to be Bill Gates to understand them.
1. ls
You’re probably thinking, “Is what?” No, that wasn’t a typographical error – I really intended to type a lower-case L. ls, or “list,” is the number one command you need to know to use the Linux CLI. This list command functions within the Linux terminal to reveal all the major directories filed under a respective filesystem. For example, this command:
ls /applications
shows every folder stored in the applications folder. You’ll use it to view files, folders, and directories.
All hidden files are viewable by using the command ls -a.
2. cd
This command is what you use to go (or “change”) to a directory. It is how you navigate from one folder to another. Say you’re in your Downloads folder, but you want to go to a folder called Gym Playlist. Simply typing cd Gym Playlist won’t work, as the shell won’t recognize it and will report the folder you’re looking for doesn’t exist. To bring up that folder, you’ll need to include a backslash. The command should look like this:
cd Gym\ Playlist
To go back from the current folder to the previous one, you can type in the folder name followed by cd ... Think of the two dots like a back button.
3. mv
This command transfers a file from one folder to another; mv stands for “move.” You can use this short command like you would drag a file to a folder on a PC.
For example, if I create a file called testfile to demonstrate all the basic Linux commands, and I want to move it to my Documents folder, I would issue this command:
mv /home/sam/testfile /home/sam/Documents/
The first piece of the command (mv) says I want to move a file, the second part (home/sam/testfile) names the file I want to move, and the third part (/home/sam/Documents/) indicates the location where I want the file transferred.
4. Keyboard shortcuts
Okay, this is more than one command, but I couldn’t resist including them all here. Why? Because they save time and take the headache out of your experience.
CTRL+K Cuts text from the cursor until the end of the line
CTRL+Y Pastes text
CTRL+E Moves the cursor to the end of the line
CTRL+A Moves the cursor to the beginning of the line
ALT+F Jumps forward to the next space
ALT+B Skips back to the previous space
ALT+Backspace Deletes the previous word
CTRL+W Cuts the word behind the cursor
Shift+Insert Pastes text into the terminal
Ctrl+D Logs you out
These commands come in handy in many ways. For example, imagine you misspell a word in your command text:
sudo apt-get intall programname
You probably noticed “install” is misspelled, so the command won’t work. But keyboard shortcuts make it easy to go back and fix it. If my cursor is at the end of the line, I can click ALT+B twice to move the cursor to the place noted below with the ^ symbol:
sudo apt-get^intall programname
Now, we can quickly add the letter s to fix install. Easy peasy!
5. mkdir
This is the command you use to make a directory or a folder in the Linux environment. For example, if you’re big into DIY hacks like I am, you could enter mkdir DIY to make a directory for your DIY projects.
6. at
If you want to run a Linux command at a certain time, you can add at to the equation. The syntax is at followed by the date and time you want the command to run. Then the command prompt changes to at> so you can enter the command(s) you want to run at the time you specified above
For example:
at 4:08 PM Sat at> cowsay 'hello' at> CTRL+D
This will run the program cowsay at 4:08 p.m. on Saturday night.
7. rmdir
This command allows you to remove a directory through the Linux CLI. For example:
rmdir testdirectory
Bear in mind that this command will not remove a directory that has files inside. This only works when removing empty directories.
8. rm
If you want to remove files, the rm command is what you want. It can delete files and directories. To delete a single file, type rm testfile, or to delete a directory and the files inside it, type rm -r.
9. touch
The touch command, otherwise known as the “make file command,” allows you to create new, empty files using the Linux CLI. Much like mkdir creates directories, touch creates files. For example, touch testfile will make an empty file named testfile.
10. locate
This command is what you use to find a file in a Linux system. Think of it like search in Windows. It’s very useful if you forget where you stored a file or what you named it.
For example, if you have a document about blockchain use cases, but you can’t think of the title, you can punch in locate -blockchain or you can look for “blockchain use cases” by separating the words with an asterisk or asterisks (*). For example:
locate -i*blockchain*use*cases*.
There are tons of other helpful Linux CLI commands, like the pkill command, which is great if you start a shutdown and realize you didn’t mean to. But the 10 simple and useful commands described here are the essentials you need to get started using the Linux command line.
Introducing TensorFlow.js: Machine Learning in Javascript
We’re excited to introduce TensorFlow.js, an open-source library you can use to define, train, and run machine learning models entirely in the browser, using Javascript and a high-level layers API. If you’re a Javascript developer who’s new to ML, TensorFlow.js is a great way to begin learning. Or, if you’re a ML developer who’s new to Javascript, read on to learn more about new opportunities for in-browser ML. In this post, we’ll give you a quick overview of TensorFlow.js, and getting started resources you can use to try it out.
In-Browser ML
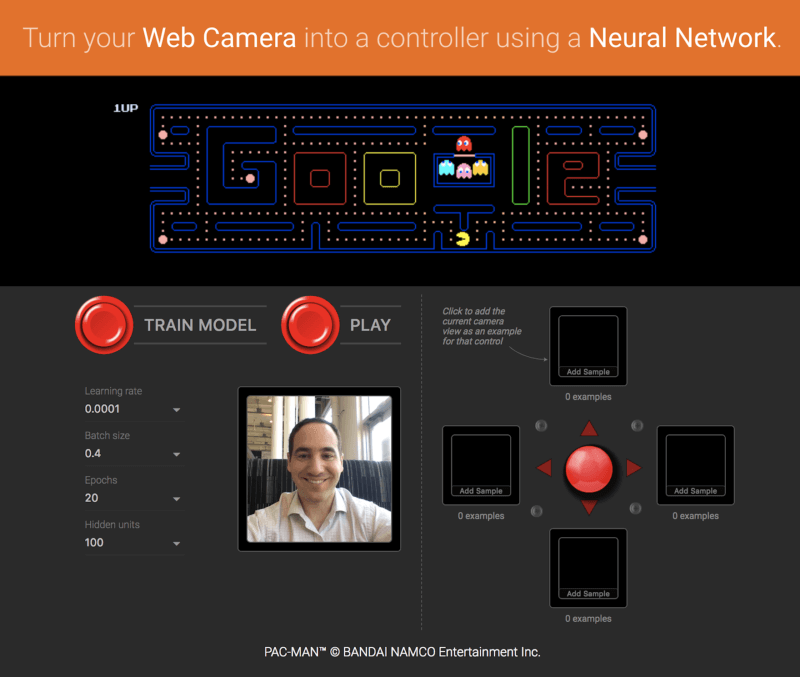
Running machine learning programs entirely client-side in the browser unlocks new opportunities, like interactive ML! If you’re watching the livestream for the TensorFlow Developer Summit, during the TensorFlow.js talk you’ll find a demo where @dsmilkov and @nsthorat train a model to control a PAC-MAN game using computer vision and a webcam, entirely in the browser. You can try it out yourself, too, with the link below — and find the source in the examples folder.
If you’d like to try another game, give the Emoji Scavenger Hunt a whirl — this time, from a browser on your mobile phone.
The Emoji Scavenger Hunt is another fun example of an application built using TensorFlow.js. Try it using your phone, and find the source here.
ML running in the browser means that from a user’s perspective, there’s no need to install any libraries or drivers. Just open a webpage, and your program is ready to run. In addition, it’s ready to run with GPU acceleration. TensorFlow.js automatically supports WebGL, and will accelerate your code behind the scenes when a GPU is available. Users may also open your webpage from a mobile device, in which case your model can take advantage of sensor data, say from a gyroscope or accelerometer. Finally, all data stays on the client, making TensorFlow.js useful for low-latency inference, as well as for privacy preserving applications.
What can you do with TensorFlow.js?
If you’re developing with TensorFlow.js, here are three workflows you can consider.
You can import an existing, pre-trained model for inference. If you have an existing TensorFlow or Keras model you’ve previously trained offline, you can convert into TensorFlow.js format, and load it into the browser for inference.
You can re-train an imported model. As in the Pac-Man demo above, you can use transfer learning to augment an existing model trained offline using a small amount of data collected in the browser using a technique called Image Retraining. This is one way to train an accurate model quickly, using only a small amount of data.
Author models directly in browser. You can also use TensorFlow.js to define, train, and run models entirely in the browser using Javascript and a high-level layers API. If you’re familiar with Keras, the high-level layers API should feel familiar.
Let’s see some code
If you like, you can head directly to the samples or tutorials to get started. These show how-to export a model defined in Python for inference in the browser, as well as how to define and train models entirely in Javascript. As a quick preview, here’s a snippet of code that defines a neural network to classify flowers, much like on the getting started guide on TensorFlow.org. Here, we’ll define a model using a stack of layers.
import * as tf from ‘@tensorflow/tfjs’;
const model = tf.sequential();
model.add(tf.layers.dense({inputShape: [4], units: 100}));
model.add(tf.layers.dense({units: 4}));
model.compile({loss: ‘categoricalCrossentropy’, optimizer: ‘sgd’});
The layers API we’re using here supports all of the Keras layers found in the examples directory (including Dense, CNN, LSTM, and so on). We can then train our model using the same Keras-compatible API with a method call:
The model is now ready to use to make predictions:
// Get measurements for a new flower to generate a prediction
// The first argument is the data, and the second is the shape.
const inputData = tf.tensor2d([[4.8, 3.0, 1.4, 0.1]], [1, 4]);

// Get the highest confidence prediction from our model
const result = model.predict(inputData);
const winner = irisClasses[result.argMax().dataSync()[0]];

// Display the winner
console.log(winner);
TensorFlow.js also includes a low-level API (previously deeplearn.js) and support for Eager execution. You can learn more about these by watching the talk at the TensorFlow Developer Summit.
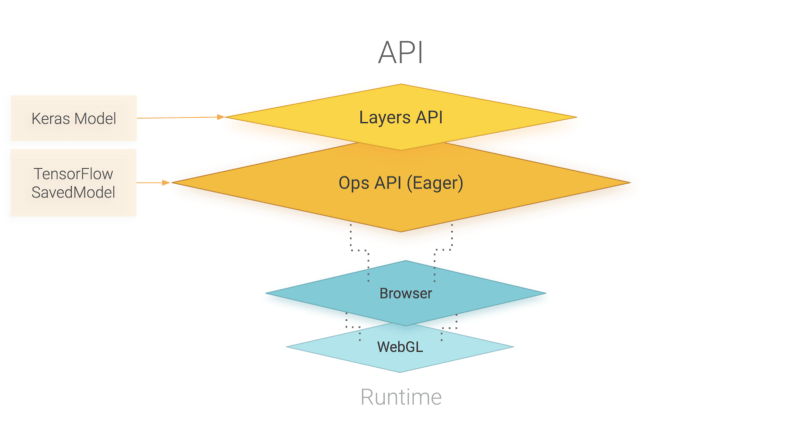
An overview of TensorFlow.js APIs. TensorFlow.js is powered by WebGL and provides a high-level layers API for defining models, and a low-level API for linear algebra and automatic differentiation. TensorFlow.js supports importing TensorFlow SavedModels and Keras models.
How does TensorFlow.js relate to deeplearn.js?
Good question! TensorFlow.js, an ecosystem of JavaScript tools for machine learning, is the successor to deeplearn.js which is now called TensorFlow.js Core. TensorFlow.js also includes a Layers API, which is a higher level library for building machine learning models that uses Core, as well as tools for automatically porting TensorFlow SavedModels and Keras hdf5 models. For answers to more questions like this, check out the FAQ.


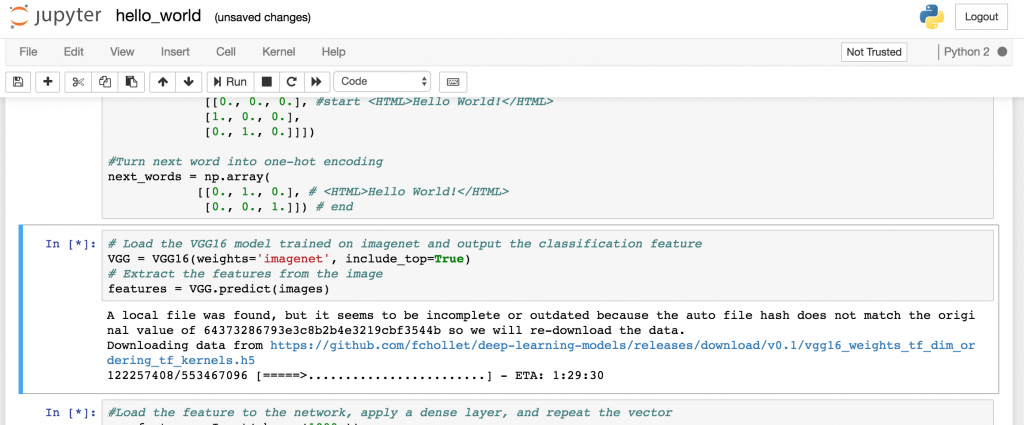
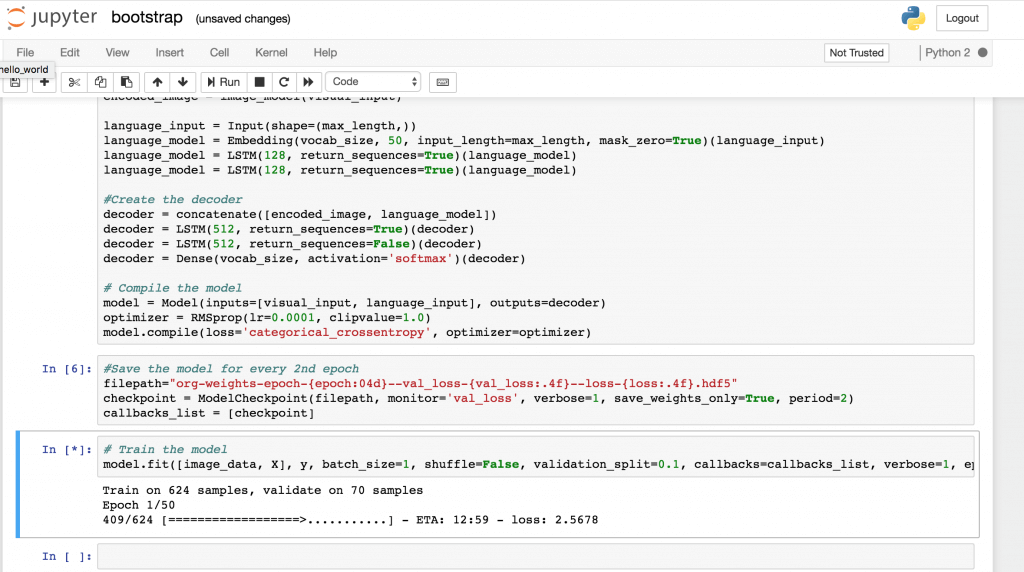
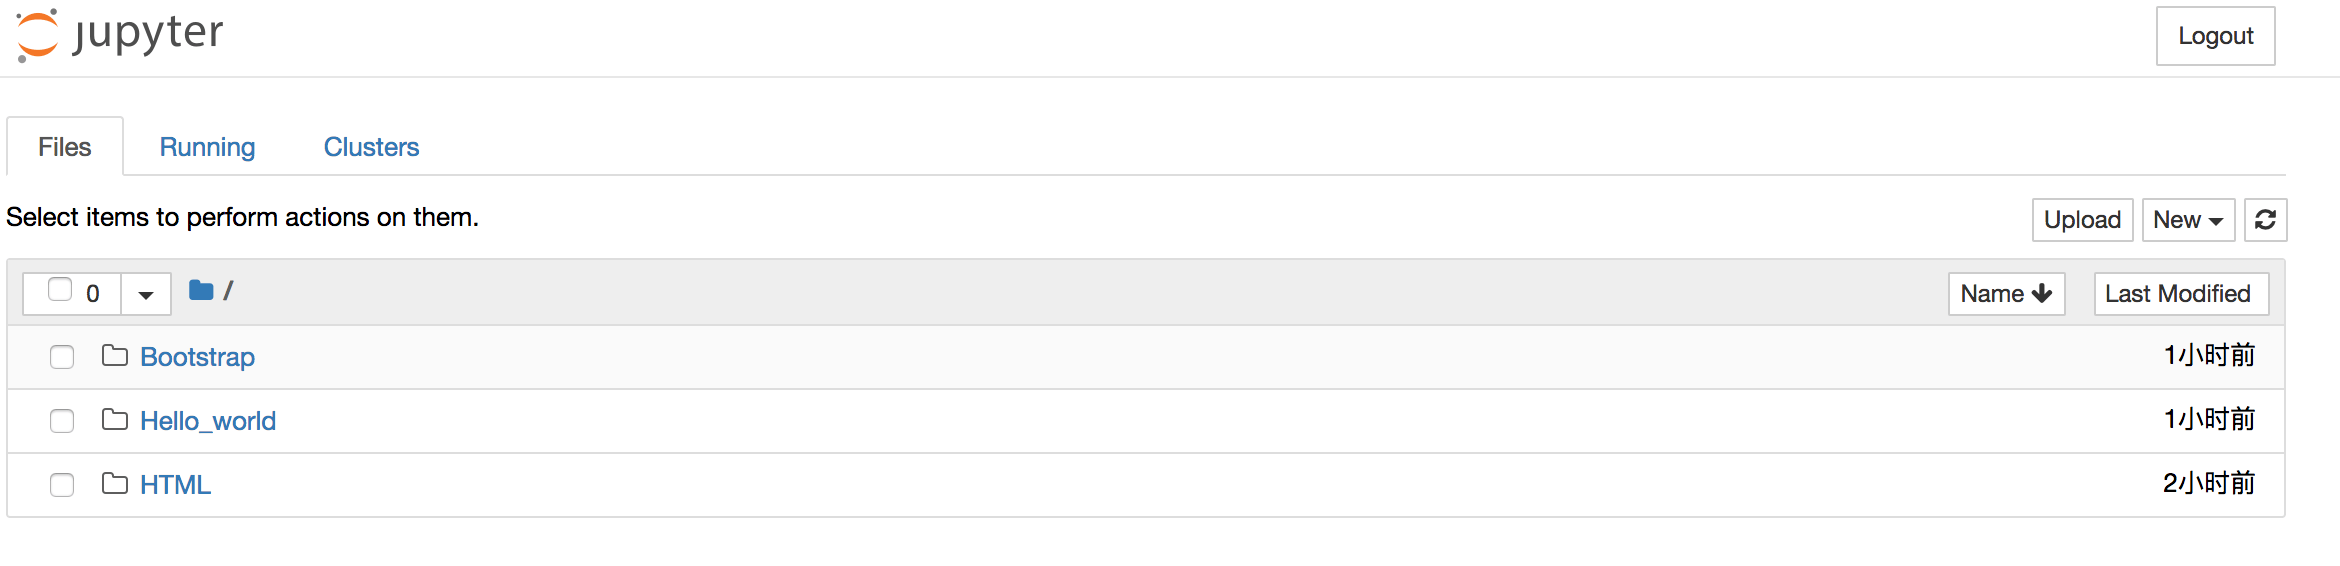 运行 Bootstrap 和 Hello_world 两项,如下图,如果在本地跑小心电脑风扇烧起来,下载资源和训练十分耗时耗资源